*REVIEW* Artec Industries Venture Bumper

I haven’t posted a follow up to my install because I have been experiencing the same issues as everyone else. I had to cut and modify the hood latch bar in order to mount the bumper with a smittybilt 10k synthetic rope winch. No big deal, but I did some damage to my plastic bumper in the process even with masking tape applied. The hooks on the top of the steel bumper are too high for them to mount and align with the holes in the factory frame rails. I had to use a jack to prop the steel bumper in order to get the bolts back in. Once installed, the steel bumper sits too far into the plastic bumper and lower grille. I tried every adjustment and could not get it right. I could live with how close it sits because it looks like a factory snug fit, but it’s pushing so hard the bumper is popping out by the passenger headlight. I called Artec today and talked to Tom who then asked me to forward photos and an explanation of my issues and they would be getting back to me. From what I can see the easiest remedy would be to create a 1/16 - 1/8 spacer between the frame rail and the Artec bumper. I’ve already repainted my bumper once, and it looks like I will have to do it again. I will post an update once I hear back from them.


Mine is also popping out on the passenger side.

Like you, I also just had my front bumper repainted prior to installing the winch bumper.. its not completely scratched up in the same locations as yours.
 
I was planning go with Smittybilt XRC 9.5k. Now I’m a little nervous. Did you install winch control box on motor or above drum. I think installing on motor will make it overall shorter, not sure if that help fitting.


Sent from my iPhone using Tapatalk


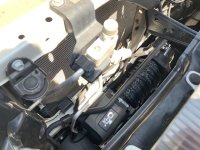
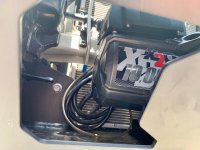
I installed the control box over the motor. If you install it over the drum, it will make contact with a black hose (pictured) that is not bendable and therefore it will not fit. Installing the control box over the motor is a nearly perfect fit and allows easy access to the switch through the left front opening on the bumper. Note** I replaced the wireless switch on the control box with an aftermarket switch from Amazon ($12.95) because it is fell apart. Smittybilt sent me a replacement and it also fell apart. They know the switch is an issue and are looking for a new manufacturer of that specific part. Here is the link to the switch on amazon:

https://www.amazon.com/gp/product/B0039KZP4Y/ref=ppx_yo_dt_b_asin_title_o08_s00?ie=UTF8&psc=1

You may notice my front tie bar is missing in the photos. Long story short, I mangled the tie bar on the initial bumper install when it would not align and I couldn't figure out what the issue was. (I was doing the install myself by hand, heavy as sh**). I swapped the front tie bar to the rear and Smittybilt sent me a replacement for the mangled one. There are two very small metal dowels that align the tie bar and I lost one in the process of reinstalling the new tie bar (fml), so I am awaiting on those to arrive in the mail any day now.

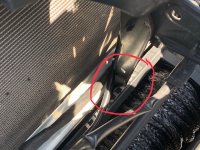
In Artec's install video there is no winch installed so keep that in mind and trim the hood latch bar. I circled it in one of my photos for reference. The black wire running behind it is the power wire to the winch running to the battery.

Also their instruction of how to trim the black air flow pieces isn't even close. Don't be afraid to trim that entire area off on both sides because you're going to need the room to move your hands (and tools) inside if you install a light bar and need to make any adjustments without removing the entire bumper.

I have yet to hear back from anyone from Artec about a solution or even a follow up to my emails and phone calls.
 

Attachments

  • 1.jpg
    1.jpg
    118.1 KB · Views: 1,611
  • 2.jpg
    2.jpg
    96.4 KB · Views: 1,567
  • 3.jpg
    3.jpg
    73.9 KB · Views: 1,574
  • 5.jpg
    5.jpg
    77.7 KB · Views: 1,874
I haven’t posted a follow up to my install because I have been experiencing the same issues as everyone else. I had to cut and modify the hood latch bar in order to mount the bumper with a smittybilt 10k synthetic rope winch. No big deal, but I did some damage to my plastic bumper in the process even with masking tape applied. The hooks on the top of the steel bumper are too high for them to mount and align with the holes in the factory frame rails. I had to use a jack to prop the steel bumper in order to get the bolts back in. Once installed, the steel bumper sits too far into the plastic bumper and lower grille. I tried every adjustment and could not get it right. I could live with how close it sits because it looks like a factory snug fit, but it’s pushing so hard the bumper is popping out by the passenger headlight. I called Artec today and talked to Tom who then asked me to forward photos and an explanation of my issues and they would be getting back to me. From what I can see the easiest remedy would be to create a 1/16 - 1/8 spacer between the frame rail and the Artec bumper. I’ve already repainted my bumper once, and it looks like I will have to do it again. I will post an update once I hear back from them.

Please email me directly and I will get you some details on a fix for this.

We have been testing on a few different vehicles to verify fit and found that some of the plastic molds deviate quite a bit.

As this is a new product we will continue to look at changes and provide fixes to ensure proper fitment.

Armando
[email protected]
 
Hi Armando,

Can you share which winch you used in 4Runner on the front page of your website?

And how much torque should we put on the 8 mount bolts?

Thank you


Sent from my iPhone using Tapatalk

There is a Superwinch Tigershark 10k winch on ours. I am sending a message to R&D for specs on the torque. Will update on that when I get information.

Thank you,

Armando
 
We have been working a lot behind the scenes to do more test fits and measurements on a few more vehicles. The results we are finding is that there are some pretty good variations in both the plastic mold and frame horns when being built.

So, we are making some adjustments to the frame horn mounts to allow a bit more movement to allow install across the variations. Keep in mind this will work in most cases and there may be some instances where the horns deviate a bit more than expected and may need to have the holes opened up slightly more to accommodate that.

We will be including the shims, as seen the attached pdf document, with every bumper. This will allow for the installer to space out the bumper in 1/16" increments to clear the plastic. Not all installations will require the shims, but every bumper will be shipped with these.

If you already have a bumper and need the shims, please email me directly at [email protected] with an address and information on who you ordered from and I will get you these sent.

We thank those of you who have reached out and helped us resolve some of these issues and like all of our products, we will always strive to make them the best possible and do listen to feedback.

Thank you.

Armando
 

Attachments

Hi Armando,

Can you share which winch you used in 4Runner on the front page of your website?

And how much torque should we put on the 8 mount bolts?

Thank you


Sent from my iPhone using Tapatalk

Torque specs for Metric Bolts is 57 lbs for 12.9 spec and 47 lbs for 10.9 spec.

Hope this helps.
 
I installed the control box over the motor. If you install it over the drum, it will make contact with a black hose (pictured) that is not bendable and therefore it will not fit. Installing the control box over the motor is a nearly perfect fit and allows easy access to the switch through the left front opening on the bumper. Note** I replaced the wireless switch on the control box with an aftermarket switch from Amazon ($12.95) because it is fell apart. Smittybilt sent me a replacement and it also fell apart. They know the switch is an issue and are looking for a new manufacturer of that specific part. Here is the link to the switch on amazon:

https://www.amazon.com/gp/product/B0039KZP4Y/ref=ppx_yo_dt_b_asin_title_o08_s00?ie=UTF8&psc=1

You may notice my front tie bar is missing in the photos. Long story short, I mangled the tie bar on the initial bumper install when it would not align and I couldn't figure out what the issue was. (I was doing the install myself by hand, heavy as sh**). I swapped the front tie bar to the rear and Smittybilt sent me a replacement for the mangled one. There are two very small metal dowels that align the tie bar and I lost one in the process of reinstalling the new tie bar (fml), so I am awaiting on those to arrive in the mail any day now.

In Artec's install video there is no winch installed so keep that in mind and trim the hood latch bar. I circled it in one of my photos for reference. The black wire running behind it is the power wire to the winch running to the battery.

Also their instruction of how to trim the black air flow pieces isn't even close. Don't be afraid to trim that entire area off on both sides because you're going to need the room to move your hands (and tools) inside if you install a light bar and need to make any adjustments without removing the entire bumper.

I have yet to hear back from anyone from Artec about a solution or even a follow up to my emails and phone calls.

Thank you for detailed instruction. It will save me a lot of time.
 
Thanks to everyone for posting. I was looking at this for an alternative to the others that everyone seems to have but sounds like they don't have QC locked down yet.
 
I was about to pull the trigger on their bumper due to the Labor Day deal they have ongoing.....right up until I read through this.
 
Looks like they are at least working with people so that is good. I am not ready to pull the trigger on a front bumper yet but will pay close attention to this thread to see how everyone makes out.
 
Their fitment might not be the best, but they've had great communication in this thread so far. they owned up to the mistakes and explained how they happened, which is FAR better than some other big-name vendors have been doing recently, and they also seem to want to resolve the issues with customers (such as a replacement bumper, etc)
 
Looks like they are at least working with people so that is good. I am not ready to pull the trigger on a front bumper yet but will pay close attention to this thread to see how everyone makes out.

Their fitment might not be the best, but they've had great communication in this thread so far. they owned up to the mistakes and explained how they happened, which is FAR better than some other big-name vendors have been doing recently, and they also seem to want to resolve the issues with customers (such as a replacement bumper, etc)

Im actually planning to update my review to reflect that. Armando has been very helpful and professional. He genuinely cares about making it right, which is better than most other vendors I must say. Definitely listened to what I had to say and he told me he would pass all my recommendations along to R&D.

Theyre in the process of sending me another bumper to test fit, which I was told should have most, if not all of my initial issues addressed.
 
Well I bit the bullet and bought one. $608 shipped with lower control arm skids is a steal. Artec and their communication to make things right on here has definietly gave me confidence they will stand by their products. I will update once I have the bumper and install it.
 
Does anyone have the install PDF for the bumper? The PDF on their site shows 404 error, I got mine last Wednesday and had it Powder Thursday. Should hopefully be installing it today but who knows.
 

Members online

Forum statistics

Threads
278,316
Messages
3,554,120
Members
248,016
Latest member
Advally Service

Trending content

Back
Top