
You are using an out of date browser. It may not display this or other websites correctly.
You should upgrade or use an alternative browser.
You should upgrade or use an alternative browser.
Road Bull's 2002 SR-5 timeline.
- Thread starter Road Bull
- Start date

Road Bull
Senior Member
It's been a minute.
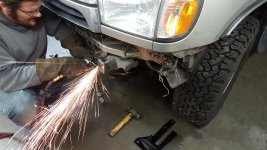
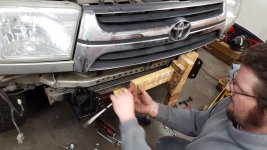
My friend and I just put some long hours in trying to get my Shrockworks front bumper mounted. WOW... that was a royal PITA. The bumper mounts were very tight matching up to the mounting brackets that were too narrow. I am sure glad my mechanic friend helped me out. I would have been at a loss as to what to try. So far, we managed to get it mounted and the turn signals hooked up before we had to call it a night. I still need to mount the PIAA fog lights open up a few holes so that I can get the lead bolts in. Sigh...
I found out that if you have a SW font bumper, you can not run your bug deflector. If you do, there is no way to open the hood. There is absolutely no clearance.
Pictures later, I am beat.
My friend and I just put some long hours in trying to get my Shrockworks front bumper mounted. WOW... that was a royal PITA. The bumper mounts were very tight matching up to the mounting brackets that were too narrow. I am sure glad my mechanic friend helped me out. I would have been at a loss as to what to try. So far, we managed to get it mounted and the turn signals hooked up before we had to call it a night. I still need to mount the PIAA fog lights open up a few holes so that I can get the lead bolts in. Sigh...
I found out that if you have a SW font bumper, you can not run your bug deflector. If you do, there is no way to open the hood. There is absolutely no clearance.
Pictures later, I am beat.

Rock_Rat
Senior Member
You can still open the hood. I'll take pic later on and show you what I did. Hopefully you installed the lights before installing the bumper. It's so much easier. Glad it's on though!
I'm not a fan of the white square connectors that PIAA provides with their lights. Later on I'll find the link to what I did.
I'm not a fan of the white square connectors that PIAA provides with their lights. Later on I'll find the link to what I did.
Rock_Rat
Senior Member
I found out that if you have a SW font bumper, you can not run your bug deflector. If you do, there is no way to open the hood. There is absolutely no clearance. Pictures later, I am beat.
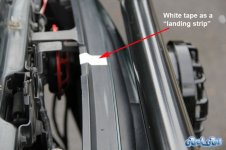
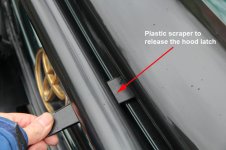
OK so what I did was add a piece of white tape even with the hood latch and essentially made a landing strip to guide my plastic scraper under the hood to the release mechanism. I'm using a large black plastic scraper to release the latch once released from inside the vehicle. This works great and allows me to keep my bug deflector there. Because it's a plastic scraper there's no damage. But as you said, no room otherwise. It's a "workaround" I hate a work around but I'll live with this one.
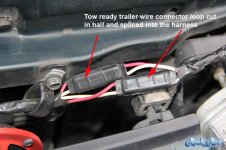
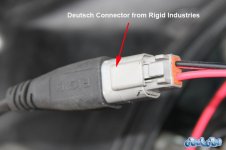
You can also see the connectors I used for my lights. They're nothing but a two plug towing connector for a trailer from O'Reilley's. The photo is a picture of the connectors for the two PIAA 520's. Same concept for the PIAA 510's. If I had to do it again, I would order the Deutsch connectors that Rigid Industries uses. They are so much better.
EDIT: Something I failed to mention is the location of your connectors. I would recommend you keep your connectors on this side of your engine bay just in case you ever need to remove your bumper or slide it forward etc. You'll notice my PIAA 520 connectors are in the front, easily accessible so I can install a winch to the bumper later on or change my lights to a 30" LED Bar without having to cut and splice. Just a thought.
Attachments
Last edited:
Road Bull
Senior Member
OK so what I did was add a piece of white tape even with the hood latch and essentially made a landing strip to guide my plastic scraper under the hood to the release mechanism. I'm using a large black plastic scraper to release the latch once released from inside the vehicle. This works great and allows me to keep my bug deflector there. Because it's a plastic scraper there's no damage. But as you said, no room otherwise. It's a "workaround" I hate a work around but I'll live with this one.
You can also see the connectors I used for my lights. They're nothing but a two plug towing connector for a trailer from O'Reilley's. The photo is a picture of the connectors for the two PIAA 520's. Same concept for the PIAA 510's. If I had to do it again, I would order the Deutsch connectors that Rigid Industries uses. They are so much better.
EDIT: Something I failed to mention is the location of your connectors. I would recommend you keep your connectors on this side of your engine bay just in case you ever need to remove your bumper or slide it forward etc. You'll notice my PIAA 520 connectors are in the front, easily accessible so I can install a winch to the bumper later on or change my lights to a 30" LED Bar without having to cut and splice. Just a thought.
Thanks for the good information. I like the bumper, but knowing what I know now, I am not sure I would go the same route again. Those tight tolerances are a b**!!. I can't see being able to access the grill for removal. I picked it up as part of the last group buy, and I thought I did a good amount of research. What I would really look into going foward is serviceability, ease of installation, and the function and form. Live and learn.
Rock_Rat
Senior Member
Yea, I'm not sure I would either but I like the low profile "non-aggressive" look. Here's the website for the scraper: Nylon Scraper... but knowing what I know now, I am not sure I would go the same route again...
Road Bull
Senior Member
Yea, I'm not sure I would either but I like the low profile "non-aggressive" look. Here's the website for the scraper: Nylon Scraper
Ha! I might just have to go this route. I don't know why, but I have some fondness for that hood deflector. This would let me throw it back on.
Another question, how much clearance to you have between the outside light protection hoops on the bumper and the quarter panel? It just makes me a bit nervous. I know it shouldn't move, or go anywhere, but still..
Road Bull
Senior Member
Ok, I have gotten caught up on a few things that I had been meaning to get done. I have had a big pile of parts waiting for me to get to. So here is what I have done so far.
Sold my 1994 Toyota Extended Cab
My runner
-LBJs (oem)
-ITRs (oem)
-OTRs (oem)
-Installed my Shrockworks front bumper (need to go back and load my fog lights and install my B&M transmission cooler. (Ran out of time)
Better pics to follow.
Now after I get the bumper fully sorted, I will consider lift options.
Sold my 1994 Toyota Extended Cab
My runner
-LBJs (oem)
-ITRs (oem)
-OTRs (oem)
-Installed my Shrockworks front bumper (need to go back and load my fog lights and install my B&M transmission cooler. (Ran out of time)
Better pics to follow.
Now after I get the bumper fully sorted, I will consider lift options.
Attachments
Rock_Rat
Senior Member
Ha! I might just have to go this route. I don't know why, but I have some fondness for that hood deflector. This would let me throw it back on.
Another question, how much clearance to you have between the outside light protection hoops on the bumper and the quarter panel? It just makes me a bit nervous. I know it shouldn't move, or go anywhere, but still..
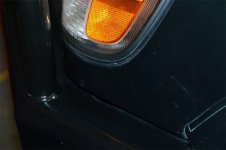
Hopefully this picture will give you an idea. Keep in mind I ordered my bumper with the one inch body lift brackets. I didn't want the gap and I knew I would not be taking the lift off of my rig. So I lifted first then installed. Even when you lift yours after the install, you should be fine. It's definitely a tight fit. I can barely get my fingers in there. Good to see you moving along with everything!
Attachments
Road Bull
Senior Member
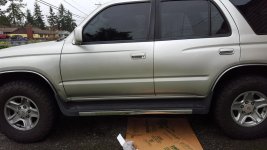
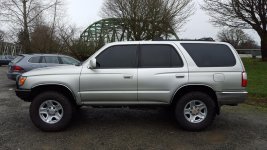
Running Board Delete.
Now you see em, now you don't.
I have been meaning to make this happen for a while now. Now I am looking into, I think, the base model front mud flaps. And somewhere down the line, sliders!
Now you see em, now you don't.
I have been meaning to make this happen for a while now. Now I am looking into, I think, the base model front mud flaps. And somewhere down the line, sliders!
Attachments
Rock_Rat
Senior Member
Now you see em, now you don't.
I have been meaning to make this happen for a while now. Now I am looking into, I think, the base model front mud flaps. And somewhere down the line, sliders!
They have a complete set at G&R Auto Salvage in Portland. I was just there on Friday picking out a pair of LCA's. I commented to the guy that I was surprised they were still there. Here's their number. (503) 238-6218 Tell him they're on the Green 4Runner directly in front of the office. The same one they're pulling the LCA's off of for me. I'll be there tomorrow. Let me know if you want them. These are the ones without the flares like your rig. You don't plan on adding flares do you?
Road Bull
Senior Member
They have a complete set at G&R Auto Salvage in Portland. I was just there on Friday picking out a pair of LCA's. I commented to the guy that I was surprised they were still there. Here's their number. (503) 238-6218 Tell him they're on the Green 4Runner directly in front of the office. The same one they're pulling the LCA's off of for me. I'll be there tomorrow. Let me know if you want them. These are the ones without the flares like your rig. You don't plan on adding flares do you?
Thanks for the head's up Mike!
Let me research it a bit tonight. I remember looking the base model front mud flaps up before and they didn't seem too bad. I just wonder how much they would sell them for, and then ship. It might just make more sense to order from Camelback unless they were significantly cheaper. I definitely don't mind saving money. LOL.
Road Bull
Senior Member
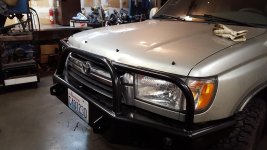
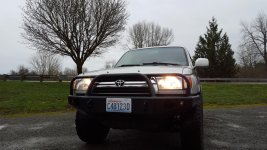
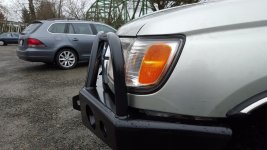
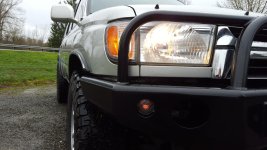
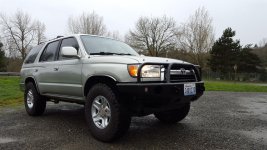
New frontier end look.
I am not completely done with the front bumper just yet. I need to take it off, load and wire my PIAA ion fog lights, and hook up my B&M transmission cooler before I throw the bumper back on.
But here are some pics of how she looks now.
I am not completely done with the front bumper just yet. I need to take it off, load and wire my PIAA ion fog lights, and hook up my B&M transmission cooler before I throw the bumper back on.
But here are some pics of how she looks now.
Attachments
Rock_Rat
Senior Member
Thanks for the head's up Mike!
Let me research it a bit tonight. I remember looking the base model front mud flaps up before and they didn't seem too bad. I just wonder how much they would sell them for, and then ship. It might just make more sense to order from Camelback unless they were significantly cheaper. I definitely don't mind saving money. LOL.
I'll get you a quote tomorrow. I can ship them for you.
Road Bull
Senior Member
I'll get you a quote tomorrow. I can ship them for you.
Thanks for the offer! If their price is right, I would be happy to pay you to ship them.
Thats a really clean looking rig! Keep up the work man.
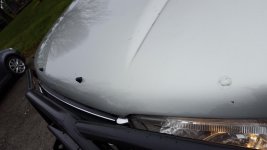
Thank you. Don't look too close. Tee hee. My nickname for my rig is Dingbat. I swear I didn't see most of these small blemishes and dings when I bought it from the PO. There are the usual minor scrapes, and some odd ones where I wonder how they managed to to the damage that they did without doing far more damage. I had to pull the hood's plastic deflector off in order to have enough clearance to get my hand between the hood and the new Shrockworks front bumper. In doing so, I noticed a healthy ding on the edge of the hood, right in the center. As soon as the weather lets up, I can try to do some touch up with some touch up paint. Waiting to decide if I want to use a previously suggested scrapper tool to pop the hood and so that I can keep the plastic deflector on or just skip it. So for now.. I have these little rubber nubs that stick under said protector still on. Except, one popped off today at the car wash.
Still, not bad for a 13 year old vehicle!
Attachments
Last edited:

Road Bull
Senior Member
What exactly were you doing with the wood and bottle jack? I'll be installing an AOR bumper on my truck here soon.
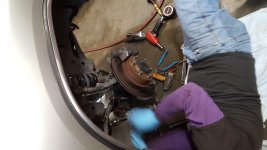
I hope you don't have to go through what my friend and I had to go through to get the bumper on. LOL. So, the SW bumper has a reputation for being TIGHT! Like, super tight. This one did not disappoint. It almost did not happen. Directions say to put the mounting brackets on then the bumper connection goes between, as in, inside of the mounting brackets. It was off a considerable amount. My friend is a mechanic, but we were working at his home so he didn't have everything at his disposal that he would normally have. So, we improvised. Several times, we had to use bottle jack to try to spread the mounting brackets enough, tighten the hardware back down, then try to fit the bumper, again, and again, and again. I hear not all bumpers are like this, so good luck. But if you find yourself in a jam and have to improvise, take it slow, and wear eye protection.
The directions call for mounting the brackets, tightening the hardware, then mounting the bumper. I hear some leave the mounting hardware loose, put the bumper on, THEN tighten the hardware back down. Mine was not an easy install. LOL. I am not that lucky.:yell::ybrick:
Road Bull
Senior Member
Hope I don't have to do that...
Looks good too by the way.
For the SW bumper don't you have to weld onto the frame? I know mine you don't, just cut the stock bumper brackets off the frame, and drill one hole on each side.
You weld new end caps onto the frame. These provide two very sturdy connection points that anchor the bumper to the frame. This is advised for wenching due to high load that wenching puts on the bumper and its hardware.
Similar threads

- Replies
- 2
- Views
- 3K

- Replies
- 0
- Views
- 344

- Replies
- 0
- Views
- 2K


