Well after I noticed my Febest lower control arm bushings were cracking and splitting after about a year I decided to replace them. I spent quite a bit of time researching factory replacement bushings to fit in the Febest arms since they used the newer style bushing compared to my 96 arms. The thought had crossed my mind to cut out the factory bushings on the 96 arms and then take measurements to see if I could find a suitable replacement. After pricing factory bushing and thinking about the work to press them out (without a nice hydraulic press) I started researching threads for aftermarket arms. TC, Stubbs/Sonoran, Rokmen trails Series and Front Range where all in my sights. Long hours of reading reviews, staring at pictures, reading up on features (bushings, adjustable, etc) I decided that for my needs the Rokmen Trail Series were the best. They offer a build that is much stronger than stock and at a price that was hard to beat. One concern was the use of their own bushings, but I could not find one mention of bushing issues not to mention they claim to never need to be replaced. So I found the best deal at Wheelers Off-Road and pulled the trigger.
While I was going to be under there and with the current bad taste in my mouth for the Febest units, I decided to replace the uppers at the same time. Currently, I had Febest units up top as well and with the large flanges, I could not tell if the bushings were split on them also. So off to TRDParts.com for some factory uppers.
Replaced all for this morning in the wonderful Florida heat. All went well on the take-down and replacement for all four. I was planning on doing a write-up as I don't remember seeing one, but it is a pretty straight-forward job so I did not. If you have any questions though, please feel free to ask below or in a Private Message.
Somethings to keep in mind for anyone reading this and attempting this for the first time....
1. For the control arms, if one side has a washer, then this is the side you want to loosen while you hold the other side stationary. The reason for this is Toyota factory bolts for the control arms have ridges on one side to hold the nut or bolt still so you can tight the other side. On my 96, the uppers had washers on the nuts so the flanged bolt heads had the ridges. On the lowers, the head of the bolt had a washer so the nuts had the ridges. Pretty nice set up to keep things tight without lock washers and a good thing to keep in mind so you don't wear the ridges down while loosening.
2. While I did not remove the rear wheels or jack up the truck at first (this time around as I did on the Febest units) it does help to have a jack handy for raising and lowering the body. I used the factory jack on a support placed under the hitch to raise and lower the body as needed. It took some time, but if you get the body raised to the right place you can easily pull out the upper arms/bolts and replace them without the use of a pry bar.
3. Keep an eye on the upper arm ABS tab placement when removing the upper arms. They should face to the inside of the truck on both sides. Stupid me did not at first and when working on one lower I spotted my mistake. Only cost me a little more time and more of an arm workout.
3.Uppers are 17mm for the bolt heads and nuts on my 96 although I think the 3rd gens are all the same. The Lowers are 19mm on both the head and nut. And I used a small flat head screwdriver on the ABS lines to disconnect them from the upper arms. No other special tools needed except for maybe a strong flat head screwdriver or small prybar to help move items into place and a ratchet strap(I used a motorcycle tie down).
4. When replacing the lower arms you will find that the arm spacing may have moved when you pulled the bolts. This is where the ratchet strap came in handy. I place one hook in a hole above the LCA front mount and the other hook in a hole of the spring pad (keeping the strap parallel to the LCA). With the strap as tight as you can get it you will still need to pry some to get a perfect alignment for the bolt hole. It may work better with a stronger strap, but this was all I had...
For me, I did one side at a time and did the upper arm first. Don't think it would matter which you do first.
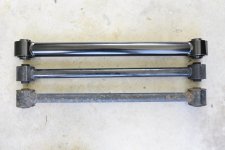
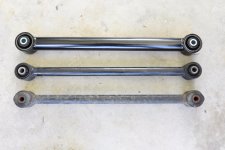
I have attached a few pic's of the LCA's for comparison purposes. The lower bar that looks to have some surface rust is my factory '96 arms. The middle arms are the Febest which I picked up on Amazon a little over a year ago. And of course, the massive ones at the top are the Rokmen Trail Series. They are very nice units that are tig welded and powder-coated. Much larger in size than the factory units and the bushing is larger than the factory as well. The bushing itself has a similar design to the latest factory bushing.
Rokmen specs from Wheelers site:
Improve your on road ride, and off-road performance and durability. The Rokmen Trail-Series lower trailing arms are an affordable yet extremely heavy duty upgrade over the stock Toyota trailing arms.
Sold as a pair.
• 1.750″ outer diameter x.250″ wall 1026 DOM tubing.
• Fully TIG Welded
• Rokmen EnduroMax™ Bushings
• Maintenance Free, bolt them on and forget about them.
• Bushings are replaceable should the need ever arise – but probably will not…
• Sand Blasted and Powder Coated for a tough and long lasting finish.
Mine did not come with the little Rokmen stickers as seen in the stock photos, but who is really going to look for them anyhow.
Hope this is informative and if you have any questions/comments, feel free to let me know!
While I was going to be under there and with the current bad taste in my mouth for the Febest units, I decided to replace the uppers at the same time. Currently, I had Febest units up top as well and with the large flanges, I could not tell if the bushings were split on them also. So off to TRDParts.com for some factory uppers.
Replaced all for this morning in the wonderful Florida heat. All went well on the take-down and replacement for all four. I was planning on doing a write-up as I don't remember seeing one, but it is a pretty straight-forward job so I did not. If you have any questions though, please feel free to ask below or in a Private Message.
Somethings to keep in mind for anyone reading this and attempting this for the first time....
1. For the control arms, if one side has a washer, then this is the side you want to loosen while you hold the other side stationary. The reason for this is Toyota factory bolts for the control arms have ridges on one side to hold the nut or bolt still so you can tight the other side. On my 96, the uppers had washers on the nuts so the flanged bolt heads had the ridges. On the lowers, the head of the bolt had a washer so the nuts had the ridges. Pretty nice set up to keep things tight without lock washers and a good thing to keep in mind so you don't wear the ridges down while loosening.
2. While I did not remove the rear wheels or jack up the truck at first (this time around as I did on the Febest units) it does help to have a jack handy for raising and lowering the body. I used the factory jack on a support placed under the hitch to raise and lower the body as needed. It took some time, but if you get the body raised to the right place you can easily pull out the upper arms/bolts and replace them without the use of a pry bar.
3. Keep an eye on the upper arm ABS tab placement when removing the upper arms. They should face to the inside of the truck on both sides. Stupid me did not at first and when working on one lower I spotted my mistake. Only cost me a little more time and more of an arm workout.
3.Uppers are 17mm for the bolt heads and nuts on my 96 although I think the 3rd gens are all the same. The Lowers are 19mm on both the head and nut. And I used a small flat head screwdriver on the ABS lines to disconnect them from the upper arms. No other special tools needed except for maybe a strong flat head screwdriver or small prybar to help move items into place and a ratchet strap(I used a motorcycle tie down).
4. When replacing the lower arms you will find that the arm spacing may have moved when you pulled the bolts. This is where the ratchet strap came in handy. I place one hook in a hole above the LCA front mount and the other hook in a hole of the spring pad (keeping the strap parallel to the LCA). With the strap as tight as you can get it you will still need to pry some to get a perfect alignment for the bolt hole. It may work better with a stronger strap, but this was all I had...
For me, I did one side at a time and did the upper arm first. Don't think it would matter which you do first.
I have attached a few pic's of the LCA's for comparison purposes. The lower bar that looks to have some surface rust is my factory '96 arms. The middle arms are the Febest which I picked up on Amazon a little over a year ago. And of course, the massive ones at the top are the Rokmen Trail Series. They are very nice units that are tig welded and powder-coated. Much larger in size than the factory units and the bushing is larger than the factory as well. The bushing itself has a similar design to the latest factory bushing.
Rokmen specs from Wheelers site:
Improve your on road ride, and off-road performance and durability. The Rokmen Trail-Series lower trailing arms are an affordable yet extremely heavy duty upgrade over the stock Toyota trailing arms.
Sold as a pair.
• 1.750″ outer diameter x.250″ wall 1026 DOM tubing.
• Fully TIG Welded
• Rokmen EnduroMax™ Bushings
• Maintenance Free, bolt them on and forget about them.
• Bushings are replaceable should the need ever arise – but probably will not…
• Sand Blasted and Powder Coated for a tough and long lasting finish.
Mine did not come with the little Rokmen stickers as seen in the stock photos, but who is really going to look for them anyhow.
Hope this is informative and if you have any questions/comments, feel free to let me know!