Shawnathan9's Build Thread

shawnathan9

New member
Hello fellow T4R lurkers and regulars.

I decided to post a build thread so I can keep a log of what I have repaired, modified, installed, and the results so others can use it should they like what they see as well as provide any feedback for what I've done to the Runner.

Now I've been a 4runner (3rd gen) owner for years and really kept things stock for the most part. I sold my last 3rd gen two years ago and had been driving a Lexus since then. Just recently, I had already been posting into the "What did you do to your 3rd gen today" and I'll transfer those posts onto this thread in due time.

Recently, I had the itch and jumped on Craigslist and found a local seller offering a 1996 Limited with some minor mods, high mileage, for a reasonable price.

From my initial inspection, I noticed that the UBJ was torn and I believe the previous owner didn't know how to turn a wrench and wanted to sell it instead of paying for costly repairs from a mechanic.

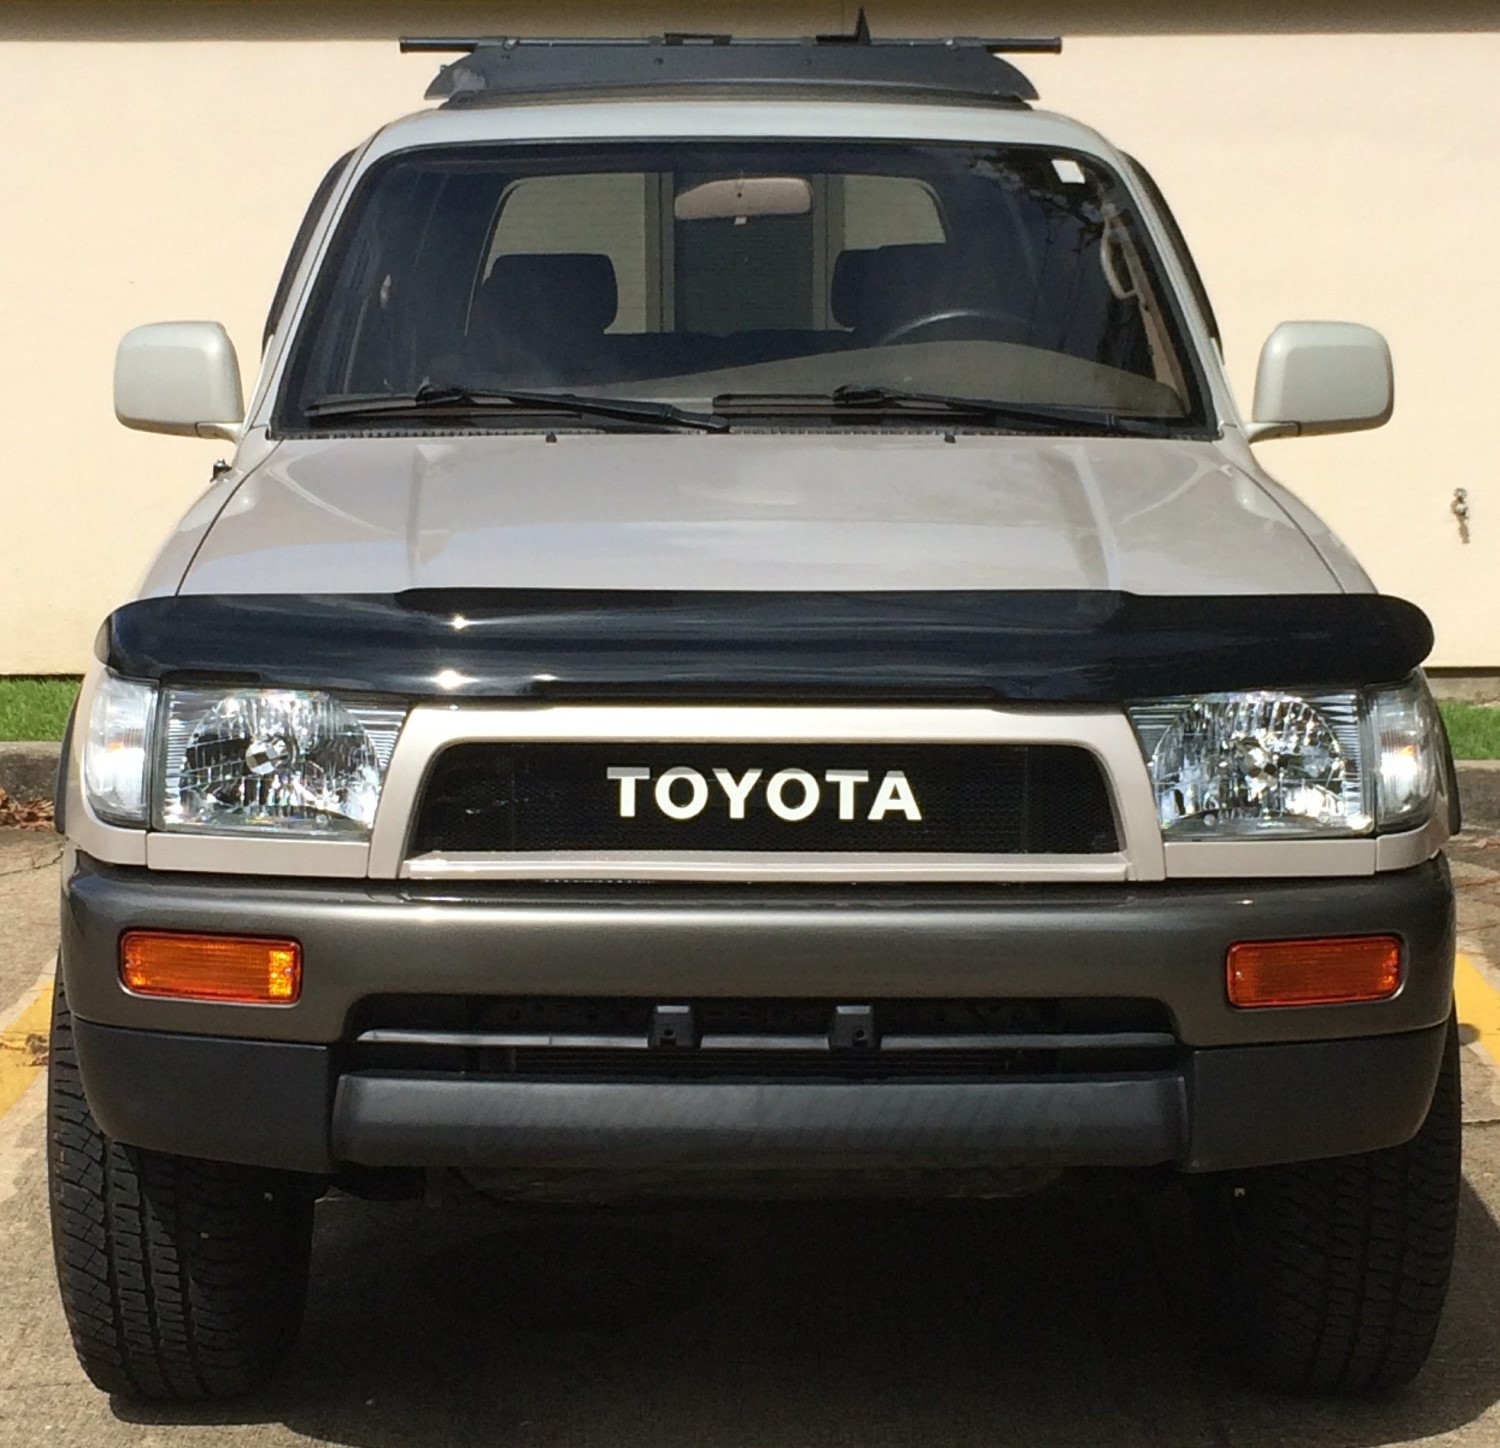
The paint was in immaculate condition as was the interior and trim. The lower valance was taped up but that's easily replaceable. There was a Sony sterero installed that sounded really good. It had a cheap aftermarket roof basket and some Vision 16" RIMS with new Yokohama Geolanders. Front and rear 3" spacer lifts from an unknown company. It ran smooth, shifted fine, but had some loose/rough steering and suspension. The previous owners had over 14yrs of service records. I was convinced that this is a good buy.

I was sold; I purchased it minutes before I had to run to work. With all the paper work in hand, I parked my Lexus on the curb and drove it away:
<a href="https://ibb.co/XjKW7Vg"><img src="https://i.ibb.co/0m6nCQS/20201130-172608-Copy.jpg" alt="20201130-172608-Copy" border="0"></a>

<a href="https://ibb.co/5nLTG42"><img src="https://i.ibb.co/ZYxdGXN/20201130-172555.jpg" alt="20201130-172555" border="0"></a>

<a href="https://ibb.co/CB6SPyC"><img src="https://i.ibb.co/Tc1NWGj/20201130-172743.jpg" alt="20201130-172743" border="0"></a>


Installed/reparied/modified:

  • Depo clear corners and front signal lights
  • Toytec differential drop kit
  • Bilstein 5100 & OME 880/906
  • Replaced front and rear end links w/ Moog K80380 Stabilizer Bar Links for a 2nd gen
  • Replaced OEM UBJs @298k
  • Replaced OEM LBJs @298k
  • Replaced front bumper lower valance
  • NGK spark plug wires/ OEM spark plugs @299k
  • Auto Meter 15411 Gauge w/ MaxTow Double Vision 260 F Transmission Temperature Gauge Kit
  • B&M 70264 Transmission cooler
  • Flushed transmission fluid, differential and transfer case @299k
  • Replaced OEM radiator @299k
  • New OEM radiator cap @299k
  • Flushed coolant and replaced with Toyota Red @299k
  • ScanGauge - SG2 II Ultra Compact 3-in-1
  • Replaced/installed LED interior lighting & rear license plate
  • BOSS Audio Systems Elite BE7ACP
  • NATIKA Backup camera
  • Flowmaster 50 Series Delta Flow
  • Rear differential breather mod
  • Sound dampening mats in rear cargo
  • Fuel filter replaced @299k
  • Satoshi grille mod using 2nd gen Toyota emblem
  • TBU w/ 231m OEM, OEM rotors, OEM brake pads and shims; Stainless steel brake lines
  • SPC UCA @300k
  • Whiteline LCA bushings @300k
  • 1/4" driver side suspension spacer to level things out
  • Big 3 mod
  • 2014 OEM 17" rims w/ 285/70/r17 BF Goodrich K02
  • Installed rock lights
  • BAMF Rock Sliders
  • Eimkeith PCK


7/1/22:

 
Last edited:
Register to hide this ad
Added Depo clear corners and front signal lights

Just installed Depo clear corners and front signal lights. The clears look pretty good on Desert dune. Can't wait until I find a parts car on Craigslist and I can grab a replace front bumper valance since mine has gorilla tape on it from the previous owner.

<a href="https://ibb.co/CQJ2mTY"><img src="https://i.ibb.co/tDZXQWv/20201207-122114.jpg" alt="20201207-122114" border="0"></a>

<a href="https://ibb.co/QjFt3cS"><img src="https://i.ibb.co/5xWwg9p/20201207-122122.jpg" alt="20201207-122122" border="0"></a>

<a href="https://ibb.co/XzfrYHS"><img src="https://i.ibb.co/fCVzDJ4/20201207-122129.jpg" alt="20201207-122129" border="0"></a>
 
Installed a Revo differential drop kit

*Update: I removed these and replaced them with a Toytec stainless steel differential drop kit as of January 2021.

I'm a bit disappointed by Revtek as their Amazon listing showed that this was an aluminum spacer but I received a rubber spacer instead. I've complained about this and it's too much of a hassle to go through a replacement at the time but I'll eventually find a place that was aluminum spacers that work.

Differential drop kit:
<a href="https://ibb.co/2NBQwsP"><img src="https://i.ibb.co/M6L4bGp/20201205-091704.jpg" alt="20201205-091704" border="0"></a>

Removing the OEM bushing bolts: The kit from Revtek did NOT come with new washers. It stated to use the OEM washers but those are stuck on the original bolt and bolt thread prevent them from being removed. - No way am I going to wreck the OEM bolt since I'll hold onto those for the future.
<a href="https://ibb.co/42wBZzr"><img src="https://i.ibb.co/68c6RzC/20201205-101353.jpg" alt="20201205-101353" border="0"></a>

I visited a local hardware store and found washers that fit over the new bolt.
<a href="https://ibb.co/Ns75yvT"><img src="https://i.ibb.co/hyCbm6Y/20201205-104419.jpg" alt="20201205-104419" border="0"></a>

The new washers cover much more width. It turns out to be a problem later as I noticed the washers surface was stripping from the nut due to it being wider than the nut surface. It worked for the moment but shame on you Revtek for asking people to re-use washers that are not meant to be removed from the OEM bolt:
<a href="https://ibb.co/BK1gwZM"><img src="https://i.ibb.co/1JS9bqW/20201205-104454.jpg" alt="20201205-104454" border="0"></a>

I had to stack two washers together to match the OEM height.
<a href="https://ibb.co/hBLr88w"><img src="https://i.ibb.co/LxYBppH/20201205-104439.jpg" alt="20201205-104439" border="0"></a>

Installed one side, loosely bolted before starting on the other side. The differential is being supported by a floor jack.
<a href="https://ibb.co/jgnNHqk"><img src="https://i.ibb.co/4PhqJCR/20201205-105011.jpg" alt="20201205-105011" border="0"></a>

The differential drop it is now fully installed.
<a href="https://ibb.co/3fxgCxQ"><img src="https://i.ibb.co/yhzHQz7/20201205-112503.jpg" alt="20201205-112503" border="0"></a>

The CV axles are now sitting a better angle: :becky::becky::becky:
<a href="https://ibb.co/vJ306DZ"><img src="https://i.ibb.co/qRNT3xk/20201205-112456.jpg" alt="20201205-112456" border="0"></a>

Just two weeks after the install, I had to remove the spacers while I was replacing the rack and pinion bushings and I noticed how deformed the bushings already are. These are definitely NOT going to hold up like aluminum spacers which Revtek falsely advertised on their Amazon listing. I would not recommend them unless you can be for certain that you'll receive aluminum spacers.
<a href="https://ibb.co/Fxy92TH"><img src="https://i.ibb.co/PmPRKHD/20201210-152439.jpg" alt="20201210-152439" border="0"></a>
 
Installed Bilstein 5100's and OME 880

After having my Amazon order misdelivered/ stolen, I luckily found a seller and picked up a pair of Bilstein 5100 and OME 880 along with some hardware to manage the install. *I ran into quite a few hardware issues which was caused by using KYB mount plates and my lack of having a good c-clamp to compress the shock bushings to install

On late Tuesday evening, after work, I started to compress my OME 880's and then installed the first coil onto the 5100.

Bilstein 5100
<a href="https://ibb.co/rQqc8zC"><img src="https://i.ibb.co/wd8wGP9/20201208-105800.jpg" alt="20201208-105800" border="0"></a>


OME 880
<a href="https://ibb.co/XxxWP8r"><img src="https://i.ibb.co/CKKwy23/20201208-110330.jpg" alt="20201208-110330" border="0"></a>

I started to compress the springs and this was going just fine:
<a href="https://ibb.co/khQt4ms"><img src="https://i.ibb.co/brzksbM/20201208-115835.jpg" alt="20201208-115835" border="0"></a>

I totally blanked out as I was watching a movie while doing this and I placed the ring on the 4th perch!!! - I was having a hell of a time compressing the coil; my lack of sleep made my really not focus on the reality of what I was doing. By the time I figured this out, I had already uncompressed my coil to the shock as you can see in this picture:
<a href="https://ibb.co/QCGBbkX"><img src="https://i.ibb.co/D8nXVYL/20201208-235743.jpg" alt="20201208-235743" border="0"></a>

As I was taking this photo, I was not considerate of the perch and began to decompress the coil onto the shock:
<a href="https://ibb.co/J2yYZkd"><img src="https://i.ibb.co/1KdCc2n/20201208-235745.jpg" alt="20201208-235745" border="0"></a>

I spent about an hour going through the ordeal of re-compressing the spring and then removing it from the shock, and then decompressing the spring once I adjusted the perch settings correctly.

Later on, I ran into an issue installing the Bilstein bushings as there was little to no room to screw on the nut to the top of the shock. I had to McGyver my way through it using clamps and made it work.

Here's a pic of the previous owners work: He installed 3" spacers on the front:
<a href="https://ibb.co/z4QL4jt"><img src="https://i.ibb.co/d5j351H/20201209-124154.jpg" alt="20201209-124154" border="0"></a>

Out with the old. In with the new:
<a href="https://ibb.co/YD78X8c"><img src="https://i.ibb.co/db06t6P/20201210-145019.jpg" alt="20201210-145019" border="0"></a>

*I didn't have any rear coil seats and so I ended up leaving the rear spacers for the time being. *A bit of reverse rake but I'll settle for the time. The rear is really stiff because of this.
<a href="https://ibb.co/7XnpSX3"><img src="https://i.ibb.co/Msc1gsz/20201214-102046.jpg" alt="20201214-102046" border="0"></a>
 
Last edited:
Replaced UBJ and LBJ

I just purchased this '96 from a guy who had the truck for a few months and looks like he put on a cheap lift kit which compromised the boot of the upper balljoints. The lower balljoints looked to have been there for a while and didn't show much issues but I don't know the history of how this truck was driven and so I decided to replace them.

Dismantling the front end. I noticed that the someone had recently replaced the Tie rods as the rod, boot, castle nut, and retaining wire was pretty new:
<a href="https://ibb.co/2ctydVs"><img src="https://i.ibb.co/6DPmF91/20201209-122528.jpg" alt="20201209-122528" border="0"></a>

I used a OTC puller set which made the job a breeze. On the upper ball joint, I used this puller and rigged electric tape around it to prevent it from kicking back when the upper ball joint pops out of place. It worked like a charm:
<a href="https://ibb.co/QQxK7hx"><img src="https://i.ibb.co/nmKLq4K/20201209-124151.jpg" alt="20201209-124151" border="0"></a>

Here's a picture of the whole knuckle, removed, and the lower ball joint boot looks okay, there was no play, but I've decided to proceed with the replacement for peace of mind:
<a href="https://ibb.co/wpZkPRX"><img src="https://i.ibb.co/DwPJvty/20201209-124156.jpg" alt="20201209-124156" border="0"></a>

This is the condition of the upper ball joint and the main reason why I've removed the knuckle so I have better leverage to press it out on a vice:
<a href="https://ibb.co/8KJwCZD"><img src="https://i.ibb.co/cgP9Bnc/20201209-124242.jpg" alt="20201209-124242" border="0"></a>

Upon removing the boot and inspecting it, the ball joint appeared in good condition and could've used a reboot kit but I already committed to replacing it so I might save it for a reboot kit project later on:
<a href="https://ibb.co/Twy2Tm2"><img src="https://i.ibb.co/fXJFS4F/20201209-125126.jpg" alt="20201209-125126" border="0"></a>

I have a Makita impact driver but there wasn't enough torque to move the press; Using a press without an impact driver was one hell of a workout:
<a href="https://ibb.co/1RJ53HD"><img src="https://i.ibb.co/bNRZxpS/20201209-125843.jpg" alt="20201209-125843" border="0"></a>

Here we go, I finally popped that sucker out:
<a href="https://ibb.co/GPdCW7s"><img src="https://i.ibb.co/Jkcrvnx/20201209-130755.jpg" alt="20201209-130755" border="0"></a>

Once I pressed in the upper ball joint, I removed the lower ball joint and then I realized that the flange bolts were not ordered and so I had to place a call to Magnussen Toyota to order them for the next day:faint2:
<a href="https://ibb.co/87NJRtb"><img src="https://i.ibb.co/FDm9fCX/20201209-133750.jpg" alt="20201209-133750" border="0"></a>

I decided to proceed and use the old bolts only to hold them in firmly until I received the new flange bolts. *From here, I began to work on the driver side knuckle and noticed that upper ball joint was functional, boot was intact, and so I did not remove that knuckle.

Instead, I decided to remove the lower ball joint while the knuckle was still on:
<a href="https://ibb.co/hW1z8QY"><img src="https://i.ibb.co/yyBjsv4/20201210-145016.jpg" alt="20201210-145016" border="0"></a>

This morning, I received my flange bolts and started to prep them and began the install:
<a href="https://ibb.co/jywTPSN"><img src="https://i.ibb.co/K2sXpJP/20201210-145014.jpg" alt="20201210-145014" border="0"></a>

*Remember to double check your torque specs. I had inadvertently used the castle nut torque spec for two of the flange bolts before I ended up questing why the hell am I torqueing this so tight and then the second bolt SNAPPED OFF!

I had to disassemble the entire knuckle and bring it to my work table. Luckily, it was the one that had a bolt end sticking up and so I was able to get a pair of vice grips and twist it through the other end. I was just thinking how luck I was that it didn't happen to the ones closest to the brake/dust cover. :reddance:

I just called Toyota to order two more flange bolts which I'll be picking up tomorrow. For now, I've installed 3 sets on each lower ball joint and 1 set of the old flange bolts (no loctite) until the replacements arrive tomorrow.

*Update, all is well now as I received the 2 flange bolts and torqued to spec.

I love what you do for me...Toyota!!!
 
Energy suspension Rack and Pinion bushing kit installed

Amongst other things I did today, I also installed an Energy Suspension Rack and Pinion bushing kit:
<img src="https://static.summitracing.com/global/images/prod/mediumlarge/ens-8-10103r_ml.jpg" border="0">

I had one hell of a time figuring out how to free up slack in order to move the center retaining bolt from it's mount but I learned that there's a steering fluid line bolt that is mounted to the frame right on the drivers side and that gave me enough slack. Then, I was able to move it forward enough to use a press and push out the middle bushing. Get ready for a blurry photo:
<a href="https://ibb.co/vJB82xj"><img src="https://i.ibb.co/p3PpCvL/20201210-170429.jpg" alt="20201210-170429" border="0"></a>

Instead of using the same ball joint press, I've box cutters to trim off the lip of the old bushings, used a screw driver to go between the bushing and washer and give it play and then tap the rest out using socket and a rubber mallet. Afterwards, I cleaned it up to get install the new bushing kit:
<a href="https://ibb.co/DpwJ24B"><img src="https://i.ibb.co/74rfmv3/20201210-170427.jpg" alt="20201210-170427" border="0"></a>

I watched Timmy's video but I decided not to remove my sway bar I was able to make this all work so you can go either way apparently. The passenger side bushing is a breeze to remove:
<a href="https://ibb.co/4pGLNHS"><img src="https://i.ibb.co/XtgPJq5/20201210-170431.jpg" alt="20201210-170431" border="0"></a>

<a href="https://ibb.co/vBC69Sr"><img src="https://i.ibb.co/BPH5k97/20201210-170441.jpg" alt="20201210-170441" border="0"></a>

Got them installed and now realize how dirty my rack and pinion look from the previous owners valve cover leak:
<a href="https://ibb.co/qJnM4S2"><img src="https://i.ibb.co/7kzJTf0/20201210-201824.jpg" alt="20201210-201824" border="0"></a>

For the price of the bushing kit, it was worth the install.
 
Installed 2nd gen Stabilizer links

My original stabilizer end link boots were cracked and the bushings were falling apart and so I decided to upgrade them since I've been working on so much of the front end.

I ordered Moog's 2nd gen end links as I learned that they're about 1" longer than the 3rd gen end links for around the same price.

Here's a side by side:
<a href="https://ibb.co/g7MSmgW"><img src="https://i.ibb.co/LPzxYpg/20201210-202111.jpg" alt="20201210-202111" border="0"></a>

Of course, I'm replacing the bushings so I used Energy suspension bushings:
<a href="https://ibb.co/0nn9s45"><img src="https://i.ibb.co/GddMHYm/20201210-202113.jpg" alt="20201210-202113" border="0"></a>

I don't have all night so I'm going to do the rear end shocks, coils, rear sway bar bushing kit, and end links for tomorrow morning.

For today, I was able to finish my front end suspension, rack and pinion bushing kit, and sway bar bushing kit.
<a href="https://ibb.co/H2ZLFrW"><img src="https://i.ibb.co/kyZVHhR/20201210-214224.jpg" alt="20201210-214224" border="0"></a>

*I'm just winding down from two days of work on my new 3rd gen but things are coming along nicely. :becky::becky::becky:
 
Bilstein 5100 and 906 for rear suspension

I decided to go with Bilstein 5100's and OME 960 and will see how they feel for now. *Note, later on during the install, I found out that the because the previous owner installed Daystar spacers that the original coil spring seats were missing. :crazy: Because of this, I had to decide to either back out of the install or try the install with the existing 2"-3" lift spacers and I went with the later after noticing there was enough slack on all the lines.

I work in the afternoon so I crawled under the truck early this morning and began to install the rear shocks and coils:
<a href="https://ibb.co/jL9q5xB"><img src="https://i.ibb.co/fCVZSKB/20201211-081546.jpg" alt="20201211-081546" border="0"></a>

Here's a pic of those spacers that I was intending to remove:
<a href="https://ibb.co/Q9TQmzT"><img src="https://i.ibb.co/Y21QjY1/20201211-081608.jpg" alt="20201211-081608" border="0"></a>

I removed the sway bar as I'll also be replacing those bushings while I'm in here:
<a href="https://ibb.co/Gd4Wp1F"><img src="https://i.ibb.co/MgxcSj9/20201211-082749.jpg" alt="20201211-082749" border="0"></a>

*I unbolted the brake lines to provide slack for when I remove the shocks and coils.

The passenger side shock came out just fine but the driver side was frozen in place and the shock didn't have an allen to keep it in place. There's no room for a channel lock to use while I wrenched it so I figured I'd bust out my sawzaw to make it easier. Yes, it's a bit barbaric but it gets the job done:
<a href="https://ibb.co/PzDx77L"><img src="https://i.ibb.co/KzK6MMP/20201211-095414.jpg" alt="20201211-095414" border="0"></a>

Installation was a breeze there was plenty of room to wrestle in the coils before installing the new shocks.

I used 2nd gen end links for the rear:
<a href="https://ibb.co/0BKj3KG"><img src="https://i.ibb.co/LQrzfrZ/20201211-082926.jpg" alt="20201211-082926" border="0"></a>

And, I got my shocks/coils installed before work starts. Woohoo!!
<a href="https://ibb.co/wdLrGJJ"><img src="https://i.ibb.co/3TsY6ff/20201212-081501.jpg" alt="20201212-081501" border="0"></a>
 
Replaced the taped up lower valance

The 4Runner has a lower valance that was taped up from the previous owner and I'm done looking at the nasty looking patch job so I decided to shop online for a cheap replacement and found one on Amazon.

Here's a pic of the lower valance taped up with some sort of gorilla tape and some black paint:noidea:
<a href="https://ibb.co/rtm8410"><img src="https://i.ibb.co/TTkjmF2/20201207-122104.jpg" alt="20201207-122104" border="0"></a>

There were two bots, behind the bumper that attach the bumper to the frame. Then, there was one bolt, on each side, right under the very edge of the bumper near the wheel well. Once these are unbolted, you can remove the entire bumper to make it easier to unbolt the lower valance rather than trying to do that while it's attached to the front end:
<a href="https://ibb.co/C8ffRX6"><img src="https://i.ibb.co/wgff5b7/20201212-100357.jpg" alt="20201212-100357" border="0"></a>

Once the bumper comes off, you'll unbolt the valance from the bumper and then use the existing clips on the old valance and place them onto the new valance so you can bolt them back on.

Here's a old valance and the new one:
<a href="https://ibb.co/0tVrrDX"><img src="https://i.ibb.co/Zm1xxLJ/20201212-100410.jpg" alt="20201212-100410" border="0"></a>

With the new valance, the front end looks pretty much like a brand new truck:
<a href="https://ibb.co/NKprXVQ"><img src="https://i.ibb.co/BBjGmzd/20201212-135544.jpg" alt="20201212-135544" border="0"></a>
 
Painted 3rd and 2nd gen tow hooks

While I wait for transmission temp. gauge that'll I'll work on next, I decided to remove my 2nd gen tow hook as well as my 3rd gen tow hook and paint them red.

You really only need one recovery point but what the hell... each tow hook had it's unique look and I thought that two red hooks were better than one. :frisky:

Since there's really no need to explain how to unbolt, remove, and install these things, here are pictures of what it looks like on the front end:

<a href="https://ibb.co/hd4Jt9V"><img src="https://i.ibb.co/GM84bpR/20201219-083412.jpg" alt="20201219-083412" border="0"></a>

<a href="https://ibb.co/H27DWgb"><img src="https://i.ibb.co/Qc9F2mT/20201218-203957.jpg" alt="20201218-203957" border="0"></a>

<a href="https://ibb.co/NYJtTG1"><img src="https://i.ibb.co/w6PBc2J/20201218-204005.jpg" alt="20201218-204005" border="0"></a>

<a href="https://ibb.co/PQ8QnmG"><img src="https://i.ibb.co/JQPQ4Bj/20201219-083441.jpg" alt="20201219-083441" border="0"></a>

I have a set of d-ring shackles that'll need a mounting bracket to be welded onto the rear tow hitch down the line. :reddance:
 
Bug removal from the dash & removal of the cheap roof rack

When I bought the 4Runner, I noticed that the dash had a dead little critter nicely posted under the fuel gauge and this was one of the things that's been "buggin'" me for a while.
<a href="https://ibb.co/cxdPzss"><img src="https://i.ibb.co/M9LbqJJ/20201215-084804.jpg" alt="20201215-084804" border="0"></a>

It just takes a few screws, bolts, some accessories wires to be unplugged and off you go:
<a href="https://ibb.co/X7ttyhr"><img src="https://i.ibb.co/hBVVXPJ/20201215-084807.jpg" alt="20201215-084807" border="0"></a>

The speedometers protective shield is held in by by clips that you simply press down in order to pop up the plastic shield:
<a href="https://ibb.co/HDmZ1gW"><img src="https://i.ibb.co/qMb6X1t/20201215-085126.jpg" alt="20201215-085126" border="0"></a>


And there she is...Something that must've been annoying the crap out of the last owner as they obviously didn't take the time to address this thing:
<a href="https://ibb.co/HgztyQb"><img src="https://i.ibb.co/4NT8LxX/20201215-085131.jpg" alt="20201215-085131" border="0"></a>

Finally, the dash doesn't look like a resting place any longer. :bluejump:
<a href="https://ibb.co/S7mFbWJ"><img src="https://i.ibb.co/934Q6zG/20201215-091149.jpg" alt="20201215-091149" border="0"></a>

------

The previous owner installed a cheap roof rack, which already showed signs of rusting after one day of rain. I decided to remove it and install it onto my 2nd gen which I am selling today (Kind of sad to see it go since I put good work into making it run as well as it does now)

Requiem for a Dream :pound:
<a href="https://ibb.co/7XnpSX3"><img src="https://i.ibb.co/Msc1gsz/20201214-102046.jpg" alt="20201214-102046" border="0"></a>
 
Installed NGK spark plug wires and replaced OEM spark plugs

My 4Runner came with over 14 years of service records and none suggest the spark plugs were ever changed :noidea:

Just bought some OEM plugs and NGK wires and went to town. The driver side rear plug did not require any removal of brackets or tubing and I was able to get an extension in there and into the plug without issues.
<a href="https://ibb.co/qCrWjrG"><img src="https://i.ibb.co/hcmZ9m5/20201221-103424.jpg" alt="20201221-103424" border="0"></a>


Okay, so these are not OEM so it has been changed but never documented. They're NGK's and look like they've been in there for a while:
<a href="https://ibb.co/98wD1y1"><img src="https://i.ibb.co/xCmkBzB/20201221-104539.jpg" alt="20201221-104539" border="0"></a>

The intake tubing had to be removed for the passenger side but this was such an easy install compared to my 2nd gen that was covered with vacuum tubes on the passenger side:
<a href="https://ibb.co/vVzghZN"><img src="https://i.ibb.co/WGKq0gr/20201221-105855.jpg" alt="20201221-105855" border="0"></a>

I hear that these engines eat plugs up pretty fast if it's a single gap. I'm happy to be replacing the NGK's with OEM dual gaps:
<a href="https://ibb.co/XzMcdqJ"><img src="https://i.ibb.co/dQx83RK/20201221-110143.jpg" alt="20201221-110143" border="0"></a>

And in less than 30 minutes, we're back in action:
<a href="https://ibb.co/Fb295xP"><img src="https://i.ibb.co/xSWy1C4/20201221-112149.jpg" alt="20201221-112149" border="0"></a>

*Just took it for a spin and it already feels better. *While I was in there, I noticed that the PVC grommet/valve looked old and that's going to be on my list for when I also look into the timing belt and water pump. :pimp:
 
MaxTow Double Vision 260 F Transmission temp gauge w/ Auto Meter a-pilar mount

Lately, I've been on a Timmy YT binge and have been going through a ton of useful content. I pulled the trigger and, last week, I decided to order a transmission temp. gauge and a transmission cooler for preventative maintenance.

The first thing I did was attempt to JB weld the temp gauge housing to the a-pillar plastic.

<a href="https://ibb.co/xSrsRGN"><img src="https://i.ibb.co/QFxc1n4/20201227-084950.jpg" alt="20201227-084950" border="0"></a>

I wasn't happy with the extra material that hung past the a-pillar so I decided to dremel/file away the excess.

Before:
<a href="https://ibb.co/vXFh44L"><img src="https://i.ibb.co/nPGBMMQ/20201227-082054.jpg" alt="20201227-082054" border="0"></a>

After:
<a href="https://ibb.co/s1yfGZ4"><img src="https://i.ibb.co/bvz0ZkV/20201227-202238.jpg" alt="20201227-202238" border="0"></a>
<a href="https://ibb.co/7G3WwDV"><img src="https://i.ibb.co/BghZXJj/20201227-082038.jpg" alt="20201227-082038" border="0"></a>

Dremeled a pathway for the wiring that will lead behind the a-pilar:
<a href="https://ibb.co/FWYwzJy"><img src="https://i.ibb.co/th2sDcv/20201227-202230.jpg" alt="20201227-202230" border="0"></a>

Following Timmy's guide, I assembled a brass tee and a brass bushing to fit the transmission temperature sensor:
<a href="https://ibb.co/S66VJ3V"><img src="https://i.ibb.co/BffTwCT/20201229-092740.jpg" alt="20201229-092740" border="0"></a>

*I decided to secure the sensor wiring with a loom and electric tape to keep it away from debris.

Continued with installing two brass barbs to complete the assembly:
<a href="https://ibb.co/tDnVD8j"><img src="https://i.ibb.co/M7KF7Mw/20201229-093226.jpg" alt="20201229-093226" border="0"></a>
<a href="https://ibb.co/QkWrtF7"><img src="https://i.ibb.co/VxF25W0/20201229-093658.jpg" alt="20201229-093658" border="0"></a>

I decided to wrap some electric tape on a pair of vice' and clamped both sides of the transmission tubing to prevent excess leakage/mess:
<a href="https://ibb.co/fqt8Z1G"><img src="https://i.ibb.co/0mZB1DV/20201229-094225.jpg" alt="20201229-094225" border="0"></a>

I made quick work of the fitting and decided to lead the sensor from the bottom to prevent any trapped air:
<a href="https://ibb.co/x5TJhN5"><img src="https://i.ibb.co/bd9z1kd/20201229-100213.jpg" alt="20201229-100213" border="0"></a>

After an initial test to determine the length of wire needed, I cut the plug side and soldered a thicker gauge wire to the plugs and later covered it with a loom:
<a href="https://ibb.co/YXqRw0b"><img src="https://i.ibb.co/Sc9sGfJ/20201227-205017.jpg" alt="20201227-205017" border="0"></a>

I fastened the cabling with a zip ties to prevent any possibility of it touching the belts:
<a href="https://ibb.co/Ht6Mcb4"><img src="https://i.ibb.co/WkZdrM5/20201231-150719.jpg" alt="20201231-150719" border="0"></a>

I also used a universal firewall boot and lead the loomed assembly through it first, measuring how much excess cabling I'll have lead into through the firewall, pushed it through with the loom, and it was water tight due to the loom being in place with the firewall boot.

Now, the I had to go through the trouble of removing the center console, radio, and then some soldering into the right connections.
<a href="https://ibb.co/4YfGpQ1"><img src="https://i.ibb.co/vQBGktX/20201227-110518.jpg" alt="20201227-110518" border="0"></a>

Along the way, I found remnants of the previous owners belongings under the console:
<a href="https://ibb.co/BLxCVF2"><img src="https://i.ibb.co/Q9RKFtv/20201227-090307.jpg" alt="20201227-090307" border="0"></a>

Since I was down there, I installed a Magnefine magnetic line transmission filter which was super easy to do:
<a href="https://ibb.co/bKZJdWy"><img src="https://i.ibb.co/S38rvs1/20201229-103308.jpg" alt="20201229-103308" border="0"></a>

I performed a quick fitting and was happy with the placement of the gauge and that the wiring worked out. Then, the JW weld snapped off and I realized I didn't use a plastic glue. I decided to use some small screws and decided to call it a day:
<a href="https://ibb.co/NsBZCTX"><img src="https://i.ibb.co/nbJzmPT/20201229-110812.jpg" alt="20201229-110812" border="0"></a>

The matching paint came the next day so know it doesn't look so tacky:
<a href="https://ibb.co/PZbLcK1"><img src="https://i.ibb.co/KjQP2dV/20201230-133000.jpg" alt="20201230-133000" border="0"></a>

*continued...
 
*Removed the radiator grill, removed the car horns to prep for the trans. cooler install:
<a href="https://ibb.co/BzC3tbX"><img src="https://i.ibb.co/DVRWthx/20201231-141546.jpg" alt="20201231-141546" border="0"></a>

I decided that the current radiator is still good, for now, and so I opt'd out of replacing it today (though I had a OEM radiator on stand-by). Instead, I removed the 4 bolts and was able to clear enough room to install the trans. cooler. - I had to pull the radiator back, carefully without any damage to the fins, and fasten it with a bungee cord to keep it back far enough so I can reach down to install the cooler:
<a href="https://ibb.co/j5VnNmt"><img src="https://i.ibb.co/wLJ5kVt/20201231-141532.jpg" alt="20201231-141532" border="0"></a>
<a href="https://ibb.co/C1vQTBJ"><img src="https://i.ibb.co/dW6DzBb/20201231-141537.jpg" alt="20201231-141537" border="0"></a>
<a href="https://ibb.co/NsKT5wm"><img src="https://i.ibb.co/0crsTPF/20201231-141542.jpg" alt="20201231-141542" border="0"></a>
<a href="https://ibb.co/gTLNyrt"><img src="https://i.ibb.co/yyct0Ng/20201231-141529.jpg" alt="20201231-141529" border="0"></a>

Found the ideal set up, that everyone seems to use, and pushed the provided zip ties through the ac:
<a href="https://ibb.co/yXnCfDs"><img src="https://i.ibb.co/t4M6mSC/20201231-142718.jpg" alt="20201231-142718" border="0"></a>

As you can see here, you can get away with the install without removing the radiator:
<a href="https://ibb.co/gtf4Yxh"><img src="https://i.ibb.co/7rZkhqL/20201231-142727.jpg" alt="20201231-142727" border="0"></a>
<a href="https://ibb.co/QnW0WbM"><img src="https://i.ibb.co/FJQpQxz/20201231-142941.jpg" alt="20201231-142941" border="0"></a>

I decided to connect the tubing from the radiator end and then guide it to the cooler to have a good length fit. Installed the inlet hose on the bottom and the outlet on the top of the cooler:
<a href="https://ibb.co/CMmM1fZ"><img src="https://i.ibb.co/fnqn1s5/20201231-150756.jpg" alt="20201231-150756" border="0"></a>
<a href="https://ibb.co/Ht6Mcb4"><img src="https://i.ibb.co/WkZdrM5/20201231-150719.jpg" alt="20201231-150719" border="0"></a>
<a href="https://ibb.co/cb95SDP"><img src="https://i.ibb.co/tZ6fT8S/20201231-144953.jpg" alt="20201231-144953" border="0"></a>
<a href="https://ibb.co/59r5qyM"><img src="https://i.ibb.co/6ZH46xn/20201231-144958.jpg" alt="20201231-144958" border="0"></a>

I already noticed a difference when I was driving around today and found that my temps were 30-40 degrees cooler :car:

*Finally, a new pic without the cringe Amazon roof rack that the previous owner installed. :love:
<a href="https://ibb.co/hVBXCVS"><img src="https://i.ibb.co/sqK5tqZ/20201230-132842.jpg" alt="20201230-132842" border="0"></a>
 
Installed a back up camera the right way.

After much debate about how I should go about an install for a back up camera, I finally decided to try a camera that looks as OEM as possible and route it through the rear hatch and through the rubber tubes leading into the headliner and then routed through the B pillar, through the lower moldings and then into the stereo.

To get it all started, I selected an aftermarket back up camera that looks as OEM as possible and a affordable Android 7" touch screen to get the job done since the price allowed for it to be upgraded later should I agree with the camera set up I run through the rig.

Camera: NATIKA Backup/Front View Camera
<a href="https://ibb.co/b6RwKcx"><img src="https://i.ibb.co/fXG6xjb/Natika-camera.jpg" alt="Natika-camera" border="0"></a>

A cheap Android 7" double din on Amazon (This is cheap enough to pass on to my nephew should I have an urge to upgrade due to any functionality issues): Amazon.com: ANKEWAY 7 Inch Android 9.1 Car Stereo with HiFi+WiFi+Bluetooth+GPS+RDS+FM, 2021 New Double Din Car Radio 1080P HD Touch Screen Multimedia Player+Mirror Link(Android/iOS)+Rearview Camera+Dual USB: GPS & Navigation

*The first thing you'll want to do is to remove the back door trim so you can begin your journey to access the rear door innards where you'll later guide your back up camera wiring. It helps to have a service manual to understand what parts should be removed.
<a href="https://ibb.co/wRcz2ks"><img src="https://i.ibb.co/9NZrdDt/20210105-211202.jpg" alt="20210105-211202" border="0"></a>

Note: The factory manual will tell you to take apart everything but you can actually do this with minimal disassembly; You don't have to remove the rear window, regulator, or hatch handles at all.

The first thing you'll want to do is to remove the plastic cover from the hatch hoop that's located on the back door trim:
<a href="https://ibb.co/L542tk8"><img src="https://i.ibb.co/k1YW8Hx/20210105-210935.jpg" alt="20210105-210935" border="0"></a>

Next, you'll want to use a trim remover tool, or a small screw driver with tape, to avoid any damage to your parts, and pry up and remove the back door trim which is only held in place with 10 plastic tension clips which can be referenced in the previous picture of the service manual shown above. - Once the 10 clips are unfastened, you'll want to use some pressure and push the back trim as if you were pushing it upward in the direction the window would close up. It's only held in by tension so it will not break anything:
<a href="https://ibb.co/CVTm0Ft"><img src="https://i.ibb.co/SV95vpx/20210105-205909.jpg" alt="20210105-205909" border="0"></a>

Once removed, you'll have access to a black plate where you'll want to disconnect the electrical connections and also associated mounts from their respective points. *If you don't remove them, they'll keep that black plate dangling onto the back door because you'll want to remove that plate in the next step. So, take your time to unplug and unmount those connections and wires:
<a href="https://ibb.co/TDGZ24R"><img src="https://i.ibb.co/HLy04tY/20210105-212216.jpg" alt="20210105-212216" border="0"></a>

There will be several bronze colored screws that hold down the black plate and then you'll want to gentle pry between the plastic fasteners and the black plate will pop off:
<a href="https://ibb.co/HFN0ZCk"><img src="https://i.ibb.co/j6Vdtz1/20210105-212415.jpg" alt="20210105-212415" border="0"></a>

Once removed, you'll have access to the inside of the back door. This was necessary for the application as I want to mount the camera onto the back door trim next to the license plate lights. I chose the right side as there appears to be an opening behind it whilst the left side was sealed closed:
<a href="https://ibb.co/HNSGskc"><img src="https://i.ibb.co/dbTkqzN/20210105-221702.jpg" alt="20210105-221702" border="0"></a>

This provided enough space to drill a hole into the back door in a place where it will not be noticeable should I choose to remove this one day:
<a href="https://ibb.co/pxLPtrM"><img src="https://i.ibb.co/dr5cdJV/20210105-223542.jpg" alt="20210105-223542" border="0"></a>

After choosing the position of where I want to mount the camera, I selected a few drill bits that match the size of my camera's mounting bolt and the wiring that needs to be led into the rear door:
<a href="https://ibb.co/c1chwSJ"><img src="https://i.ibb.co/HVDTCf7/20210105-224713.jpg" alt="20210105-224713" border="0"></a>

I checked the hole which I drilled through the back door and found that it was positioned in area that will not impede on the glass windows path when it lowers down. Now, I began to install the camera and hope that it fits as intended:
<a href="https://ibb.co/RBw8jy4"><img src="https://i.ibb.co/fnwJDvG/20210105-225341.jpg" alt="20210105-225341" border="0"></a>

The area to work was too small for a wrench so I used a pair of long nosed pliers to fasten the nut onto the back up camera bolt and then finished leading the wires through the back door (tape some electric tape on the plastic trip to avoid any rubbing with your pliers:
<a href="https://ibb.co/brY1Sy2"><img src="https://i.ibb.co/FBc6Sf0/20210105-230001.jpg" alt="20210105-230001" border="0"></a>

From here, I used an abundant amount of gasket sealer and covered the area where I drilled so as to prevent any expose to weather conditions and to act as a buffer against any rubbing that the wire could have elsewise encountered:
<a href="https://ibb.co/z4ShCxB"><img src="https://i.ibb.co/BCgVv3Q/20210105-231402.jpg" alt="20210105-231402" border="0"></a>

Now that I was satisfied of how the camera sits in an OEM style position and it has the OEM look, I gave it a final torque to tighten it and reinstalled the right driver license light back into to place and moved to snaking the camera wire in the door latch.

You'll find there's just enough hand space to guide that wire within the right side of the door assembly and there will be door latch wire that you can use to zip tie your camera wire against. (If you pay attention, you'll realize that door latch wire must not be in the way of the window so you can simply use that as a guide to how you'll want to guide your camera wire through the back of your door:
<a href="https://ibb.co/FJfT2bs"><img src="https://i.ibb.co/2PL4x78/20210105-232222.jpg" alt="20210105-232222" border="0"></a>

Once you zip tied your cable toward the right of the door, set the wire aside and look up and you'll see the rubber boot that is covering the wires that lead into your chassis.

You'll want to lead your camera wiring through this boot so you don not cause any wear and exposure of elements to the wiring. To get started, you'll need access to the chassis end of the boot.

To do this, you'll need to remove the bottom plastic retainer panel of your trunk as that holds the side trim in place and you won't be able to pop off your side trim until you remove this piece:
<a href="https://ibb.co/jvKr6cq"><img src="https://i.ibb.co/C5dH1k4/20210105-205220.jpg" alt="20210105-205220" border="0"></a>

Next, remove your rear door light the screws within will keep the upper plastic panel in place:
<a href="https://ibb.co/rZfrSwt"><img src="https://i.ibb.co/9q35Lrv/20210105-205853.jpg" alt="20210105-205853" border="0"></a>

Once removed, you can pop off your upper panel using that trim remover tool:
<a href="https://ibb.co/WWgcWss"><img src="https://i.ibb.co/SXRKXJJ/20210105-205858.jpg" alt="20210105-205858" border="0"></a>

You should now have access to your wiring within the chassis side of the rubber boot:
<a href="https://ibb.co/dW77sB5"><img src="https://i.ibb.co/BzwwHLC/20210105-211003.jpg" alt="20210105-211003" border="0"></a>

*If your back up camera wiring is like this one, it comes in two parts; One part is directly connected to the camera and has an end that has a connector. This is the part you've been leading through the back door. The other wire the kit comes with is an extension that leads to your stereo and this is also has a leads that'll connect to your reverse light so you can active the camera.

Next, I moved on to lead the wire extension through the rubber boot that connects the chassis to the rear door.

*Caution: Removing this may cause you to break the plastic retaining fastener and you may have to use gasket sealer to secure the existing boot as you'll have a hell of a time trying to remount the OEM boot back into place.

Next, I unplugged both ends of the rubber boot and also a middle plastic retainer clip and then lead the wiring through the chassis side, through the boot, and out to the rear door side:
<a href="https://ibb.co/VW73qVk"><img src="https://i.ibb.co/nsHRLrK/20210105-232502.jpg" alt="20210105-232502" border="0"></a>

I found a hollow metal tube lying around the work area. I lead the entire wire through the tube until the connecter tip, the one that is supposed to connect to the previous wire that we were leading through the back door, was at the end of the hollow tube. I used some silicone to lube up the tube and then inserted it through the boot and pushed it through until it, and the wire connector, both pushed through the end that leads to the back door:

Hollow tube:
<a href="https://ibb.co/mJK77q5"><img src="https://i.ibb.co/v1W88P4/20210105-234435.jpg" alt="20210105-234435" border="0"></a>

Wires successfully snaked through the rubber boot:
<a href="https://ibb.co/Lg33FQT"><img src="https://i.ibb.co/1XkkgsC/20210105-234447.jpg" alt="20210105-234447" border="0"></a>

..continued
 
Last edited:
..continued:

If you have successfully guided your wiring through that boot, that next thing you have to do is to get that connector lead down through the back door until you can access it at the previous location where you lead your back up camera wires. To do this, I used a coat hanger, twist sticks, and secured the extension wire connector and lead it through the narrow tunnel until it was accessible on the other end:
<a href="https://ibb.co/frwDgJ0"><img src="https://i.ibb.co/VM4w16B/20210106-000417.jpg" alt="20210106-000417" border="0"></a>

Take the two ends and connect them together. Use some electric tape and secure them together so they won't come apart somewhere down the line. Once secured together, zip tie the wiring away from the path of the window. You will have to use your judgement and simply fasten the wire as snug as you can against the door. You can even hot glue it to parts of the door if you want to be creative. Just get it out of the way of the windows path.

(Technically, you can connect those previous unplugged connections, turn on your truck and lower the window. You'll immediately recognize where it leads and how to avoid the windows path.)

Once you've correctly set the wires, pull the wire back from the boot to remove any excess slack. Be gentle so you don't unplug the connection that you have secured fastened with electric tape:
<a href="https://ibb.co/bgHgh6J"><img src="https://i.ibb.co/BV4VDfN/20210106-000421.jpg" alt="20210106-000421" border="0"></a>

Do the same thing and remove any excess slack from the boot that is closest to the chassis. Now, you'll want to go through the reverse steps and reinstall the rubber boot. *Good luck on this part. I decided to use black gasket sealer and formed a clean-ish seal around the boot where I wasn't able to push back into the holes.

Now, you'll want to lead the reverse light wiring to the reverse light and so you'll want to remove the side trim from your interior to gain access to some existing wires that you can use as guides to zip tie your wiring in place:
<a href="https://ibb.co/0BKc6yR"><img src="https://i.ibb.co/JxqKGjw/20210106-015318.jpg" alt="20210106-015318" border="0"></a>

You can save yourself the guess work and know that the red/blue wire for a 1996 limited is the power for the reverse lights. Therefore, you don't have to lead your wiring to the actual lights and simply tap into it within the chassis as shown here. *Note: the red wire is soldered into the red/blue wire and then a protective (white) shrink wrap is covering the solder point. To the right is a black wire I lead to a new ground point I created because the existing grounds where already connected from two different connections. I zip tied the remaining wire length and fastened it to the chassis:
<a href="https://ibb.co/drRwYYv"><img src="https://i.ibb.co/9N7k550/20210106-015322.jpg" alt="20210106-015322" border="0"></a>

While the trim was exposed, I guided the wiring on the top liner until it reached the b-pilar and then guided it to the bottom where I ran it through the OEM wiring channels:
<a href="https://ibb.co/NsBMqxM"><img src="https://i.ibb.co/nbJFyrF/20210105-132132.jpg" alt="20210105-132132" border="0"></a>

From here, continue to lead it under the A-pilar, and through the front driver lower panel until you can guide it underneath the driver side panel under the steering wheel. From there, simply guide it go your aftermarket stereo of choice. In my case, a budge Android 7 inch double din did the job. My novice wiring skills at hand:
<a href="https://ibb.co/XCJN4KS"><img src="https://i.ibb.co/G5PBJ8c/20210106-062141.jpg" alt="20210106-062141" border="0"></a>

1. Google your car models stereo wiring diagram to confirm the connections.
2. Get yourself a wire harness adapter for your aftermarket stereo.
3. Purchase the right mounting brackets
4. *Install and test fit your console. In my case, I should have measured the OEM console and then chosen a stereo head that measured to spec. However, I made some small dremel adjustments to the bezel of my center console as needed and it made for a smooth OEM style fit:
<a href="https://ibb.co/8XdJ9kx"><img src="https://i.ibb.co/t3xSDR2/20210106-112700.jpg" alt="20210106-112700" border="0"></a>

I'm glad I went through the trouble to make this work as I didn't have a wireless license plate camera as those tend to look really tacky.

The camera sits well and looks like how Toyota OEM back up cameras are mounted. The budget android screen shows a good resolution, as does the camera that captures the video, and it engages as it should without fault. I'm definitely glad I invested in this mod as I know have a means to back up really close to my garage or anything else I might tow.

The camera and head unit rounded up to around 160-80 total but you could get away with doing it for just the camera if you already have a good head unit. Best of luck to you...and what did you do today?
 
Recently flushed all the trans, coolant, replaced the thermostat and radiator

Well, I just spent a good 30 mins typing up a reply and then "x" out of that tab like a nimrod so here I am again, typing out the same ol' that I just typed 30 mins ago. :keyboard:

I recently performed a transmission flush which was over due as, you'll see from the upcoming picture, the fluid looked more like dark molasses than a cherry pie red. I decided on this for maintenance concerns as the previous owner had no record of any transmission fluid fills within the last decade.

As such, I present to you the dark molasse that oozed out of my transmission lines during this flush:
<a href="https://ibb.co/r5MyvTX"><img src="https://i.ibb.co/BTjswdY/20210103-082335.jpg" alt="20210103-082335" border="0"></a>

I went through 2 gallons of new fluid, during this flush, before I began to see "red" transmission fluid re-appear on the drain hose/catch can. Once I noticed that the fluid being drained was a clear red, I called it good and filled in what I took out; I bought a cheap $8.00 12qt container at Smart and Final and modified it by making several 1/2 qt increments so I could accurately measure the drained fluid against what I needed to fill:
<a href="https://ibb.co/cydrCnQ"><img src="https://i.ibb.co/zmw47vZ/20210103-084928.jpg" alt="20210103-084928" border="0"></a>

Filling was measured using another cheap 4qt painters bucket from Home Depot. - I used an approximate 2.5 gallons of new transmission during this flush:
<a href="https://ibb.co/wBctHrp"><img src="https://i.ibb.co/CmPLdsV/20210103-082341.jpg" alt="20210103-082341" border="0"></a>

It sure beats the cost to do this yourself than to pay someone else to do what you can do with a minimal amount of tools, your time, a few buckets, and new fluids.

Drove around for a few days, checked for any leaks, and noticed smoother shifting into gears and a slightly lower transmission temp. :becky:

My next goal was to replace the green coolant which appeared to have entered the vehicle sometime in 2007 when the previous owner had a coolant leak from the radiator. At that time, the maintenance records indicated a spectra radiator and a unbranded thermostat/gasket was replaced. There was no indication of any hoses being replaced then, after, and until I purchased the Runner.

As such, I figured that this was all due soon and I'd rather get to it before it gets to me through some breakdown while I'm out on a trail or on the highway. So, I ordered new upper/lower hoses, a OEM thermostat/gasket, and a OEM radiator from Magnussen Toyota of Palo Alto:
<a href="https://ibb.co/St1wzLP"><img src="https://i.ibb.co/x1cqN4D/20210112-112152.jpg" alt="20210112-112152" border="0"></a>

First things first, I drained 2quarts of radiator fluid from the petcock. Opening up the radiator cap helps with this process. - Make sure your coolant temps are low so you don't burn yourself.

After a good 2 quarts drains out, I temporarily closed the petcock and then I removed the old upper radiator hose.

(Warning: try to have your coolant temps low so you don't scold yourself with hot fluids AND also make sure you've drained at least 2 quarts out so you don't remove the upper radiator hose while there's fluid leveled at that height!).

Once you've removed that upper radiator hose, you can use it to increase the time it takes to drain out your coolant from the system.

Now, simply go back and unfasten the petcock all the way BUT keep your fingers pressed down on the petcock to keep it in place.

With the radiator hose in your other hand hand, place one end of that old radiator hose over the petcock and the other end into the catch bucket.

Then, use your other hand let your finger go of the petcock which will come draining out of the radiator hose and into your catch bucket. Let radiator hose redirect the gushing fluid into the bucket instead of it gushing out all over your engine bay and driveway. - It saves so much time flushing the fluid this way than to let the petcock drip away for 30mins each flush interval you'll perform moving forward.

Okay, I didn't capture any photo of the said method as it required both hands to perform it as you can imagine.

After all the coolant was flushed, I removed the transmission fluid lines on the inlet/outlet of the radiator, plugged those lines to prevent transmission fluid loss, and proceeded to remove the upper/lower radiator hoses:
<a href="https://ibb.co/m9sRxMF"><img src="https://i.ibb.co/CbdwrTs/20210112-115309.jpg" alt="20210112-115309" border="0"></a>

I removed the lower radiator hose and water outlet pipe to reveal the thermostat:
<a href="https://ibb.co/PWqP65Z"><img src="https://i.ibb.co/s18NVFv/20210112-112203.jpg" alt="20210112-112203" border="0"></a>

During this process, one of the thermostat bolt studs actually came off the engine. Later on, I had no specs about this stud and it's torque rating so I ended up using the same torque spec required for the thermostat outlet pipe. Time will tell if this holds up later on.

Note: The mechanic whom previously installed the off-brand thermostat had it positioned at 12 o'clock which is the opposite of what Toyota recommends which is the 6 o'clock position.

The off-brand thermostat also has a jiggle valve that was stationed closer to the diaphragm of the thermostat than on the exterior circumference which is how the OEM thermostat was built:
<a href="https://ibb.co/yVfxmX8"><img src="https://i.ibb.co/QXbx7f6/20210112-115638.jpg" alt="20210112-115638" border="0"></a>

The OEM thermostat has a much more robust jiggle valve shown in this pic at 12 o'clock:
<a href="https://ibb.co/7nWFNtr"><img src="https://i.ibb.co/Pch8zG1/20210112-115635.jpg" alt="20210112-115635" border="0"></a>

I added a new gasket onto the OEM thermostat and installed it back onto the engine. Next, I removed the coolant overflow container and flushed that with distilled water until I was satisfied.

I took the old water outlet pipe, cleaned it's mating surfaces and replaced the lower radiator hose with a new silicone aftermarket hose:
<a href="https://ibb.co/RvFXs09"><img src="https://i.ibb.co/6nMKTPm/20210112-110437.jpg" alt="20210112-110437" border="0"></a>
<a href="https://ibb.co/PCVjwts"><img src="https://i.ibb.co/VBk9230/20210112-113955.jpg" alt="20210112-113955" border="0"></a>


I installed the new OEM radiator back in place, re-attached the transmission fluid lines, attached the lower/upper radiator hoses, and then the coolant overflow container back in place:
<a href="https://ibb.co/D8HjhcK"><img src="https://i.ibb.co/hZJTbQ8/20210112-122733.jpg" alt="20210112-122733" border="0"></a>
<a href="https://ibb.co/DVMmM0k"><img src="https://i.ibb.co/C1949Rv/20210112-124210.jpg" alt="20210112-124210" border="0"></a>

I simply went with blue since it matches my NGK plug wires and a blue oil catch can I have running through a PVC outlet tube to throttle body.

Next, I topped the radiator up using a Lisle funnel, which really helps with the process, and proceeded through approximately 8-10 gallons of distilled water until the nasty old green stuff was no more. There's just something satisfying about the color change and how you just know you're doing something good for the Runner. Money shot:
<a href="https://ibb.co/P4sWGZL"><img src="https://i.ibb.co/92m4H9D/20210112-152910.jpg" alt="20210112-152910" border="0"></a>

I flushed the last amount of distilled water out of the radiator and then began to add the Toyota Red back into the system. Note: It really helps to jack up your Runner on it's rear to help flush out the distilled water. - Then, it's helpful to later jack up the front end when you finally top it off to help remove any trapped air. - You'll want the Runner leveled when you do your final topping off however.

To top it all off, pun intended, I busted out my new OEM Toyota radiator cap and stored the aftermarket one for emergency cases:
<a href="https://ibb.co/ZLFjnnJ"><img src="https://i.ibb.co/0D67ggX/20210112-121634.jpg" alt="20210112-121634" border="0"></a>

*Now I feel much better with the idea that the Red coolant has better corrosion preventative properties than the green. Nowadays, they have Toyota and Zerex Red around enough areas that you'll probably have access to them in case of an emergency. :trophy:

*Got to remind myself to print out a maintenance worksheet and keep it in my glove box so I can see what my next intervals should be. - Do you guys use apps to keep up to date or go the old fashioned way and log it in excel or a paper print out? - Thoughts?
 
Flowermaster 50 and sound deadening mats

I'm trying out a Flowermaster 50 that I picked up from Autozone during a holiday deal; $50 for a 50.
<a href="https://ibb.co/LQzZWc2"><img src="https://i.ibb.co/vsxjGTK/20210105-162002.jpg" alt="20210105-162002" border="0"></a>

So far, I like the low end rumble it makes but the high end and highway sounds a bit overboard. I still have my old muffler and am going to see if this grows on me or if I should go back to the "nice and quiet" Toyota sound.

I figured I try some sound deadening mats to see how much it'll help with the sound. So far, it didn't change much but I haven't installed any mats in the front, console, and rear floor of the saloon. When that happens, I'll post if this stuff really works for low end sounds.
<a href="https://ibb.co/gMSr0Db"><img src="https://i.ibb.co/svKgTFp/20210119-221318.jpg" alt="20210119-221318" border="0"></a>
<a href="https://ibb.co/BN7nHKY"><img src="https://i.ibb.co/HdMhLp9/20210119-221322.jpg" alt="20210119-221322" border="0"></a>

I'm starting to feel like I should make a Build thread with all these things I've been doing lately. - I might just copy and paste all my posts into a new thread, maybe.
 
Satoshi Grill with a 2nd Gen Emblem

I've been thinking about a Satoshi grill mod but I haven't been satisfied with the larger TOYOTA emblems that tend to make the grill look over the top.

I recall the original Satoshi grill had a old school Landcruiser TOYOTA emblem which was quite smaller and looked pretty nice on the grill. However, I felt that the retro TOYOTA font looked a bit dated and the newer FJ Cruiser TOYOTA logo looked too big.

I owned a 1991 2nd Gen that had the TOYOTA name plate on the radiator grill and it gave me the idea to use that for the Satoshi Mod. I previously sold my 2nd gen so I no longer had access to the name plate but I recently found one on eBay and snagged it right up for this mod.

I personally think the hard to find 2nd gen TOYOTA name plate is the way to go if you decide to do a Satoshi Mod:

I decided to keep my chrome trim and ended up using a matte rust/silver finish for the trim area and it matched perfectly with the lower valance color:
<a href="https://ibb.co/YP78fFV"><img src="https://i.ibb.co/BcVjT5Y/20210123-091041.jpg" alt="20210123-091041" border="0"></a>

Example of a FJ Cruiser TOYOTA name plate:
3rd-Gen-4Runner-Color-Match-Satoshi-Grille.jpg


<a href="https://ibb.co/cQBDP4Z"><img src="https://i.ibb.co/rHj4gDz/20210123-091305.jpg" alt="20210123-091305" border="0"></a>

Example of a retro Landcruiser TOYOTA name plate:
7ff54d18cf9da8d6a949ff40ed651a0d.jpg


Just as anyone who does this mod, I'm very happy with the result. I especially feel that using the 2nd Gen '90-'91 TOYOTA name plate for the Satoshi Mod makes works out really well with the font size and chrome lettering that matches the grill trim:
<a href="https://ibb.co/FxSJ2pF"><img src="https://i.ibb.co/tm7cgR9/20210123-091313.jpg" alt="20210123-091313" border="0"></a>

:hatsoff:
 
SPC UCAs, Whiteline LCA bushings, TBU 231mm upgrade, 1/4" spacer driver side, Toytec.

Earlier this week, I received my SPC UCAs, Whiteline LCA bushings, and I also gathered all the parts for the Tundra brake upgrade and got really busy on Wednesday morning.

I went with SPC UCAs as it would be helpful to adjust things when I upgrade my tires in the near future. Installation was a breeze; unfasten, remove the bolt, grab new UCA and contort your hands, move some parts, and Abracadabra Alakazam! - New parts practically walked themselves back into the original space:
<a href="https://ibb.co/Pj2Tv0k"><img src="https://i.ibb.co/2hz81HJ/20210129-020527.jpg" alt="20210129-020527" border="0"></a>

The LCA were a PITA TBH! Nearly removed the rack and pinion, match marked camber dials, contort tie rods to remove the bolts. Once they come off, the real fun began:
<a href="https://ibb.co/HN4JX56"><img src="https://i.ibb.co/N1C47c5/20210129-020523.jpg" alt="20210129-020523" border="0"></a>

I used a ball joint press to pop off the inner bearing sleeve from all LCAs; Used the blowtorch method to assist with the outer bushing sleeve removal which was the real PITA. Installation of the new bushings was a breeze.
<a href="https://ibb.co/vkMysGH"><img src="https://i.ibb.co/6Fq9vxm/20210129-020510.jpg" alt="20210129-020510" border="0"></a>

I simply used a vice grip to secure the LCA while I Thor hammered the new bushings in with press sleeve and a small sledge.
<a href="https://ibb.co/TrDbk86"><img src="https://i.ibb.co/kMV9x8j/20210129-020503.jpg" alt="20210129-020503" border="0"></a>

Re-installing the LCA was a slight challenge due to the limited space to sneak in the new washers that came along with the Whiteline bushing kit but I eventually made it work. Reset the match points on the cambers, reseated the rack and pinion, and then torqued all things back to OEM spec.

Having that ordeal out of the way, I started working on the TBU and replaced the rubber line with a steel braided replacement then switched back to getting the knuckle back to it's rightful place:
<a href="https://ibb.co/TRYrZNC"><img src="https://i.ibb.co/92cGJdM/20210128-213115.jpg" alt="20210128-213115" border="0"></a>

I give the old caliper a sweet farewell and say hello to the Tundra calipers which I decided NOT to color as I felt the black looked pretty enough. I stare at it real hard and then I tell it get to where it belongs and STAY!
<a href="https://ibb.co/rp5MtZz"><img src="https://i.ibb.co/Lg96PCc/20210128-213138.jpg" alt="20210128-213138" border="0"></a>

All the hard work completed and, only after I reviewed this picture did I noice that I placed the retaining clip up-side-down:
<a href="https://ibb.co/HH4LngR"><img src="https://i.ibb.co/sVRpy3c/20210129-020535.jpg" alt="20210129-020535" border="0"></a>

Well, that was corrected and then I had the p-l-e-a-s-u-r-e of doing this procedure all over again with the driver side - yippy-kai-yay-MF's!

Just when I think it's all done, FedEx delivers my ToyTec differential drop kit which replaces the ridiculously crappy RevTek poly bushing spacers which really smush to 3/4" after 1 week of use and 1/4" spacer to correct my driver side lean.

I'll spare the details on the spacer since it's just plug and play.

But, here are some pics of the crappy poly spacer, distorted after 1 week of use, vs the aluminum spacer which should NOT have that problem.
<a href="https://ibb.co/hypDNWZ"><img src="https://i.ibb.co/yXLWCyY/20210130-105249.jpg" alt="20210130-105249" border="0"></a>
<a href="https://ibb.co/dtp0HLr"><img src="https://i.ibb.co/kJDgP9x/20210130-105246.jpg" alt="20210130-105246" border="0"></a>

Now imagine how much you'd have to pay someone if you didn't do these things yourself?

A well deserved beer ended the night in good fashion.
:cheers:
 

Members online

Forum statistics

Threads
278,307
Messages
3,554,050
Members
248,016
Latest member
Advally Service

Trending content

Back
Top