She's a Real Beaut Clark - My 88 Build

Got some interior pieces, hood latch, and cable at the junkyard today

yotalac-albums-%27ol+beauty-picture16901-img-20130223-171241.jpg
 
Ordered a few things for the Runner tonight.

Got 2 sets of these. Planning on building a roof rack and mounting these up there.
images.ashx


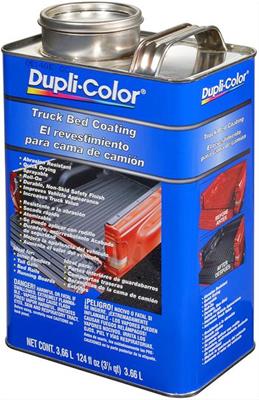
Ordered 2 gallons of this bedliner. Planning on painting the whole truck inside and out. Had it on my old S10 for a couple years. I had excellent results with it.
SHW-TRG251.jpg


In keeping with all black, picked up a set of these headlights.
$T2eC16FHJGkE9no8fyypBQ27BjD0wg~~60_12.JPG


Getting the rest of the interior parts, and 2 fenders from the junkyard this weekend. On vacation next week, so hopefully i'll get everything built/installed. Gonna try to build a rear bumper as well.
 
Been a busy week so far on the Runner. Installed all my interior pieces, new tailight lenses, projector headlights (cheapies off ebay, but my old headlights looked like candles) new marker lenses, and thank goodness i got a stereo again. The rest of today im gonna clean the interior again, and get the metal ready for bedliner. Tomorrow im gonna use the old fenders to patch some of the rust up, build a rear bumper and roof rack, and hopefully friday i can get the bedliner applied. Supposed to be warm weather. Here are the headlights. I need to go get a can of the tailight tint, and tent the marker lights and tailights.

yotalac-albums-%27ol+beauty-picture17086-projector-headlights.jpg
 
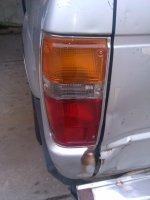
Picked up these tail light lenses off ebay for $35 shipped to my door.
IMG_20130306_161510.jpg

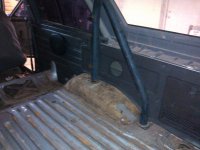
Here is the interior pieces i put in. All the remaining exposed metal is gonna be covered in bedliner.
IMG_20130306_135734.jpg

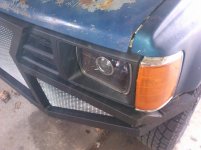
Got these marker lights locally from a guy. Also picked up a set of fenders and put em on yesterday.
IMG_20130306_161527.jpg
 

Attachments

  • IMG_20130306_161510.jpg
    IMG_20130306_161510.jpg
    124.1 KB · Views: 595
  • IMG_20130306_135734.jpg
    IMG_20130306_135734.jpg
    140.2 KB · Views: 661
  • IMG_20130306_161527.jpg
    IMG_20130306_161527.jpg
    134 KB · Views: 702
Are you sure? Maybe the angles of the pictures make it look lower than it is. The lowest bar in the center is about 1/4" above the very front perforated crossmember. For example, if I didnt have any bumper period, my approach angle should be the exact same as it is now. Am I missing something? I'm not trying to disagree, maybe theres something im not factoring in. Thanks for the heads up though!

It sure looks low in the pics. You're the one with eyeballs on it, if you're happy then it's good!
 
Nice 4Runner
A great spot to wheel and camp is called Dirty Turtle in KY.
Its about 2 hours away from you.

The Dirty Turtle eh......sounds like my kinda place!! I'm gonna have to check this out. Building a roof rack as we speak to haul camping gear, might have an excuse for some R&D now :cool:
 
Got started on the roof rack yesterday, althought a little late in the afternoon. Been under the weather most of the week, so I havent been as productive as i'd like. But anyways, here's what i've got so far. I've got some 1/4" rod to make a cage type bottom to hold my camping supplies. The long drop bar is for the lights to mount to. I've got a rubber bushing to put in between the body and the bar, just to ensure it doesnt slam when im runnin the trails. It's not the prettiest, but it should work. I dont think im gonna put sides or a back on it. Just gonna make a bunch of hoops so i'll be able to attach ratchet straps or bungees. I am hoping i've got enough steel to make a cage for the lights. I'll post some more pics this afternoon. My helper springs for miss saggy fat bottom should be here tomorrow.

yotalac-albums-%27ol+beauty-picture17124-roof-rack-light-bar.jpg


yotalac-albums-%27ol+beauty-picture17123-roof-rack-light-bar.jpg
 
Got the roof rack all fabbed up. A little grinding, some paint, and I cant mount the lights! 5 Forward facing, 1 Rear.

yotalac-albums-%27ol+beauty-picture17126-light-bar-cage.jpg
 
Finally finished the roof rack / light bar. Got it painted and the lights mounted. I'm waiting to wire it up until sunday. I'm planning on putting the bedliner on tomorrow, dont wanna have to wire it twice. Here's a couple pics

yotalac-albums-%27ol+beauty-picture17132-she-s-almost-ready.jpg


yotalac-albums-%27ol+beauty-picture17131-roof-rack-headlights-fenders-completed.jpg
 
Cut the rust out today. 6 spots total. 4 small spots over the rear fenders, 2 very large spots in front of the rear fenders. These trim pieces seem to be the culprits. Here's a few pics of what im working on. Got the biggest spot crudely patched. Gonna patch the other big spot and the 4 small ones later on tonight. Also go some 16 gauge sheet to fix the floor pan spot on the drivers side. Hopefully i'll get it finished tonight.

yotalac-albums-%27ol+beauty-picture17163-rust-repair.jpg


yotalac-albums-%27ol+beauty-picture17162-little-rust-repair.jpg
 
Hahaha you dont wanna see details from me! I'm about 60% sure about how im supposed to do it. Subtract the fact that I don't have any of the proper tools and i'm giving this a 20% chance of success. I dont have any of the little clamps that hold the steel repair panels in place, i've just got a welder and a screwdriver :trophy: The 2 big holes i'm just gonna wing it. I can't make complex bends and curves, i just cut it a little big, trimmed, and welded it. Honestly it looks like shit, but its strong enough to cover the hole and offer support to the body. I bought some fiberglass and resin to cover it and completely weatherproof it. The big patch on the other side, is gonna get wire mesh and fiberglass over it. The smaller patches, i cut them out bigger than the rust and somewhat square, that way the piece would stay together and I can use it as a template. Those will be simple. I'll post up some pictures this evening once im finished.

 
Hey whats goin on. Been awhile since I posted on here. Been out keepin the roads warm and the trails sloppy! Head gasket blew a few weeks back. 217K. Replaced the gasket, did a valve job and all that jazz. Runs like a sewing machine again. When I was in there, I could tell where someone had replaced the timing chain. Saw the apparent wear marks wear marks from the previous chain. It was a boatload of fun, took forever to get the air out of the cooling system, but I have no issues now. Runs cool as a fan. Also got around to building a bikini top. Has some 1"x2"s laying around and some thick plastic, so I gave myself a little rain protection. Also got around to wiring the switches for the lights. Its amazing how bright these things are at night. I could see the nuts on a squirell 300 yards out in pitch black. Here are a few pictures.

1150189_10201324116778097_1124822704_n.jpg


The red switch is the ******* switch. I get someone tailgating me and bright lighting me, they get a little piece of sunshine :hello:
1186034_10201324122298235_1304417656_n.jpg
 
The red switch is the ******* switch. I get someone tailgating me and bright lighting me, they get a little piece of sunshine :hello:
1186034_10201324122298235_1304417656_n.jpg


I love your idea for the red switch. Just hope you don't do it to a cop!

It looks like you may want to do some work to your floor panels so you don't fall through.
 
Your not kidding about the floor board! Although to be honest, it was a life saver after changing my head gasket. Had alot of air in the cooling system, and each time a large bubble would work its way out, it would force a decent amount of coolant out of the overflow tank, then with the lack of coolant in the system, the motor would get hot. Those holes in the floorboard are in the perfect position to catch the water coming out of the overflow. Everytime water would start coming in there, i'd pull over, let it cool, and add coolant. Kept it from getting hot :p But I really do need to do something. I'll probably cut it out and fab something very basic to replace it with, then fiberglass for good measure. Got a few University of Tennessee flags to cover the top with. If it'll quit raining, im gonna put those over the plastic. I really need to take my 4wd shifter out and try to get it back in right. When my transfer case and transmission seperated at 3am on the interstate, i didnt get it back in quite right, and its bound up I reckon. Added a couple 1"x2"s so I could haul my canoe around. Built that bad boy outa plywood. Absolutely love this truck.

1146604_10201328267521863_1368988548_n.jpg
 

Members online

Forum statistics

Threads
278,316
Messages
3,554,121
Members
248,016
Latest member
Advally Service

Trending content

Back
Top