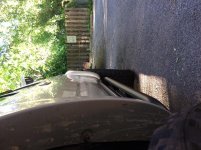
Shrockworks bolt-on slider install

jmferg

New member
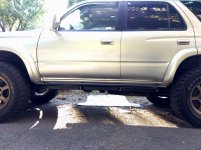
Shrockworks bolt-on slider install.

A couple install notes.
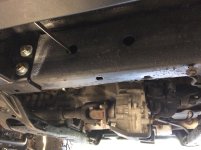
The drivers side has clearance issue around the gas tank skid mounting tab as well as the the plastic fuel line cover.
The plastic cover will be notched and re-installed.
Do the drivers side first. The passenger has all the room to adjust where you mount so this way they match. The driver's side is about 3/8" farther forward because I didn't do this.
8 total holes have to be drilled to install. There are NO existing holes in the frame to utilize contrary to other write-ups.
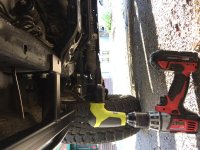
You need a right angle drill to drill the upper holes.
See the picture of the setup I used with a ryobi right angle attachment.

My frame has been undercoated and fluid filmed which made it difficult to mark the holes.
1. I spray painted the general location of the mounting holes with silver paint to make the marks stand out.
2. Raise the slider into the general location with a floor jack. There is a driver and passenger side as indicated on the frame plate of each
3. Measure and step back to make sure it is located where you want it. Clamp the L-shaped frame plates snug against the frame rails and mark mounting holes.
4. Center punch holes and start with a small pilot drill bit. Use a step drill bit to drill the holes out to 9/16". The bolts are 1/2" but the extra 1/16" will help to line things up accounting for any error.
5. Paint the drilled surface to prevent rusting.
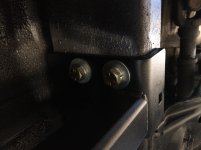
6. Raise slider back up with floor jack and install bolts and stick nuts. There wasn't a torque spec on the instructions but I went to 85 ft/lb without much issue. Use a pair of vise grips to hold the stick nut end.

I ordered the 2 tube support, angled up with their textured powdercoat. The powdercoat job and the welds look excellent.
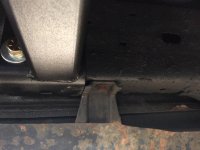
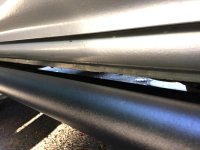
There is roughly 3/8" clearance between the main tube and the pinch weld.
The directions show installing 1 bolt through the side of the frame and 1 through the bottom. My plates don't match the picture as the bottom hole is square and oversized. I installed all 8 bolts through the side and will be reaching out to shrockworks for an answer.
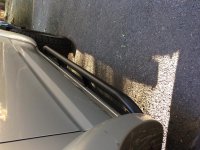
this is probably the tightest tucked factory built slider I've seen for a 3rd gen.
The standard length allows coverage from flare to flare.
Overall I am happy and tested with the obligatory jack stand lift and it supported weight and the truck with no deflection. (+10 Overland poser points).
 

Attachments

  • IMG_4357.jpg
    IMG_4357.jpg
    130.4 KB · Views: 2,076
  • IMG_4356.jpg
    IMG_4356.jpg
    136.3 KB · Views: 2,067
  • IMG_4358.jpg
    IMG_4358.jpg
    137.3 KB · Views: 2,048
  • IMG_4359.jpg
    IMG_4359.jpg
    137.2 KB · Views: 2,809
  • IMG_4360.jpg
    IMG_4360.jpg
    131.6 KB · Views: 2,058
  • IMG_4361.jpg
    IMG_4361.jpg
    133.4 KB · Views: 2,131
  • IMG_4362.jpg
    IMG_4362.jpg
    137.7 KB · Views: 2,021
  • IMG_4363.jpg
    IMG_4363.jpg
    128.2 KB · Views: 2,047
Register to hide this ad
Shrockworks bolt-on slider install.

A couple install notes.
The drivers side has clearance issue around the gas tank skid mounting tab as well as the the plastic fuel line cover.
The plastic cover will be notched and re-installed.
Do the drivers side first. The passenger has all the room to adjust where you mount so this way they match. The driver's side is about 3/8" farther forward because I didn't do this.
8 total holes have to be drilled to install. There are NO existing holes in the frame to utilize contrary to other write-ups.
You need a right angle drill to drill the upper holes.
See the picture of the setup I used with a ryobi right angle attachment.

My frame has been undercoated and fluid filmed which made it difficult to mark the holes.
1. I spray painted the general location of the mounting holes with silver paint to make the marks stand out.
2. Raise the slider into the general location with a floor jack. There is a driver and passenger side as indicated on the frame plate of each
3. Measure and step back to make sure it is located where you want it. Clamp the L-shaped frame plates snug against the frame rails and mark mounting holes.
4. Center punch holes and start with a small pilot drill bit. Use a step drill bit to drill the holes out to 9/16". The bolts are 1/2" but the extra 1/16" will help to line things up accounting for any error.
5. Paint the drilled surface to prevent rusting.
6. Raise slider back up with floor jack and install bolts and stick nuts. There wasn't a torque spec on the instructions but I went to 85 ft/lb without much issue. Use a pair of vise grips to hold the stick nut end.

I ordered the 2 tube support, angled up with their textured powdercoat. The powdercoat job and the welds look excellent.
There is roughly 3/8" clearance between the main tube and the pinch weld.
The directions show installing 1 bolt through the side of the frame and 1 through the bottom. My plates don't match the picture as the bottom hole is square and oversized. I installed all 8 bolts through the side and will be reaching out to shrockworks for an answer.
this is probably the tightest tucked factory built slider I've seen for a 3rd gen.
The standard length allows coverage from flare to flare.
Overall I am happy and tested with the obligatory jack stand lift and it supported weight and the truck with no deflection. (+10 Overland poser points).

That is great info

I did not know they even made bolt on. Was under the impression everything was weld on. I really want some sliders but I don’t want to weld them onto my frame. Hmm thanks for posting
 
I have been running the Schrockworks sliders for almost three years now. Great piece of armor and I have only managed to dent them by doing some pretty stupid stuff. I am glad they were there though otherwise my rig would be pretty damaged.
 
Interesting

I assume the bolts go all the way through the frame, but are there any sleeves to keep the boxed and hollow frame from collapsing while tightening the bolts?

Can you post the instructions that came with the sliders?
 
Interesting

I assume the bolts go all the way through the frame, but are there any sleeves to keep the boxed and hollow frame from collapsing while tightening the bolts?

The bolts don't go all the way through, Shrockworks provides "stick nuts" (nuts with long metal tabs welded on that you can maneuver into to position through factory access holes in the frame, you can see a few of these sticking out in the photos provided by the op)

I have the same sliders on mine with the extra middle support tube option, love them, great quality stuff from Shrockworks. (Also have both their bumpers, rear with swing out tire carrier and jerry can bracket)
 
The bolts don't go all the way through, Shrockworks provides "stick nuts" (nuts with long metal tabs welded on that you can maneuver into to position through factory access holes in the frame, you can see a few of these sticking out in the photos provided by the op)

I have the same sliders on mine with the extra middle support tube option, love them, great quality stuff from Shrockworks. (Also have both their bumpers, rear with swing out tire carrier and jerry can bracket)

Thanks!
And now the wheels are turning in me little head

I assume these are serrated flange nuts and you tighten the bolts from the outside? Also, is any loctite involved?
 
Thanks!
And now the wheels are turning in me little head

I assume these are serrated flange nuts and you tighten the bolts from the outside? Also, is any loctite involved?

They are just regular nuts, the welded on sticks do provide a bit of a flange, didn't use loctite on mine, tighten from the outside with washer and lock-washer, (shown in op pictures). Shrockworks includes highest quality (grade 8) nuts & bolts, just cranked them real tight on mine and not had a problem after many miles on tooth rattlin roads.
 
Got my running boards removed + my shrockworks sliders arrived.
dropped them off to get Line-X 'd :)

PICS HERE

I think the running boards saved my rockers, i don't see too much rust.
Actually getting my truck undercoated professionally with POR15 then sprayed with a gallon of FluidFilm...yea it's probably too early since its around spring but oh well, will just get it resprayed with FF again in the fall.

PM me if anyone wants running boards, idk whether to keep or just throw them away. They're in great shape but I don't really see myself putting them back on


Thanks for the install steps and pics. I hope this helps my mechanic install it in a week or so. Will post pics once I have them installed.
 
I've been eyeing them for the bolt-on aspect. How long was delivery from order?

I ordered from the Group Buy on 11/20/2019 and received it on my porch on 3/6/2020 so about 4 months. But I think Shrockworks is like 2 months minimum depending on how busy they are.

I thought I'd get mine at the 3 month mark because it was just bare steel not powder coated but I guess due to the holidays it may have delayed production.
 
Thread bump - is everyone still happy with their Shrockworks sliders?

Have any other bolt-ons appeared that people like? I'm more comfortable drilling my frame myself than having a 'friend' weld for me.
 
Have any other bolt-ons appeared that people like? I'm more comfortable drilling my frame myself than having a 'friend' weld for me.
Haha... I did exactly the opposite. I like the look/style of the Shrockworks sliders with treadplates and I wanted them welded... and had a friend do it. :frog:

AIxBhjOh.jpg


-Charlie
 
Thanks for posting this thread with the detailed install instructions and tips! I plan on installing mine this weekend as they have finally arrived.

Just curious if you got a hold of Shrockworks on the 2 bolts through the side (rather than side and bottom.)
 
Thanks for posting this thread with the detailed install instructions and tips! I plan on installing mine this weekend as they have finally arrived.

Just curious if you got a hold of Shrockworks on the 2 bolts through the side (rather than side and bottom.)

Cool - please post any install pix or insights here. What was the order > arrival time?
 
Last edited:

Members online

Forum statistics

Threads
278,314
Messages
3,554,095
Members
248,016
Latest member
Advally Service

Trending content

Back
Top