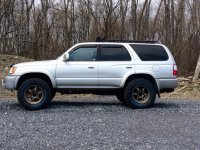
Silver Supra's build thread

Hey there.

Loving all the maintenance and clean up work you are doing to the runner.

Maybe I missed it but where did you get the seat bottom covers? I really need to redo mine front and back. They are getting pretty hard and the drivers side has seen better days like yours. :thumb3:
 
Hey there.

Loving all the maintenance and clean up work you are doing to the runner.

Maybe I missed it but where did you get the seat bottom covers? I really need to redo mine front and back. They are getting pretty hard and the drivers side has seen better days like yours. :thumb3:

I got them from ebay -

https://www.ebay.com/itm/1996-1997-...e=STRK:MEBIDX:IT&_trksid=p2060353.m2749.l2649

I'm REALLY impressed with the quality. The install was pretty easy too (if you have your own @silvrsuprasub to do the work :cheers:), while it's apart put some seat heaters in it!

Thanks.
 
Thanks for the input. I will definitely have to consider the heated seats as well.

Looks like front and rear will get pricey.... Might need to save up a while before I can take care of the whole truck but the fronts might be able to get taken care of now.

How are you liking the seat heaters and where did you mount the on off switch? Did you order Qty 2 of the Dorman kits so you had back and bottom on each seat?

EDIT: Also looks like there is a low and high setting for the heaters. :yo:
 
Last edited:
Thanks for the input. I will definitely have to consider the heated seats as well.

Looks like front and rear will get pricey.... Might need to save up a while before I can take care of the whole truck but the fronts might be able to get taken care of now.

How are you liking the seat heaters and where did you mount the on off switch? Did you order Qty 2 of the Dorman kits so you had back and bottom on each seat?

EDIT: Also looks like there is a low and high setting for the heaters. :yo:

Love the Dorman seat heaters. You need two kits, one for each seat. Each kit comes with an element for the bottom and for the back. Yes, there is a high and low setting - they get nice and toasty.

I mounted the switches in the center console in front of the shifter. I'll post pics tomorrow... it took me FOREVER to decide where I wanted to put them, but I'm really happy with where I put them.

Yes to do the seat bottoms and backs it gets pricey which is why I only did the bottoms. Mine were trashed, esp the drivers bottom...

large.jpg
 
Love the Dorman seat heaters. You need two kits, one for each seat. Each kit comes with an element for the bottom and for the back. Yes, there is a high and low setting - they get nice and toasty.

I mounted the switches in the center console in front of the shifter. I'll post pics tomorrow... it took me FOREVER to decide where I wanted to put them, but I'm really happy with where I put them.

Yes to do the seat bottoms and backs it gets pricey which is why I only did the bottoms. Mine were trashed, esp the drivers bottom...

large.jpg

So I guess my next question is that if you only bought the bases, did you pull the back covers to install the heaters?
 
So I guess my next question is that if you only bought the bases, did you pull the back covers to install the heaters?

I just bought new leather and installed it over the old foam base. Yes, you insert the heating elements between the leather and the foam.

Here is where I put the switches.

large.jpg
 
[MENTION=212429]Silver Supra[/MENTION], he meant the back vs the seat; did you pull the leather off the back to install the heaters.

Ah... I mis-understood.

You don't have to fully remove it, just open it up and slide it up between the leather and the setback foam. The OEM leather has a long clip at the bottom of the seat back that holds the front and rear leather together.

Here is the seam/clip I was talking about. I would HIGHLY recommend you pull the seat back off the seat frame.

large.jpg


Here is the seam opened up

medium800.jpg


The space between the foam and the leather. It's easy to slide the heater element in once you open it up.

medium800.jpg
 
Last edited:
After talking to Steve at Sonoran Steel, I was confident in his 1.2 kit would give me what I was looking for. He was very very helpful and quick to turn around this kit for me. Very pleased so far with Sonoran Steel!

large.jpg
 
A small but important update. My original drivers seat lumbar had stopped working so I took it apart to see if I could get it going again.

I pulled the small pump and air bladder and when connected directly to 12V everything worked correctly. The switch, not so much. After scouring the web I found the company that sold the kit to Toyota dealers, at least in the southeast.

Car, Truck and SUV Lumbar Support System by Rostra

After a few calls to get the switch PN I was able to find it on Summit Racing for a LOT cheaper than what I was originally quoted. Sure enough, the new switch fixed the problem and I now have a proper working lumbar system again.

I'm also planning on installing the SS 1.2 kit this weekend and really excited about that. Planning to swap the wheels and tires (285/75-17 M/T's) from my Tacoma for an upcoming beach trip, then eventually upgrading the tires on the 4Runner.
 
Freeman Park(ing Lot)? I used to cut class and go hang out down there when it was just the North End.


...I miss the beach.
 
This weekend me and [MENTION=213580]SlvrSupraSub[/MENTION] finally got around to installing the SS1.2 lift.

Here she is working on the front suspension.

large.jpg


large.jpg


Out with the old, in with the new.

large.jpg


All buttoned up

large.jpg


large.jpg


I didn't take any pics of the rear suspension because I was too busy cursing and fighting the rear shocks trying to get the damn nut off the top, but we finally got them.

The SS kit was awesome and included everything we needed. Great instructions and Steve was ALWAYS available via email to answer questions for me, even on the 4th of July. I hated to bug him on a holiday but I really wanted to get it installed. Thanks Steve!!

Here is the finished product.

large.jpg


Look at that drivers smile! :biggrin2: She loves the stance of the new setup - so do I.

large.jpg


And here is [MENTION=213580]SlvrSupraSub[/MENTION] cleaning the tub, just because. :) :usa2:

large.jpg


Overall I'm SUPER happy with the lift and now need to fill those wheel wells with some bigger rubber. I can highly recommend the SS1.2 if you are like me and wanted a complete kit designed to really work together.
 
This weekend me and [MENTION=213580]SlvrSupraSub[/MENTION] finally got around to installing the SS1.2 lift.

Here she is working on the front suspension.

large.jpg


large.jpg


Out with the old, in with the new.

large.jpg


All buttoned up

large.jpg


large.jpg


I didn't take any pics of the rear suspension because I was too busy cursing and fighting the rear shocks trying to get the damn nut off the top, but we finally got them.

The SS kit was awesome and included everything we needed. Great instructions and Steve was ALWAYS available via email to answer questions for me, even on the 4th of July. I hated to bug him on a holiday but I really wanted to get it installed. Thanks Steve!!

Here is the finished product.

large.jpg


Look at that drivers smile! :biggrin2: She loves the stance of the new setup - so do I.

large.jpg


And here is [MENTION=213580]SlvrSupraSub[/MENTION] cleaning the tub, just because. :) :usa2:

large.jpg


Overall I'm SUPER happy with the lift and now need to fill those wheel wells with some bigger rubber. I can highly recommend the SS1.2 if you are like me and wanted a complete kit designed to really work together.

Can you get me a measurement from the center of the hub to the top of the fender on the rear?
I am really debating the SS 1.2 rear lift but am afraid it'll be too tall for my 265/70/17s. My OME 890s are in sad shape
 

Attachments

  • IMG_4136.jpg
    IMG_4136.jpg
    140.3 KB · Views: 662
Can you get me a measurement from the center of the hub to the top of the fender on the rear?
I am really debating the SS 1.2 rear lift but am afraid it'll be too tall for my 265/70/17s. My OME 890s are in sad shape

[MENTION=147200]jmferg[/MENTION] - No problem, I will measure it this evening for you.
 
[MENTION=147200]jmferg[/MENTION] - No problem, I will measure it this evening for you.

Thank you!
Love the simplicity of the build. Clean mods that look like they belong are a lost thing in an automotive world of over-the-top catalog shopping with a visa.
Good choice the on FN wheels.
What's your impressions of the ride characteristics of the 1.2-specifically the rear?
 
Thank you!
Love the simplicity of the build. Clean mods that look like they belong are a lost thing in an automotive world of over-the-top catalog shopping with a visa.
Good choice the on FN wheels.
What's your impressions of the ride characteristics of the 1.2-specifically the rear?


I measured 23.75" from center of hub to bottom of fender in the rear.

I really like how it rides. It's not as smooth as my King setup on my Tacoma but I knew that and overall would absolutely buy the SS1.2 kit again.
 
Me and [MENTION=213580]SlvrSupraSub[/MENTION] finished installing the Curt roof rack this evening. We still have a few things to tidy up (paint, front supports, etc) and need to mount the ARB 2000 awning as well.

We followed this thread (http://www.toyota-4runner.org/3rd-gen-t4rs/224557-inexpensive-full-length-roof-rack-curt-rack.html) for the most part but ended up changing a few things. We added an aluminum L bracket on top of the square tubing and ran bolts horizontally into the Curt rack. It made for an easier install and is REALLY secure.

Here are a few pics of it... I'll add more tomorrow. Overall, we're very happy how it turned out and should be sturdy enough to hold lots of our camping stuff.

L bracket shown here:

large.jpg


xlarge.jpg


large.jpg


large.jpg
 

Members online

Forum statistics

Threads
278,307
Messages
3,554,053
Members
248,016
Latest member
Advally Service

Trending content

Back
Top