Skids Custom Audio Install

Skidmarcx

New member
I'm finally able to get going on my custom audio upgrade! I will be installing an active 2-way front stage using the factory HU (non JBL), I will be documenting everything from installing the power cables to tuning the system, I hope to provide valuable information for other members that are eager to do their own install as well, not that I'm against the complete PnP systems, but they aren't as good ;) here's my list of components...

Core components:
- Audio Control D-6.1200
- Audiofrog GS690
- Audiofrog GB15
- JL Audio 10W0v3 in a slot ported enclosure
- Dynamat Xtreme and DynaLiner

Installation/Accessories:
- Audio Control AC-BT24 BlueTooth adapter
- Audio Control ACR-3 remote level controller
- Audio Control SA-4100i calibrated microphone
- Crutchfield CK4 amplifier 4ga OFC power install kit
- InstallGear 16ga OFC speaker wire
- Various wire sleeve, cloth tape, cable ties
- 47uf 100V non polarized capacitors for tweeters
- Road Kill speaker ring kit
- Metra ‘in radio’ harness
- 1” HDPE for speaker adapters
- Toyota dash speaker adapters

I should start seeing equipment by Friday and I plan on at least getting started with running the power cable and doing sound deadening in the front doors this weekend.

A major concern of mine is how I'll deal with the factory HU as I'd much rather leave that intact because it does everything I need, luckily the D-6.1200 has an integrated Digital Sound Processor that can perform input summing... for those that aren't familiar with this it basically takes multiple signals and combines them into one removing any 'eq' effects... so I can take the front and rear speaker channels and run them through the high level inputs of the DSP, combine and clean the signal, then use that signal to process and tune for the amplifier... additionally, the AccuBASS function can be used to correct any bass roll off as volume increases. I'll be running each driver actively using individual channels, so I'll be using capacitors inline with the tweeters for protection (not trying to smoke a set of $400 tweeters). The subwoofer will get a bridged set of channels for 400w RMS which will be plenty. As for tuning I got the Audio Control calibrated microphone that is compatible with iOS devices, so I can plug it into my iPhone and use the mobile tuning app to run an RTA (Real Time Analyzer) and set my time delay, crossovers, and left/right EQ. Sounds good on paper, we shall see

I'll be posting updates with pictures as I move along and any feedback will be appreciated (good or bad)... this is not my first rodeo, but it will be the most complex for me as I've never tuned a DSP before, so I'm excited! Thanks for staying tuned :)

Initial time delay and EQ settings on page 3
 
Last edited:
Register to hide this ad
Good luck with the install! I have Audiofrog GB10 in the tweeter spot and GB60 in the doors. Did you go GS690 for price? If not I highly recommend the GB60.
 
Good luck with the install! I have Audiofrog GB10 in the tweeter spot and GB60 in the doors. Did you go GS690 for price? If not I highly recommend the GB60.

I did go that route do to budget, I was originally going to use a JL VX800/8i amp as well, but it was getting up there in cost... i REALLY wanted the GB60, but we’ll see how the GS690 performs I’ve read that it’s no slouch
 
You can snag both Metra harnesses off of Amazon and make your own T-harness for $30...might be waiting a while for the TT one to ship. Some 9-wire would be a good call if you go this route also.

Good luck on this route...I replaced all my speakers and really thought about a VX700/5 with the OEM headunit...but still no CarPlay type functionality. I decided to go the T9 headunit route instead with a lot of sound deadening. I am running my Focal flax off the headunit for now and it sounds great with lots of DSP control/equalizer in the headunit.

BUT I saw another guy running a D-4.800 plus a sub amp directly controlled from the T9. So just imagine the USB connection direct from the amp to the headunit that also runs the android app. This allows complete control of your DSP settings without using a laptop. Very slick setup and the same can be done with the JL VX amps.

I thought about the Metra harnesses, but I also ordered the speaker plates, they look beefy and would save me time on fabricating them myself, we’ll see I’m still trying to get an answer from them... what you’re saying about the T9 does sound appealing that would be amazing, my budget has a lot to do with my decisions at this point, luckily upgrading in the future would be easy
 
Slight change of plan since Tacotunes is currently moving into a new building they are not shipping orders right now, so I ordered the Metra harness for the radio and I’ll be building my own speaker adapters (should be fun lol), I did start doing some sound deadening today using Dynamat Xtreme and DynaLiner, typically I use Second Skin products, but I got a good deal on Dynamat, so we’ll see how this goes

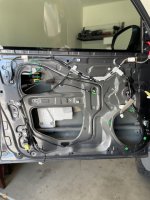
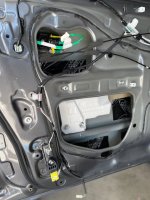
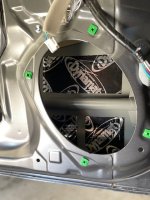
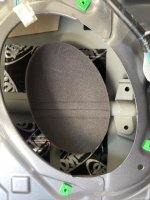
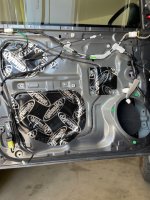
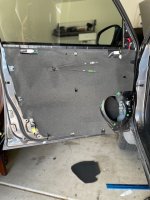
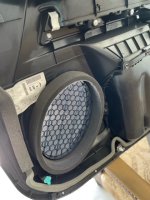
Started with removing the moisture barrier, next cleaned all the surface areas with multi surface cleaner followed by acetone, then applied just enough Dynamat Xtreme to deaden the panels, then covered the open holes... I’m sure I’ll receive some criticism as I didn’t use MLV to cover the open holes, but I just don’t like all the added weight... next inserted the foam back wave diffusers, I had to trim around the crash bar, but it was an easy task... finally trimming a piece of 1/4” DynaLiner to cover the door, admittedly I prefer the Second Skin overkill it just seems more dense... next I’ll be fabricating the speaker adapters, I’ll keep the pics coming
 

Attachments

  • DB21C05F-3365-42BF-8F0D-8BF3411CB60B.jpeg
    DB21C05F-3365-42BF-8F0D-8BF3411CB60B.jpeg
    93.2 KB · Views: 1,604
  • 381019DB-F10B-4592-90B5-D585DAC4FD73.jpeg
    381019DB-F10B-4592-90B5-D585DAC4FD73.jpeg
    100.8 KB · Views: 1,610
  • 87AFF58B-6FE5-483D-9752-9FAD1E74432A.jpeg
    87AFF58B-6FE5-483D-9752-9FAD1E74432A.jpeg
    100.1 KB · Views: 1,526
  • D785B719-D7B7-4BC4-B7FD-D21FC177590C.jpeg
    D785B719-D7B7-4BC4-B7FD-D21FC177590C.jpeg
    93.9 KB · Views: 1,628
  • 3FB7332C-92EA-4599-807D-122678BDB219.jpeg
    3FB7332C-92EA-4599-807D-122678BDB219.jpeg
    113.6 KB · Views: 1,695
  • B020AEC2-900D-4AFD-8671-FFD1EA1B73EA.jpeg
    B020AEC2-900D-4AFD-8671-FFD1EA1B73EA.jpeg
    100.7 KB · Views: 1,643
Last edited:
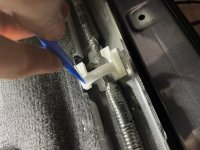
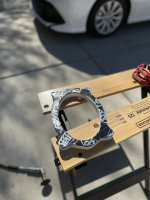
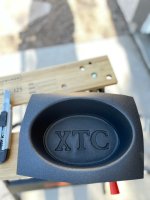
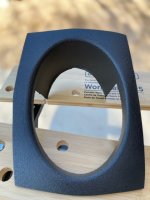
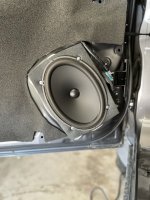
Got quite a bit done today starting with finishing the speaker adapters, I ended you using 1” HDPE which is fairly easy to work with... now mind you I’m no carpenter, so I did the best I could with a jigsaw, bring out the flamethrowers . I used Dynamat on the backside of the adapter plate to serve as a gasket, I also bought XTC baffles for the purpose of a little overhead moisture protection, just used a blade to trim them and you’ve got a cheap umbrella.
 

Attachments

  • 5697A7DB-FABA-4989-A531-2B368016B168.jpeg
    5697A7DB-FABA-4989-A531-2B368016B168.jpeg
    79.1 KB · Views: 1,529
  • 5D2E12CA-3DDB-46AB-B98F-62595161E3A3.jpeg
    5D2E12CA-3DDB-46AB-B98F-62595161E3A3.jpeg
    83.2 KB · Views: 1,479
  • 634539EA-B060-44E4-8887-B4C291ACDAE8.jpeg
    634539EA-B060-44E4-8887-B4C291ACDAE8.jpeg
    95 KB · Views: 1,495
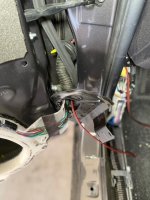
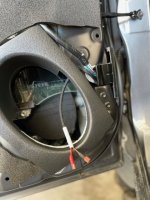
Got wires ran into the doors using the trusty coat hanger to fish em through the door boot, this was rather easy in comparison to other vehicles, the boot comes loose quite easily from the door jamb with some manipulation, then unbolt the two 10mm bits from the door where it attaches, using care you can also unclip the door seal from the inside using some needle nose pliers to gain some room to work... final result is a happy frog a finishing touch I thought I’d try is attaching the foam rings from my Road Kill kit to the inside of the door panels since it fits perfectly around the plastic baffle, I’ll just need to spend some time fitting them once the panels go back on, this should ensure all sound comes out with no wave cancellation.
 

Attachments

  • D348C042-DBDB-44BF-8C1B-4B99C6A0A350.jpeg
    D348C042-DBDB-44BF-8C1B-4B99C6A0A350.jpeg
    110 KB · Views: 1,504
  • DCEB40F7-2FA9-4216-AC48-7E3A5D6FB010.jpeg
    DCEB40F7-2FA9-4216-AC48-7E3A5D6FB010.jpeg
    123 KB · Views: 1,565
  • 9F943BF7-299C-4B63-A632-009E0A65FE79.jpeg
    9F943BF7-299C-4B63-A632-009E0A65FE79.jpeg
    126.5 KB · Views: 1,801
  • DC6EFBE4-06B7-4F97-BBD6-028EFB302589.jpeg
    DC6EFBE4-06B7-4F97-BBD6-028EFB302589.jpeg
    118.1 KB · Views: 1,540
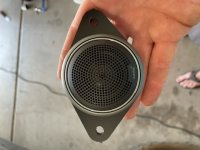
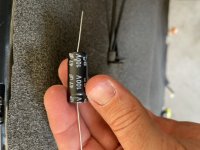
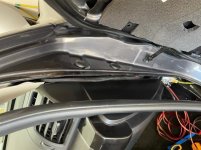
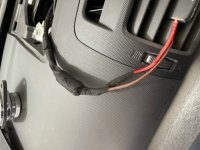
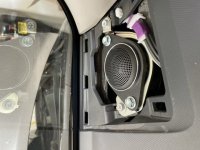
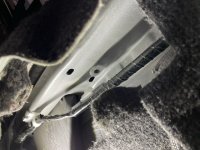
Next I worked on the tweeters, I purchased a set of Toyota dash speaker adapters from Amazon to mount the tweeter, they’re not the greatest quality, but inexpensive and easy to work with, I ended up removing the gray trim ring from the tweeter because believe it or not it’s a tight fit with the factory grille... I took a noninvasive approach and ran the wires up the channel on the A-pillar, just pull the weatherstrip back and work the wire in before reinstalling the weatherstrip... since I’m running an active crossover I used a 47uf 100V non polarized capacitor inline for protection, just connect it in series on the (+) wire, this will filter out lower frequencies and erroneous signals and prevent tweeter blow outs... end result is another happy frog

Sorry for the sideways photo
 

Attachments

  • 4D9157DD-688A-406E-B92D-2E1CCAAB9E99.jpeg
    4D9157DD-688A-406E-B92D-2E1CCAAB9E99.jpeg
    85 KB · Views: 1,458
  • 6122B518-1FFD-488B-88D9-4F68E45A7AE4.jpeg
    6122B518-1FFD-488B-88D9-4F68E45A7AE4.jpeg
    101.8 KB · Views: 1,500
  • 260F894A-0444-4480-B56D-3D3F8750B7F4.jpg
    260F894A-0444-4480-B56D-3D3F8750B7F4.jpg
    51.9 KB · Views: 1,408
  • 3DD8E8D2-1237-4A74-B651-FDAED442BB92.jpeg
    3DD8E8D2-1237-4A74-B651-FDAED442BB92.jpeg
    131.9 KB · Views: 1,549
  • 45EA7CB4-90A7-4E94-8EE8-5A5ABDE6945A.jpeg
    45EA7CB4-90A7-4E94-8EE8-5A5ABDE6945A.jpeg
    106.6 KB · Views: 1,594
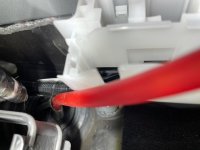
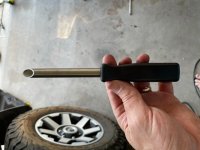
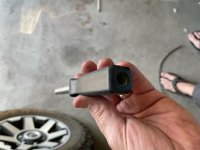
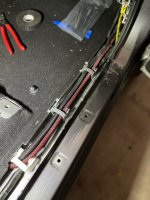
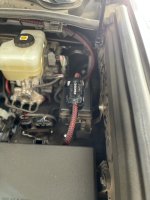
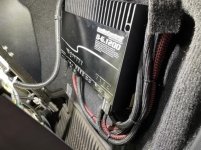
Last thing I did tonight is run the power wire for the amplifier/DSP, I chose to mount it under the passenger seat due to having more room in the rocker channel compared to the driver side, the firewall grommet on the passenger side provides easy access, fortunately I have a handy wire installation tool that fits 4ga wire, just insert it through the grommet and run your wire through, the rocker channel has harness clips that I used to keep things clean, just use a pry tool or pocket pry bar and pop the clip, the carpet can be unclipped the same way to give more room to work.

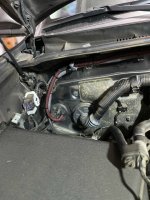
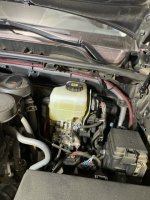
I still need to figure out where I’m installing the fuse block under the hood, once I do that I’ll finish the connection to the battery
 

Attachments

  • 38C24BE0-AD92-4AA1-93BC-82BA016A57DC.jpeg
    38C24BE0-AD92-4AA1-93BC-82BA016A57DC.jpeg
    131.7 KB · Views: 1,571
  • 410F2078-3796-42CE-8346-9BEFDADA3EBD.jpeg
    410F2078-3796-42CE-8346-9BEFDADA3EBD.jpeg
    130.1 KB · Views: 1,465
  • 0E8E766F-697F-43E1-BA7A-9C3D665C29FB.jpeg
    0E8E766F-697F-43E1-BA7A-9C3D665C29FB.jpeg
    72.9 KB · Views: 1,480
  • CFC60525-A1E1-43C5-87B4-8B36A2E34033.jpeg
    CFC60525-A1E1-43C5-87B4-8B36A2E34033.jpeg
    79.4 KB · Views: 1,447
  • 64093B7B-9C64-497A-8882-0A48E81E49FB.jpeg
    64093B7B-9C64-497A-8882-0A48E81E49FB.jpeg
    71.3 KB · Views: 1,417
  • F0672E6F-7211-4DE2-86E5-645553F8C679.jpeg
    F0672E6F-7211-4DE2-86E5-645553F8C679.jpeg
    118.6 KB · Views: 1,548
  • 2051EAD4-5A05-4812-8907-DED360DE707D.jpeg
    2051EAD4-5A05-4812-8907-DED360DE707D.jpeg
    127.2 KB · Views: 1,510
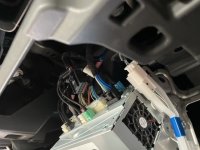
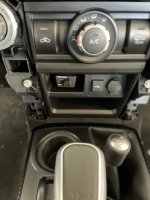
Finished wiring everything up today, with a Metra 71-1765 ‘in radio’ kit I only needed the black 10 pin connector for the speaker outputs, the rest of the kit is unused in my install, I ran those to the high level inputs on the amp for my signal, next mounted the remote level controller below the HVAC controls which I’ll use for subwoofer level.

Mounted the under hood fuse block on a relay cover using Velcro, that way it’s not permanent and can be removed if needed, mounted the amp under the passenger seat which didn’t turn out too bad, found a threaded hole on the forward seat chassis mount under the carpet, I just removed the paint for a good connection.

Again with sideways photos sorry
 

Attachments

  • EA059151-194D-42D2-B462-7B9AF78B625D.jpeg
    EA059151-194D-42D2-B462-7B9AF78B625D.jpeg
    92 KB · Views: 1,458
  • 1F97AE92-2B3F-4CCA-9C56-01D03F9DF4A4.jpeg
    1F97AE92-2B3F-4CCA-9C56-01D03F9DF4A4.jpeg
    87.1 KB · Views: 1,467
  • 986AB81F-28F8-48FC-B1E1-FC73C59EBA50.jpeg
    986AB81F-28F8-48FC-B1E1-FC73C59EBA50.jpeg
    101.5 KB · Views: 1,396
  • 3FB32344-106A-4F4B-8974-4320CB799A65.jpg
    3FB32344-106A-4F4B-8974-4320CB799A65.jpg
    61.3 KB · Views: 1,386
  • 19873069-682C-494E-8CEE-8A3C060A5111.jpeg
    19873069-682C-494E-8CEE-8A3C060A5111.jpeg
    112.1 KB · Views: 1,447
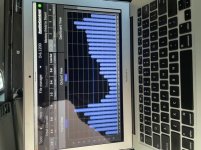
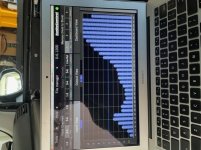
Started doing some tuning today, unfortunately I’m not proficient in this art, so I’ll be at it for days if not weeks fine tuning, I’ve attached to profiles of the input signals from the stock HU... first one being a full range signal from the fronts with a huge bump in high end and low mid range... second being a more high frequency weighted profile from the rear channels, I thought it was interesting... doesn’t appear that the bass rolls off with volume it stayed consistent.

Please let me know if there are questions I’ll do my best to assist, thanks again for tuning in.
 

Attachments

  • 1885784F-8BA9-48CE-93C8-18ED946CA826.jpg
    1885784F-8BA9-48CE-93C8-18ED946CA826.jpg
    54.7 KB · Views: 1,365
  • 252C3921-0B6C-4C4D-87B2-1826853075D9.jpg
    252C3921-0B6C-4C4D-87B2-1826853075D9.jpg
    54.3 KB · Views: 1,387
Last edited:
How did you measure the stereo output signal? I've been fighting that crazy OEM EQ with my dsp. I've only been measuring speaker output with a mic but knew there was a huge dip.
 
How did you measure the stereo output signal? I've been fighting that crazy OEM EQ with my dsp. I've only been measuring speaker output with a mic but knew there was a huge dip.

The Audio Control unit has a built in RTA, it also has an auto EQ function to flatten the signal which makes things easy, I did purchase the calibrated mic to dial in the tune considering vehicle characteristics, but I still have lots to learn about how to properly use it... I’d say I’m at 75% of where I want to be at this point.

What kind of DSP do you have?
 
I'm using a Dayton DSP-408. I can get a decent tune but I'm pulling a lot down to compensate for the dips in the factory signal since the 408 does not have an input eq.
 
Why use all this seemingly fancy stuff and then not use normal equipment like crossovers for the tweeters? Or not enclose the whole rear of the speaker and instead use it as an umbrella?
 
I'm using a Dayton DSP-408. I can get a decent tune but I'm pulling a lot down to compensate for the dips in the factory signal since the 408 does not have an input eq.

Trust me I’m still tuning, I haven’t quite figured it all out yet, my tweeters are extremely bright, I have them crossed at 2.5k and -6db now, this part of the install is definitely where the time is spent.

Why use all this seemingly fancy stuff and then not use normal equipment like crossovers for the tweeters? Or not enclose the whole rear of the speaker and instead use it as an umbrella?

Good question, the crossovers that typically come with components in a box are usually fixed as far as crossover point and filtering, normally they’ll allow for some attenuation, the upside is ease of install, down side is you get what you get and it may sound good it may not, all vehicles are different with regards to interior characteristics. The 6x9 speaker I purchased is designed to work in an infinite baffle, so using an enclosure can adversely affect it’s performance. I used those baffles for a rain guard as water does get past the window. The factory speakers have a built in umbrella I found that out when I removed mine.

The difference with an active setup is the digital processor is your EQ and crossover it’s all programmable, the advantage is you have full control and versatility, you can use time delay to compensate for each speaker being different distances from the listener, you can adjust for the different acoustic response of a given vehicle and how the equipment is installed. The downside is that it has a very steep learning curve in regards to how it’s setup, the result when done correctly is an exceptional and well balanced sound stage.
 
Why use all this seemingly fancy stuff and then not use normal equipment like crossovers for the tweeters? Or not enclose the whole rear of the speaker and instead use it as an umbrella?
Skidmarx reply was spot on. I'll add, my setup has 6 separate channels of amplification. I have tweeters custom built into the mirror mount cover by the A pillar, Dayton Reference 3" mids in the dash, and Dayton Reference 8" woofers in the door. With the DSP, I can time align, and eq each individual speaker by itself then turn them all on for listening. FWIW I've spent as many hours tuning as I have in the install.
 
Last edited:
Trust me I’m still tuning, I haven’t quite figured it all out yet, my tweeters are extremely bright, I have them crossed at 2.5k and -6db now, this part of the install is definitely where the time is spent.
I'm running an AMT tweeter so I'm crossed at 6.5k. I've been pleased with the Audio Frog curve which puts a gradual downward slope in the tweeter range. It also has a nice rise in the sub bass region which works much better in cars than a flat curve. Which curve are you using?

I'm currently running subless (will be added later). I get decent response to 30hz but my 8's currently cover such a broad range that the mid dip with that huge bump at 100hz really kills what I'm trying to do. Thank you so much for posting your input results. While I saw it in initial measurements, I had no idea they had an 21.5db swing that close.
 
Last edited:
I'm running an AMT tweeter so I'm crossed at 6.5k. I've been pleased with the Audio Frog curve which puts a gradual downward slope in the tweeter range. It also has a nice rise in the sub bass region which works much better in cars than a flat curve. Which curve are you using?

I'm currently running subless (will be added later). I get decent response to 30hz but my 8's currently cover such a broad range that the mid dip with that huge bump at 100hz really kills what I'm trying to do. Thank you so much for posting your input results. While I saw it in initial measurements, I had no idea they had an 21.5db swing that close.

No problem glad it helped you... I’m not familiar with AMT tweeters I assume you’re running 3 way active... must be nice having an those mid bass drivers, what did it take to fit them?

I’m trying to use the AF curve, but I’m not sure how accurate this iOS microphone is, I read it’s a reliable tool I’m just not very good with the tuning aspect, I will figure it out eventually, I’m thinking I may to run a different curve from 2.5k on up because my tweeters are harsh, not really sure if it’s due to reflection or if it’s inherently that way
 

Members online

Forum statistics

Threads
278,306
Messages
3,554,045
Members
248,016
Latest member
Advally Service

Trending content

Back
Top