
Specific Lights on the Console are out (radio station and heat settings)

prhime

New member
I have checked the ACC fuse and all other fuses (figured while I was in there I might as well).

I have attached the picture for visual reference.


I just inherited this 4Runner and am in the process of giving it some TLC. This is one of the things on the list.
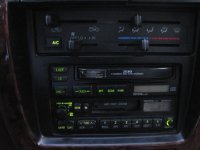
 

Attachments

  • light.jpg
    light.jpg
    83 KB · Views: 5,222
Register to hide this ad
pull the dash apart and check the bulbs. at least on the HVAC it's really easy. if you're bulbs are out, replace them with L.E.D.'s!!!!
i'm not sure how to go about checking your radio lights.
 
thank you for the reply.

do you have any links to how to remove/replace those lights?

did a search and could not find anything
 
I had the same issue with my HVAC light and I changed it. It only took about 10 minutes and I was very slow because I didn't want to mess anything up.

I went here and there were many pictures I used.

http://www.4runners.org/

Remove the HVAC knobs, pull out the AC button, pull the console face off, and then you can pry off the HVAC face. Then it's just a little light that's there. Easy as pie.

Good luck.
 
If you want to remove the woodgrain around the stereo you have to remove the E brake piece and the shifter piece, then you can remove the piece around the stereo.
 
i'll leave the woodgrain for now. my goal is to get the lights fixed first and start working on other small mechanical issues (new antenna is en route). then start going for basic mods in the longer run.
 
i think what Clemsonfan15 meant to say is that if you want to remove the radio bezel (woodgrain trim attached) thats around the radio and a/c control module, your gonna have to pop-up the trim thats around your parking brake, move that up slightly, also pop-up trim thats around the shifter (move aside), then pull knobs off the hvac along with the face of THAT module. if your gonna pull the radio bezel completely off, then there will be two phillips screws on the sides of the hvac module. after removing screws, just pop-out the bezel (carefully). all snap-ins except two screws. hopefully this helps any. keep us posted.
 
thanks for all the replies. I have swapped the light (bulb was burned out) and replaced with a new one. the condom broke but it I put it back in place. We will see how it looks later on tonight.

It was very simple as outlined above.
-pull off knobs
-carefully pop-off the HVAC face
-even more carefully take of the magnifer
-slide out the bulb
-take of the bulb cover aka condom
-swap in new bulb (it is bulb #74 from any maker)
-and replace the parts

The other half of the problem now is the radio. I can't see what station is paying (sometimes I just like to drive with Scan on to find new stations).
any ideas on this one?
 
wanted to post an update.

The climate lights are all back. They have been out for so long I truly forgot what they looked like at night.

The only light left is the radio station lights. Any ideas??
 
If you want to remove the woodgrain around the stereo you have to remove the E brake piece and the shifter piece, then you can remove the piece around the stereo.

Other than the clips, is there anything else holding this piece on? I could not get that sucker to pop off. The top part came out and the bottom part but the center didn't want to budge.
 
Are you talking the woodgrain or the faceplate on the radio?

Hmm, I thought those where one in the same.

I was trying to pop off the woodgrain bezel that goes around the whole thing. The center part (actually on the side of the wood grain panel but over all its the middle portion of the panel) does not seem to want to cooperate.
 
Hmm, I thought those where one in the same.

I was trying to pop off the woodgrain bezel that goes around the whole thing. The center part (actually on the side of the wood grain panel but over all its the middle portion of the panel) does not seem to want to cooperate.

I used step 2 of this writeup as a guide:

http://www.4runners.org/writeups/stereo/index.html

You'll need to first remove the trim piece that surrounds the shifter/4wd selector. Then the big piece you're talking about will come off. Work from the bottom up, and it just pops off. It is held on my maybe 2 or 3 sets of clips on either side. Use both hands and pull out starting from the bottom, then slowly work your way up, one hand on either side of the piece.

Good luck.
 

Members online

Forum statistics

Threads
278,315
Messages
3,554,130
Members
248,016
Latest member
Advally Service

Trending content

Back
Top