Steering Rack Poly Bushing - Washer or No Washer?

Rock_Rat

Senior Member
Quick question for those that have installed the Total Chaos (or similar) Poly bushings on their steering rack.

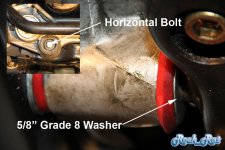
Did you install a washer between the rack and frame on the horizontal bolt?

I'm trying to wrap this job up this morning and read the instructions from TC and on item 9 it states:

"...Insert driver side bolt (#1) using factory hardware. (TUNDRA ONLY - put supplied washer between the rack and the frame behind driver side bushing.)

I ask this because it conflicts with this thread Steering rack bushing replacement | IH8MUD Forum

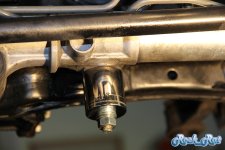
I went and purchased a grade 8 5/8" washer and installed but as you can see there's a bit of mushrooming going on.

I think If I remove the washer the sleeve will rub against the frame.
 

Attachments

  • Horizontal Bolt Steering Rack.jpg
    Horizontal Bolt Steering Rack.jpg
    103.6 KB · Views: 2,380
Register to hide this ad
My poly bushings on my old rack came with a washer and it worked fine. When I got a new rack I bought another set of poly bushings and they did not have the washer. The steering still feels solid but there is a lot of mushrooming (similar to yours), so I am planning on getting a washer to see if it changes anything.
 
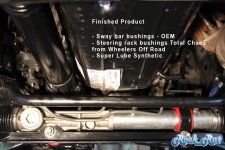
It seemed to be counterintuitive for me to remove it. I decided to leave it in and torque it down. It didn't mushroom too much more when torqued. Amazing difference with new bushings. Only the test of time will determine if the poly bushings were a good decision or not. Used Super Lube Synthetic. Still went OEM with the sway bar bushings. :thumb3:
 
This is good to know. I recently purchased the ES kit, which came with a washer, and am planning on installing it later today.
 
This is good to know. I recently purchased the ES kit, which came with a washer, and am planning on installing it later today.

There's a few things you need to know and have on hand to make the job easier. Give me a few minutes and I'll upload some pics. I planned on doing a detailed write-up later on. Busy at work right now.
 
[MENTION=85201]seabun[/MENTION]

Have fun today. It took me about eight hours total to remove skids, diff drop, sway bar bushings, steering rack guide, and bushings. Nothing hard about it just patience.

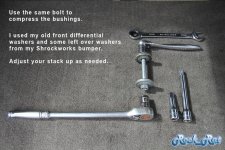
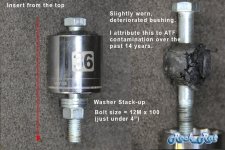
Go to Ace hardware and definitely pick up the M12 bolt and nut to use as your puller. Spend the extra for the 36mm socket. Pick up washers for your stack up if you don't have any. I had left over washers from my diff drop and from my bumper that I didn't need.

That will double as a puller and also a way to compress the bushings in once you get them started. I needed to run back to Ace for the 5/8" grade 8 washer. Fantastic tool!!

Be extremely careful you don't break your ABS wires. They are very thin and will get stretched if you don't watch out.

I opted to replace my sway bar bushings at the same time to provide me with better access to the vertical bolt. I'm so glad I did. I still had a hard time getting a torque wrench up top. Great design but a real PITA to torque.

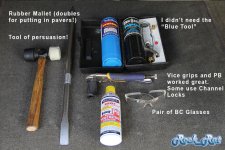
I never needed the "blue tool" (AKA-torch) to burn out the horizontal bushing. I cut the lip and sprayed some PB on both sides. Slammed some vice Grips on the back end and it literally came right out for me. Some use slip-joint pliers.

The rubber mallet is great for convincing the steering rack to go where you want it to go. (It's also great for installing pavers around your house - I know)

Use the pry bar very carefully as you don't want to bust anything. Definitely came in handy!

A 6" C-clamp came in handy on many different occasions, including closing the sway bar clamps enough to get the nut started. Use the cross-point screwdriver for your alignment tool unless you have one.

As for the lube - tons of opinions out there. One commonality is - stay away from Moly! I went with Super Lube synthetic. Pre-ordered it from Home Depot. Spendy at $12 a tube. You can also use Marine Blue or Green etc. Do a ton of research first if you haven't done so already. Absolutely NO Graphite!!!

You will need a bottle of Dawn and a box of nitrile gloves and a T-shirt you no longer want. Forget about taking pictures during the install...it ain't gonna happen. You'll be a mess! If I think of anything else I'll post up.

I'll do a step-by-step later on as I want to give credit to those that deserve to be recognized for their contributions to our forum. Hate to rush this but I have to get back to work.
 

Attachments

  • Home Made Puller.jpg
    Home Made Puller.jpg
    99.3 KB · Views: 1,530
  • Steering Rack Bushings_2.jpg
    Steering Rack Bushings_2.jpg
    138.8 KB · Views: 1,618
  • Steering Rack Bushings_3.jpg
    Steering Rack Bushings_3.jpg
    138.7 KB · Views: 1,502
  • Steering Rack Bushings_4.jpg
    Steering Rack Bushings_4.jpg
    122.5 KB · Views: 5,701
Last edited:
Really appreciate all of the info, tips and pictures. I've been bracing for a long evening but know it will be worth it in the end.
 
Im starting to rethink the use of the Dorman kit I used when i did my rack bushings last year. I don't look forward to ever having to do this again so Im going to live with them. I don't have any issues with them and I'm glad to hear Im not the only one that took extra time to do it.

I look forward to reading your step-by-step to hear about how I could have made it easier on myself.
 
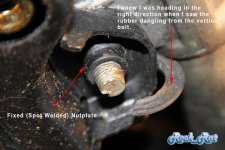
Here's a couple more pics and specs for the bolt

I'm not sure if any of you have been following this thread or not: http://www.toyota-4runner.org/3rd-g...3rd-gen-4runner-over-150k-miles-bad-idea.html but if you have, these are the "little" things that will add up very quickly! I've enjoyed reading that thread but have opted to stay out of it. :tape2: A lot of what has been said would have been a repeat from me. I can't imagine what it's like to not be able to do your own work. I couldn't afford to keep this if I had to take it to a mechanic.

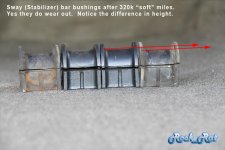
Back on topic - As you can see, the sway bar bushings had some significant wear. I opted to go with OEM instead of poly. I expect to get another 300K out of them. I'll look at them in about 150K

As for the vertical center bushing on the rack - it's a poor engineering design in that any ATF leaks will eventually find their way into a vertically mounted bushing and contaminate the rubber and cause it to deteriorate over time. There should be some sort of an "umbrella" mod over the top of that bushing. While I was under there, I noticed the ADD switch connector was deteriorating due to an ATF leak from years ago. Long tedious repair ahead of me. I'm going to have to re-pin everything into a new connector. EDIT: Found a good one at a salvage yard.

Lesson Learned: Waited too long to replace my FIPG. collateral damage

I probably could have just pulled that bushing out with a pair of tweezers! Haha Anyway, I just used the "tool" and funny thing is, it just slipped right on out of there.

Here are the specs for the hardware.

NOTE: Keep in mind I'm the original owner with some serious miles on these bushings. Don't expect your bushings to come out as nicely as mine did.:)
 

Attachments

  • Steering Rack Bushings_5.jpg
    Steering Rack Bushings_5.jpg
    113.9 KB · Views: 1,456
  • Steering Rack Bushings_6.jpg
    Steering Rack Bushings_6.jpg
    133 KB · Views: 2,303
  • Sway Bar Bushings_6.jpg
    Sway Bar Bushings_6.jpg
    89.6 KB · Views: 1,808
Last edited:
Subd.good info probably need to do this to my 1st gen Tacoma . I did notice that there were different part # for pre 2001 tacomas, so wonder if that has something to do with why when installing the washer it caused so much mushrooming
 
Some say it's too much lube on the bushing. As long as I have the metal sleeve in there I'm OK. The bolt is riding on the metal sleeve and the bushing surrounds the sleeve. I'm sure that one will last at least as long as my OEM.

After 30K I may re-visit it again if it looks different than when I originally installed it.

Tacoma?
 

Members online

No members online now.

Forum statistics

Threads
278,311
Messages
3,554,082
Members
248,016
Latest member
Advally Service

Trending content

Back
Top