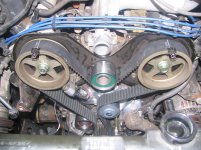
Step by step instructions on how to replace Timing Belt Kit?

Register to hide this ad
You can start with this:
Timing Belt and Water-Pump Replacement

I used the bump starter method, but I actually had some 3/4" cast iron pipe I put over my 16" breaker bar before bumping it:
http://www.toyota-4runner.org/3rd-gen-t4rs/175062-timing-belt-water-pump-replacement-diy.html

If you do the cam and crank seals, buy this tool, as well as some PVC 2" pipe or similar and 5oz tack hammer to seat the new ones in:
Amazon.com: Lisle 58430 Shaft Type Seal Puller: Automotive
/ref=sr_1_1?ie=UTF8&qid=1414710753&sr=8-1&keywords=crank+seal+puller

The hardest thing for me was getting the new timing belt on. I had to get my 6'5" neighbor to help me slip the belt under the top idler pulley. Make sure to line up the crank at 12 oclock and if the notched line on each cam does not line up exactly with the notch in the cover plate, don't worry. If the paint marks match, then you are good to go.The R cam gear will more than likely move forward just a little when there is a great deal of tension is exerted on the new belt to get it under the idler.

The jiggle valve on the thermostat should be at 6 o'clock.

If you have any more questions, just ask.
 
The hardest thing for me was getting the new timing belt on. I had to get my 6'5" neighbor to help me slip the belt under the top idler pulley.

The trick with that is loosen the top idler bolt a few turns until it tilts up a few degrees, slip the belt on, then tighten bolt, then pull tensioner pin. A few binder clips are fantastic for keeping the belt in place on the pulleys.(My own invention!) See attached.

LC's are good, but this is my favorite DIY:

http://www.nwtoys.com/forum/tech-article-submissions/1261-5vz-fe-timing-belt-4.html
 

Attachments

  • IMG_1451.jpg
    IMG_1451.jpg
    139.9 KB · Views: 7,325
Last edited:
Durk,

Before enlisting my neighbor's aid for putting on the TB I was considering taking my Schley tensioner compressor and putting one end on the idler (not bolted in and resting on top of the new belt) and the other end onto the upper coolant housing. But the tensioner wasn't long enough so I found an old axle nut (36mm maybe) that fit snug between the tool and the housing. But since I didn't want to crack the latter, I called in my neighbor. I will bet I could have opened the tensioner tool up enough to have placed the idler in position in order to have bolted it down. Maybe next time.

After 16 years my belt was stretched beyond belief. My tensioner had been maxed out for some time. But the WP was still good.

To the OP: give yourself plenty of time to undertake this job. Also I removed my radiator, bit others have not and been just fine.
 
My issues were with rusty bolts. And rust made it hard pulling off the balancer. AC compressor bolts were by far the worse. All to get the AC mount off to remove the tensioner.
 

Members online

No members online now.

Forum statistics

Threads
278,312
Messages
3,554,083
Members
248,016
Latest member
Advally Service

Trending content

Back
Top