Swaybar Bushing Upgrade

Newbie here,

Is the advantage to doing this upgrade better handling? any downside? I have a clunk/knock coming from the front, Going to find out if this is case this weekend. Just want to have the part number ready to order if this is indeed the reason.

seems like the same cost as factory bushings. so just want see why there are 15 pages on this thread :)
thanks

Largely the number of pages is due to two things
1) Different sway bar sizes between years
2) On-road vs. off-road usefulness of the mod. It does further limit swaybar movement over OEM which lowers offroad capabilities slightly

2 Downsides: Limits offroad articulation and may require regular greasing to prevent squeaking

I just did this, steering does feel noticeably tighter. Not sure when they were last replaced, so it just may be that they were worn. Either way, easy install.

This week I'm weekend I'm replacing all the bolts and the rear links.
 
Last edited:
i was wondering if someone had the same measurements as mine for front sway bar. i have a 2004 4wd sr5 v6 3rd row 4runner. when i measure the front it says 27mm. everywhere i look, everyone says the front is 29mm or 30mm. im just curious if anyone else has the same measurements i got. my rear is 19mm which ive read people have but 27mm for the front i havent see one person mention. please help. ive read that tacoma had a 27mm front sway bar do you believe that could be it?
 
When I replaced mine the factory bushing had a number on the side indicating the bushing size. For example, my rear bushings had the number 19 on the side of them as they were 19mm. Get under your truck with a flash light and you could probably see the number to make sure of the size.
 
Just finished up my sway bar bushing replacement over the weekend using the Prothane nongreasable set. Thoughts:

1) Definitely remove the skid plate. I can't imagine trying to do this with that in the way. I mixed in an oil change while i had it off.
2) The Vermont weather and salt made the bolts nice and hard to remove, even with a couple days of PB Blaster working for me. Had to use a breaker bar all the way out and back in on the rear bolts on each side. The front bolts were much more cooperative.
3) Not a fan of the universal-type bracket that came with the Prothane set. It allows a good 1/2" or more of leeway front and back so I wasn't sure where to position the sway bar. I ended up mounting it right in the middle of the bracket slots. I thought about reusing the factory brackets but the replacement bushing seemed to have a little movement within those.
4) Rear bolts were a major pain to get threaded back in due to the alignment of the positioning ring on the sway bar itself. Took a ton of pressure to push the bracket to the point to allow the bolt to engage the threads.
5) I forgot to grease the driver's side bushing so I only have one side greased. Is that an issue?
6) This replacement did fix my front end clunk! Surprising considering the bushings that I removed were completely intact and still looked perfect size-wise. I'm guessing they had lost some elasticity/rubberyness.
 
Ended up not needing any carriage bolts. All bolts came out relatively easily, exactly 38 minutes start to finish for the front only, including dropping/reinstalling skid plate.

Added new hardware while I was under there

original
View attachment 157495

original vs new
View attachment 157496

new mounted
View attachment 157497

new mounted
View attachment 157498

my sway bar is kinda like that too. I cant wait to repaint re-encapsulate it. have a fresh solid look. This is my weekend project once the weather clears up
 
I did the upgrade on my 2004 4Runner limited V8 with 153k miles last week. All I could say is wish I have done this couple years early.

The whole car feels much "tighter" and the knocking noise from the chassis was gone.

Great thread and great infor.
 
I agree with everyone that have swapped to poly. It definitely helps. I replaced the front and rear sway bar bushings, rear upper control arm bushings, panhard bar bushings and did the custom rear extended sway bar links. I used the stock bushing mounts on the sways because I've see those yellow zinc brackets rip and break.
 
Question guys: I went under the car and tried to take the sway bar, it wasn't budging. I sprayed down the bolts with penetrating oil. going to spray them every day until i get to do this.
Will you be able to move the sway bar if the bushings are bad? Or just do the upgrade and stop thinking about it? XD. Bushings didn't look to bad.
 
2004 V8 Sport Full Time 4X4:

I ordered the 30mm and 21mm grease-able bushings from Amazon along with the suggested end link bushings and installed them tonight. Not much of a difference, although the bushings I had on weren't dry rotted.

Energy Suspension 9.8105G End Link Grommet
$11.77

Prothane 19-1186-BL Black 30 mm Universal Greasable Sway Bar Bushing fits
$20.23

Prothane 19-1164-BL Black 21 mm Universal Greasable Sway Bar Bushing fits
$16.03

Also put on front stainless steel brake lines & used Mityvac to bleed fronts.

Centric 950.44007 Brake Line Kit
Sold by: AutoPartsZilla
$38.94

ToyTec rears go on tomorrow:

FJRL14 Extended Rear Brake Lines (07+FJ & '03+ Runner)
Total: $79.17
 
Last edited:
Mine came out easy - I live in the desert though and let the penetrating oil soak in for a while.

I did strip a bolt head when impacting 1 back in on the front - don't use an impact to put them back on - had to drill the stud out.

Use an impact after letting soak with penetrating oil to remove only.


Question guys: I went under the car and tried to take the sway bar, it wasn't budging. I sprayed down the bolts with penetrating oil. going to spray them every day until i get to do this.
Will you be able to move the sway bar if the bushings are bad? Or just do the upgrade and stop thinking about it? XD. Bushings didn't look to bad.
 
Question guys: I went under the car and tried to take the sway bar, it wasn't budging. I sprayed down the bolts with penetrating oil. going to spray them every day until i get to do this.
Will you be able to move the sway bar if the bushings are bad? Or just do the upgrade and stop thinking about it? XD. Bushings didn't look to bad.

Well, you have to ask yourself, is this upgrade/maintenance worth drilling out broken bolts?
 
Hey guys, if the bolt heads break off, use a punch instead of drilling. I broke like 4 drill bits on one before trying the punch/big screwdriver. It was way easier. The bolt is super hard but the tack welds on the nut are brittle.
 
Well, you have to ask yourself, is this upgrade/maintenance worth drilling out broken bolts?

:thumb3:

What Morphyne said - if you are set on doing this - be sure you let those bolts soak in penetrating oil....might even gently tap them a few times with a hammer...brush with wire brush, and apply more oil to threads & bolt head....let soak again.

I will say if you like OEM fit, just buy the bushing and re-use your hardware. The prothane bushing plates are not a perfect fit.

Another note, the ToyTec rear lines do not fit well in the OEM brackets - however, the Amazon Centric front lines fit perfect in the OEM brackets.

-1 for ToyTec.

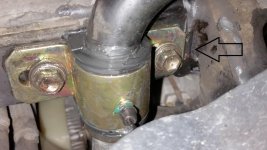
Front prothane brackets have to be slid forward to avoid seam weld - or it'll bend when tightened and not fully seat your bushing.
 

Attachments

  • front sway bar bushing.jpg
    front sway bar bushing.jpg
    89.5 KB · Views: 1,491
Last edited:
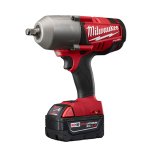
Milwaukee Tool 1/2 inch "Fuel" impact driver (battery powered) works well. $ but good

Well, you have to ask yourself, is this upgrade/maintenance worth drilling out broken bolts?

I bought this, its a Milwaukee tool battery powered 1/2 inch impact driver.

It's from their "Fuel" line, which is their marketing for versions with brushless motors.

It's a bit pricey ($400 -ish), but it is AWESOME! It puts out up to 1,100 Ft-lbs of torque to unscrew items, and up to 700 Ft-lbs to tighten!
(Yes... you read that right!!!)

It's changed my life in terms of working on the truck. I didn't know this before,
but with an impact wrench, you don't experience torque in the tool handle like
you do with a regular cordless driver drill.

I personally bought a set that came with a hammer drill, a bit driver, a charger
and two of of their "XC5.0" batteries --- which is their jargon for 5.0 amp hour extended capacity batteries. They also offer XC4.0 batteries (4.0 amp hour).

Then I bought the impact driver separately as just the driver without a battery, or charger.

At the Home Depot had a promo where if you bought one Milwaukee cordless tool, you got up to $150 off another, so the full set... three tools, two 5.0 batteries & one charger ran me $550.

Not cheap... I know... but this is WAY better than the Ryobi one+ stuff.
I've had the Ryobi 1/2 impact driver for several years, and it just doesn't have
enough torque... The Ryobi one is only rated for 200 ft-lbs of torque, and their ratings might even be optimistic... For example, I have NEVER been able to take off lug nuts with the Ryobi driver,
and the Ryobi driver has been useless for freeing up tight bolts, but with the Milwaukee Fuel 1/2 impact driver, I feel like I'm part of a NASCAR pit crew!


Also note that the tool comes in few different versions. For example, you can get the anvil with a small ball bearing to hold the socket on, or a detent snap ring. Also, the models have a low and high power mode, and the torque on the low power mode differs based on the version... just an FYI... the folks at the store where you shop probably won't be aware of these difference, but you can read about it on the company's website.

The Milwaukee Fuel 1/2 impact driver is truly professional grade. The batteries last a long time before recharging, and they are more powerful than some of the air-driven impact wrenches.

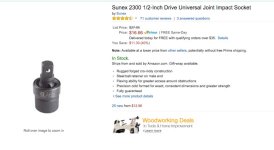
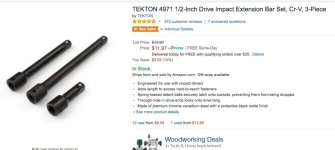
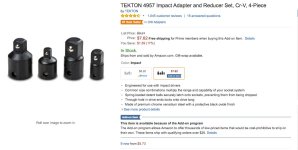
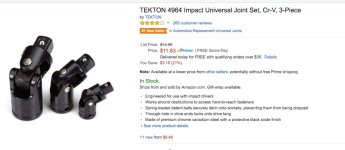
I posted this because, so far, I've been able to effortlessly break free all of my stubborn bolts. Squirt with penetrating oil. Let it sit. Then use an impact socket (black not chrome)... the impact sockets give a little more... the chrome sockets are too brittle. Also a trick that I've been using... I bought an impact rated short extension and an impact rated 1/2 to 3/8 reducer (both black)... along with an impact rated 1/2" universal joint.

I use the extension (and reducer when needed) with my regular chrome sockets. I figure the extension is the right kind of metal to help absorb some the impact force, so I'm less likely to damage my regular chrome sockets.

For sockets, I bought an inexpensive set of metric 3/8" impact driver sockets from Amazon. It's not everything I need, but it's a start, and I use my regular chrome sockets with the extension when I need other sizes.

I suppose you could (and might) break off the bold head if it is really frozen, but you also might just bust it free. It's been such a good change for me.

Also, use caution (and the lower torque settings) when putting bolts on with the driver. Torque them down by hand, or be very careful or you will over-torque, or even snap off your bold heads.

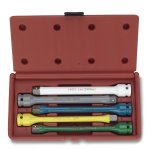
One more tip... I also bought these off of Amazon. They are "Heavy-Duty Torque Stick, 1/2-Inch Drive Extension Bars 65 to 140 Ft Lbs - Chrome Molybdenum".

Basically, they are extensions that flex when you hit a pre-specified torque setting. If you go slowly when tightening with the impact driver, you can use these to torque bolts to an approximate range. It's not exact, but if you don't normally use a torque wrench, then something like these are way better than nothing... plus they are convenient.

Sorry 'bout the long post... but I thought I'd share. It's been that helpful to me, and seemed to be on point re: freeing a stuck bolt. :heh:

(Photos of items purchased are from Amazon, Milwaukee tools were purchased at Home Depot.)

 

Attachments

  • milwaulkee_driver.jpg
    milwaulkee_driver.jpg
    117.1 KB · Views: 1,080
  • torqueBars.jpg
    torqueBars.jpg
    111.5 KB · Views: 1,084
  • universal joint for impact driver.jpg
    universal joint for impact driver.jpg
    51.8 KB · Views: 1,075
  • driver extensions 1:2 inch.jpg
    driver extensions 1:2 inch.jpg
    60.3 KB · Views: 1,079
  • imact driver adapters.jpg
    imact driver adapters.jpg
    71 KB · Views: 1,109
  • impact driver u-joints.jpg
    impact driver u-joints.jpg
    58.7 KB · Views: 1,101
Last edited:
Very cool review. What are those long extensions with the tourqe measurements on them? Do they stop when hitting that tourqe spec?
 
Very cool review. What are those long extensions with the tourqe measurements on them? Do they stop when hitting that tourqe spec?


Yes. The impact drivers turn by striking an internal gear very rapidly. It's like taking a gear and turning it by striking it hard many times with a hammer.

With The torque extensions, each one is a different thickness, and each one has a different torque rating.

So, for example, if I attach the 100 ft lb extension, when i tighten with the impact driver, it will turn a nut or bolt, and stop tightening when it gets to be about 100 ft lbs of torque.

Its really cool, i just run the driver at high speed, and when the fastener is at the approx torque, the fastener stops turning. The way that it works, is that the extension twists when it reaches the specified torque, and it rebounds back before the next impact from the driver. Thus, the fastener magically stops turning once it is at approx the correct torque. The work like magic. They are not 100% accurate, but the are close... and they are MUCH BETTER than not using anything and just winging it. The way that they work is that each specific extension is a different thickness, and based on the material and the thickness, you can predict fairly accurately when that particular extension will twist rather than rotate when driving a fastener.

If you used a powerful DRILL to turn these they wouldn't work. But with an IMPACT DRIVER, when the fastener is tightened to the right torque, the extension twists itself, rather than continuing to tighten the fastener, yet because of the nature of an impact driver, the extension returns to it's prior, unstressed position before the impact driver strikes again. So, the fastener magically stops turning when it is at about the specified torque.

Want a higher or lower torque setting, then change which torque extension you are using. Each extension in the kit is rated for one specific torque setting.

I hope this helps explain what they are and how they work. Since i rarely actually use a torque wrench (even though i own one) I really love these extensions and find them useful to quickly and easily tighten a fastener to approximately the right torque setting.
 
Are there any opinions on energy vs prothane as far as performance? Doesn't matter to me if they have zerks or not, just looking for opinions on which one has a more noticeable affect on the ride. Thanks!
 

Members online

No members online now.

Forum statistics

Threads
278,311
Messages
3,554,082
Members
248,016
Latest member
Advally Service

Trending content

Back
Top