swimmerdude1127's build thread

Great build! I'm not sure if I missed it but how did you run the wiring for your roof lights?

Maybe I didn't properly describe it. Taking from [MENTION=68685]Ducmonsta[/MENTION]'s idea, I went through the XM antenna on the back. Once you do the work in my opinion it's really the most secure and best way.

I actually got pretty into it by dropping the rear headliner and taking off the XM antenna completely in order to do the work on it. It was kinda tricky because of the limited space between the roof and the headliner. Be sure you have PLENTY of time to do it because getting the nut threaded on when mounting it back on top of the truck is tough!. Taking it off and biding my time during the install allowed me to retain the XM capability (although I don't even use it). After I finished, I put a little bit of RTV sealant where the loom protrudes out from the hole I drilled in the antenna. I'm sure you could get away without doing this, but now it's for sure waterproof.

I ran 2x 14ga cables inside a loom from the rack through the XM antenna. After that, the wires come out of the loom and run between the headliner and roof over to the driver side, down the pillar and then get routed up the driver side floorboard up to the in-cab switches


Edit: Here's the best pic I could find during install. The weird residue is from duct tape because it started raining prior to putting the XM antenna back on. [MENTION=77370]Gabex35[/MENTION] if you want any more pics please let me know and I'll try to hook you up with whatever angle/shot you want.

 
Last edited:
Cool. Cool. Cool. Whenever you get a chance, no rush. I appreciate you taking the time.

Here you go. Let me know if you're looking for any specific angles or anything. All these shots are on the driver side. The doors have to be open, otherwise you can't see much of anything.

Yes, I did test my new tires a bit and you could say they fling a little mud :D.

Rear portion


From this angle you can see how it's a flush fit; looks great.
 
Here you go. Let me know if you're looking for any specific angles or anything. All these shots are on the driver side. The doors have to be open, otherwise you can't see much of anything.


Not sure if you knew this already, but you might want to flip this end of the MT Lower Link around. The zerks are supposed to face upwards so they dont get ripped off.
 
Not sure if you knew this already, but you might want to flip this end of the MT Lower Link around. The zerks are supposed to face upwards so they dont get ripped off.

I do know it, thanks for the tip anyway. It's part of the stuff that Production Off Road here in VA Beach messed up on my install. By the way if you're in VA Beach don't go to these guys unless you want poor customer service and shoddy workmanship.

Scott is going to be flipping it around as well as adjusting a few other things when I get my TC LCAs installed, but that's intentionally not until I get my bumper on.

 
Last edited:
I do know it, thanks for the tip anyway. It's part of the stuff that Production Off Road here in VA Beach messed up on my install. By the way if you're in VA Beach don't go to these guys unless you want poor customer service and shoddy workmanship.

Scott is going to be flipping it around as well as adjusting a few other things when I get my TC LCAs installed, but that's intentionally not until I get my bumper on.

Ah, gotcha. Sounds like you are getting everything squared away right.
 
Got all the hardware yesterday for doing the fire extinguisher install. It's basically a straight copy from [MENTION=55815]Okki[/MENTION]'s build, same fire extinguisher and everything. Only difference is I got some 1/2" nylon spacers to put between the plastic and the metal to prevent the plastic from bowing in. Don't think it's totally necessary, but wanted to give it a try. I really need to be better about documenting everything with pictures!

On my agenda today if I can get it done is:

-fire extinguisher
-Plasti dip door handles
-Install Rotopax lox mount on the back of my roof rack

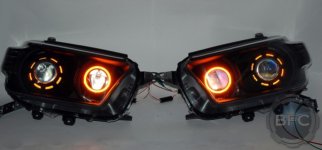
Oh, and last week I put in the work order at Black Flame Customs to get a HID projector retrofit done on some headlights. They're doing them on another housing, that way I won't have to take mine off. Let's just say this... they won't be like anything you've seen on here yet :D
 
Runner is looking great brother! Next time I drive home to NC I might have to make a stop in VA and check it out. Maybe we can even hit a trail while I'm there.
 
Realized I didn't have a complete shot of my current setup on the rear of my rack. Two in center are SR-Q floods, two on the outsides are SR-M floods.

 
Masking and first coat on Plasti-dip. Pretty straightforward mod, although on my second coats I typically manage to mess up the spray amount and get not enough coverage or too much in some places. Overall it's looking fine though. I'll post more pics here once it finishes drying this evening.

I used a piece of folded up cardboard to hold the door handle out as if you were opening it, that way I could get max coverage.

 
I'll go ahead and reserve this spot here for my extinguisher install. Okki's writeup/explanation is better than I could ever do but I'll be sure and post some pics of my own.

Here is a quick pic of all the hardware I got for this. 4 bolts, 8 washers, 4 nylon spacers, and 4 nylock nuts pretty much rounds it out.

 
Anyone know what this is? It just fell off my truck...


... JUST KIDDING!

Between coats of dipping I removed my rear sway bar. Now it can join my front sway bar collecting dust in the garage.
 
Last edited:
I got my Rotopax done on Sunday but haven't had a chance to post up a pic. Mounting this thing underneath the Stealth is a B!!!!!!!TCH. Pretty hard to get to and time-consuming, but in the end it's clean and works. Funny story, the lox mount I got was missing it's key so Rotopax sent me a new top assembly. It's currently on the way to me in the mail.

By the way, after dealing with their customer service, and in a day and age when good CS is rare, I would DEFINITELY do business with them again.

This thing fits perfectly like it was made specifically to fit in that rear spot of the Gobi Stealth. I'm liking it.
 

Attachments

  • 2013_4runner_quad_retrofit_projectors_amber_halo-08.jpg
    2013_4runner_quad_retrofit_projectors_amber_halo-08.jpg
    38.3 KB · Views: 1,277
So are the halos different? or shrouds different?
Why the difference (other than placement) from inner to outer ?

looks great!
 
Sooooo... headlight build is done. To say I'm excited is an understatement.

My favorite picture is below (credit for photo goes to BFC) but also check out the link:
2013 Toyota 4Runner Quad FXR MH1 Projector Retrofit with Quad Amber Halos | BlackFlameCustoms.com


What do you guys think? I went with the amber halos because I'm going to wire them in to come on same as my DRL/turn signals. Really looking forward to it!

Looks awesome, they will look great. How much did the whole setup ran you?
 
Looks awesome, they will look great. How much did the whole setup ran you?

Honestly I don't want to post it publicly. If you PM me I don't mind telling ya (no offense). Basically I wanted to make sure it got built professionally and with quality components, which ended up costing me probably a little more than I wanted to spend... but I'm positive I'll enjoy it.
 

Members online

Forum statistics

Threads
278,310
Messages
3,554,080
Members
248,016
Latest member
Advally Service

Trending content

Back
Top