Switch Pro 8100 mounting location

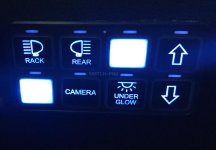
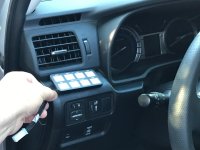
Here is where I mounted my controller.
It's a shame I can't change the color of the controller. Would like it to match the blue from the rest of the dash.

Here is my blue...
Sorry for poor image quality. The blue is nice and soft.
The placement is down by my left knee
 

Attachments

  • IMG_4550.jpg
    IMG_4550.jpg
    135.6 KB · Views: 1,597
Has anyone thought of mounting the 8100 below the drivers side air conditioning vent? Does anyone know how to remove the panel to gain access to the back of it? Seems like it would be a great location, and fairly easy to run the wiring harness to it once the panel is removed.
 

Attachments

  • IMG_5060.jpg
    IMG_5060.jpg
    129.4 KB · Views: 1,392
That's where I have mine mounted. It's temporarily Velcro'd as I wanted to make sure I like it but it's worked out well. I think I'll take the plunge and flush mount it. As far as getting behind to run wires, the panel comes off really easy.


Sent from my iPhone using Tapatalk
 
Has anyone thought of mounting the 8100 below the drivers side air conditioning vent? Does anyone know how to remove the panel to gain access to the back of it? Seems like it would be a great location, and fairly easy to run the wiring harness to it once the panel is removed.
Need to remove bottom panel before accessing that back side.

I have mine below
588c6a5d25f62ec6b9952cea04b484c5.jpg
 
d94f459a004d0477d923c38eb83c931f.jpg


This is where I mounted mine. Had to move some other switches around but liked it a little higher so I could actually see the buttons.


Sent from my iPhone using Tapatalk
 
Has anyone thought of mounting the 8100 below the drivers side air conditioning vent? Does anyone know how to remove the panel to gain access to the back of it? Seems like it would be a great location, and fairly easy to run the wiring harness to it once the panel is removed.

Thats where i plan to mount mine. Sucks that i have the regular and not the concealed mounting version. Bought my sp8100 before i bought the 4runner.


Please update on when you figure it out!
 
I mounted mine by my left knee where the factory switch blanks were located. I didn't have to cut or drill any of the factory plastic either with the recessed mounting hardware.

I removed the 4 factory switches in this location and relocated 1 to the upper switch location (wiper heater switch needs to be flipped upside down in order to fit this blank) and 1 to the lower single switch blank.

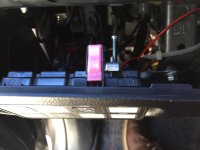
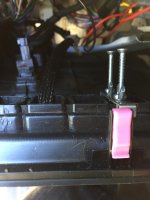
All i used was longer #1.5" x #6 machine bolts (in lieu of the supplied all-thread) and nuts to clamp the mounting brackets to the backside of the plastic.

Pretty satisfied with how clean it looks, although i have yet to install the SP-8100. I was debating mounting it vertically on the left plastic pillar below the stereo, but I didn't think it would look as clean/factory.

View attachment 242077

View attachment 242078

Thought i would post this here since a few others have asked how I mounted my SwitchPro panel to the factory switch location without cutting or drilling...

I only could use 1 of the concealed mounting brackets because the other side didn't line up right with the switch cutouts and i did not want to drill a hole in the plastic for the other bracket, so I just tightened down the one side. So far it has been perfect and does not wiggle or come loose at all.

I think i used 2 or 3"L bolts since I wasn't sure how long i needed the bolts to be, but 1.5" L bolts would be perfect.

2017-06-14_11-58-17_708.jpg

2017-06-14_11-58-56_765.jpg
 

Attachments

  • 2017-06-14_11-58-17_708.jpg
    2017-06-14_11-58-17_708.jpg
    118 KB · Views: 1,222
  • 2017-06-14_11-58-56_765.jpg
    2017-06-14_11-58-56_765.jpg
    129.2 KB · Views: 1,207
Has anyone thought of mounting the 8100 below the drivers side air conditioning vent? Does anyone know how to remove the panel to gain access to the back of it? Seems like it would be a great location, and fairly easy to run the wiring harness to it once the panel is removed.

This is probably the easiest panel to remove on the dash. You don't have to remove any other panel to open it. Just pull from the outside (door side) of the panel. There are four panel pins that hold it in place. No bolts or anything else hold it in.
 
I like where [MENTION=131300]Hawthorne[/MENTION] put the panel. I would have opted for that, but I have the flush mount panel- so I opted to do a little cutting and turn the existing coin holder (never use it) into the mounting point. pretty pleased with how it came out. Also- had to mount the module on passenger side of engine bay in order to reach my aux. battery. The cable between the module and switch panel was just enough length [emoji106]
e774e4c8c0f985536630653118b647ab.jpg
6ba1627714d9f6970f1476090925c408.jpg
1b33e02b1ed24c3cf55f85257f05adee.jpg
b950ef9f7ab5aac331804def49688032.jpg


cc6ebd0536930b92b0289d04a697cc34.jpg


Sent from my iPhone using Tapatalk
 
I like where [MENTION=131300]Hawthorne[/MENTION] put the panel. I would have opted for that, but I have the flush mount panel- so I opted to do a little cutting and turn the existing coin holder (never use it) into the mounting point. pretty pleased with how it came out. Also- had to mount the module on passenger side of engine bay in order to reach my aux. battery. The cable between the module and switch panel was just enough length [emoji106]
1b33e02b1ed24c3cf55f85257f05adee.jpg

Flat out the best location for mounting a switch pro!!!

:bravo:
 
I like where [MENTION=131300]Hawthorne[/MENTION] put the panel. I would have opted for that, but I have the flush mount panel- so I opted to do a little cutting and turn the existing coin holder (never use it) into the mounting point. pretty pleased with how it came out. Also- had to mount the module on passenger side of engine bay in order to reach my aux. battery. The cable between the module and switch panel was just enough length [emoji106]
e774e4c8c0f985536630653118b647ab.jpg
6ba1627714d9f6970f1476090925c408.jpg
1b33e02b1ed24c3cf55f85257f05adee.jpg
b950ef9f7ab5aac331804def49688032.jpg

cc6ebd0536930b92b0289d04a697cc34.jpg


Sent from my iPhone using Tapatalk

I don't have mine yet but I assume there should be more than enough cable to get to that mounting location coming through the driver side firewall? Did you run your cable through the driver or passenger side firewall?

Flat out the best location for mounting a switch pro!!!

:bravo:

I was planning to mount mine where the stock switches were but after seeing this, I think this is where I think I am going to mount mine now. Having the stock switches available is a bonus!
 
[MENTION=73851]007Tacoma[/MENTION] I was surprised no one else had put it there yet- mind you do have to do a bit more cutting than the other options (cutting down those two rounded up edges on top, and underneath need to modify the harder plastic console to accommodate the brackets that hold it in place). But definitely doable and I am no craftsman.


Sent from my iPhone using Tapatalk
 
I don't have mine yet but I assume there should be more than enough cable to get to that mounting location coming through the driver side firewall? Did you run your cable through the driver or passenger side firewall?


I was planning to mount mine where the stock switches were but after seeing this, I think this is where I think I am going to mount mine now. Having the stock switches available is a bonus!


Yes If you mount your module on driver side engine bay, you will have plenty (i.e extra) cable length for the panel. I mounted my module on passenger side engine bay, ran the cable across and down thru the driver side firewall. This method used the whole length of cable and was just the right amount of length, no more no less.


Sent from my iPhone using Tapatalk
 
I like where [MENTION=131300]Hawthorne[/MENTION] put the panel. I would have opted for that, but I have the flush mount panel- so I opted to do a little cutting and turn the existing coin holder (never use it) into the mounting point. pretty pleased with how it came out. Also- had to mount the module on passenger side of engine bay in order to reach my aux. battery. The cable between the module and switch panel was just enough length [emoji106]


Sent from my iPhone using Tapatalk

Well done! I may have to copy you when the time comes for my Switch Pros!
 
Thanks to [MENTION=144206]N.Alvarez[/MENTION] for the idea on the mounting location!

Got mine mounted up over the weekend. I opted out from cutting the coin holder although the piece is cheap enough to replace if I had to but instead, I made a 2 piece bracket out of ABS plastic and some 3M double sided tape. Still need to hide the wires but for now this works. The bracket is solid and the switch panel does not move when I press on it.

36094272396_c890568157_h.jpg
 
Nice! were you able to use the SP to control your anytime backup cam? if so, how did you wire it to the camera harness?

I'm almost finished installing my SP but i've been having the hardest time pushing the control panel wiring harness through the firewall... any tips? I've tried using a coat hanger but the wiring bundle keeps getting stuck when i try and pull it through :frusty:


I have been trying to search for this but haven't had much luck... I just did the install of my anytime backup cam auxiliary video input dongle and am having some trouble. From what I understand, I do not need to attach both the 'Auxiliary Video Input Dongle' AND the regular 'View My Backup Camera At Any Time' dongle?

So far what I did was attach the aux dongle into the rear of the headunit and then attached the factory harness into the other end of the dongle. Then I have the 'Source Selector' correctly attached with the male/female ends. From the 'Source Selector' I attached the RED wire to one of my Switchpros wires. This should give me the ability to at least turn on the rear camera override, correct? Then I attached a front camera and attached the red wire coming from that to another of the Switchpros wires. From my understanding should allow me to use that second Switchpros button for the front camera override? Also related, I have tried this both with the black wire grounded and also without it grounded and neither time worked. All the electrical wiring is fairly new to me and has thrown me for a loop.

I have been unable to get both the override or front camera to work through my switchpros and am hoping I have connected things wrong and that this is a rather simple fix. Is there something blatantly wrong with what I'm doing?
 
I have been trying to search for this but haven't had much luck... I just did the install of my anytime backup cam auxiliary video input dongle and am having some trouble. From what I understand, I do not need to attach both the 'Auxiliary Video Input Dongle' AND the regular 'View My Backup Camera At Any Time' dongle?

So far what I did was attach the aux dongle into the rear of the headunit and then attached the factory harness into the other end of the dongle. Then I have the 'Source Selector' correctly attached with the male/female ends. From the 'Source Selector' I attached the RED wire to one of my Switchpros wires. This should give me the ability to at least turn on the rear camera override, correct? Then I attached a front camera and attached the red wire coming from that to another of the Switchpros wires. From my understanding should allow me to use that second Switchpros button for the front camera override? Also related, I have tried this both with the black wire grounded and also without it grounded and neither time worked. All the electrical wiring is fairly new to me and has thrown me for a loop.

I have been unable to get both the override or front camera to work through my switchpros and am hoping I have connected things wrong and that this is a rather simple fix. Is there something blatantly wrong with what I'm doing?

I recently installed my anytime back up camera and was having some issues as well. I also have a front camera installed as well. From what i understand and how I have mine set up, you have to turn on the rear override first then while that switch is active, you turn on the switch for the front camera and this will switch the camera source to the front one. Once you turn off the override switch, then it goes back to the nav display.

Below is a video that explains this.
https://www.youtube.com/watch?v=rWhCFJ7cEmE
 
I recently installed my anytime back up camera and was having some issues as well. I also have a front camera installed as well. From what i understand and how I have mine set up, you have to turn on the rear override first then while that switch is active, you turn on the switch for the front camera and this will switch the camera source to the front one. Once you turn off the override switch, then it goes back to the nav display.

Below is a video that explains this.
https://www.youtube.com/watch?v=rWhCFJ7cEmE


Thanks for the reply! I'm unable to even get the switch I have wired up to get the rear override to activate so I'm stuck trouble shooting that first before I get to see if I'm having issues with the front as well. I should probably just use a normal switch like I'd assume most are but I have blanks on my Switchpros so I figured it would be best to try that first.
 

Members online

Forum statistics

Threads
278,309
Messages
3,554,067
Members
248,016
Latest member
Advally Service

Trending content

Back
Top