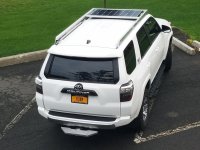
The 2016 ROAM 4Runner Build

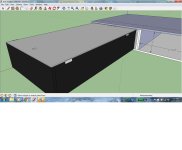
So, using your sketchup file (thanks again!), I modified it a bit to include a 'table top' for one of the drawers. When camping, I'm always wishing I had a tailgate or some flat surface to stand by and work / cook. I bring a table now and have to unload and unfold it. Why wouldn't this work?

It's a simple removable piece that would stow in the drawer (on top of the contents of the drawer). You remove it to get stuff out of the drawer (say, your stove or cooking utensils or whatever), replace it, and then work on top of it (with the drawer out and hanging out the back).

Thoughts?

I like the idea...except my thought was to cut 1/8" aluminum the same size as the outside of the drawer top (minus 1/8"), add some small 1/2" x 1-1/2" x 1/8" stops to the outside of the drawer, and lay the aluminum right on top. Easy to clean, heat resistant, strong, and light. I also would slide it under the drawer when not in use. (you might have to affix another small plate if it tends to move. I'd be sure to round the edges of the brackets to prevent snagging.

I'd leave the inside as open as possible...it fills quickly. You may also have to think about a small hold open option(something as simple as a removable pin in the side)

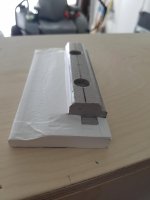
I've also included a couple of closeups from the paddle latches and catches I made to mount to underside to latch to. The screws for the paddle latches are SS 1"-10x32 with matching aviation nuts. They do not come with holes for mounting. I cut small pcs. of aluminum angle to act as catches...roughly 2" long x 3/8" high x 1-1/2" wide. The drawer has to slide under the top catch, before it will lay down on the drawer slides and fit into place. I made my tolerances a bit too tight on the drawer height...could have been an 1/8" less. (if there's any question about what an 1/8" looks like...just ask [MENTION=65614]Antman[/MENTION] to show you "big Jim and the Twins :wow:)

A few pics...


Attachments

  • 2016 drawer top.jpg
    2016 drawer top.jpg
    100 KB · Views: 2,399
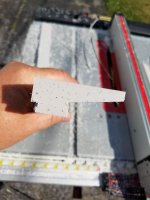
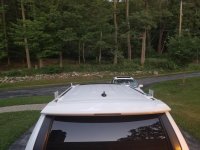
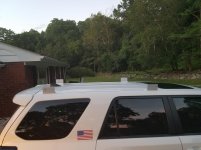
Had a little time, so I started cutting out some blocks of Star-board to act as a "foundation" for the aluminum feet for the new rack.

Once the silicone sets up...I'll start cutting my aluminum 1/4" angle and getting it bolted down.

At that point, once the angles are set (and deemed waterproof)...the slashing and crashing of the rack pieces can begin. Solar panel and awning are waiting patiently in the garage.

So I started with some scrap, trying to experiment with angles and design criteria, knowing water has to bypass and be able to drain. Another thing that I felt was important was fitting the contours as much as possible, to avoid a scenario that happened to another member, that actually crushed the sheet metal on the roof. The front part of the roof actually has more contour than the rear. A little extra time with a block plane and belt sander helped. Everything was bedded in silicone.

Before setting the blocks ....I wrapped them in white 3M vinyl, just to make them a little nicer looking.
 

Attachments

  • roof rack 3.jpg
    roof rack 3.jpg
    112.2 KB · Views: 2,257
  • roof rack 2.jpg
    roof rack 2.jpg
    106.1 KB · Views: 2,284
  • roof rack 4.jpg
    roof rack 4.jpg
    117.7 KB · Views: 2,301
Last edited:
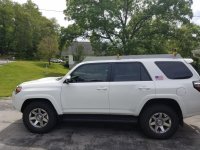
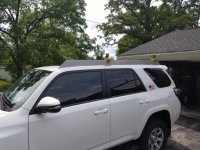
A little more progress..
 

Attachments

  • 20160702_203824.jpg
    20160702_203824.jpg
    135.1 KB · Views: 2,241
  • 20160702_203853.jpg
    20160702_203853.jpg
    132.7 KB · Views: 2,235
  • 20160703_145403.jpg
    20160703_145403.jpg
    137.7 KB · Views: 2,245
  • 20160703_145417.jpg
    20160703_145417.jpg
    137.6 KB · Views: 2,263
Got the solar panel mounted and hooked up yesterday...hot as balls all day. Also started a foundation for my nephews house, so between running back and forth down the street with the excavator, it was slow going.

Right now the controller is lying in the back, just to see how it does, and is not wired in. It was putting out 2 continuous amps with clouds and minimal sun...and my battery would usually drop to 12.3 by the end of the day, is now holding at 12.9.(the controller says the battery voltage is at 13.8, so I'll have investigate that further) That's with the windows up, and it's pretty hot in the truck. I'm guessing full sun the panel will put it at well over 5 amps.


Last edited:
Got the solar panel mounted and hooked up yesterday...hot as balls all day. Also started a foundation for my nephews house, so between running back and forth down the street with the excavator, it was slow going.

Right now the controller is lying in the back, just to see how it does, and is not wired in. It was putting out 2 continuous amps with clouds and minimal sun...and my battery would usually drop to 12.3 by the end of the day, is now holding at 12.9.(the controller says the battery voltage is at 13.8, so I'll have investigate that further) That's with the windows up, and it's pretty hot in the truck. I'm guessing full sun the panel will put it at well over 5 amps.


Looking super cool so far Mrs. Pat.
 
This is exactly what I have been thinking of doing. I built something similar before(I wanted to keep the factory rail mount):
http://www.toyota-4runner.org/5th-g...onstructive-criticism-please.html#post1994548
and found that kind of design is very practical. So following the direction of what I did, I was planning to do exactly what you are doing. I'm pretty excited to see you are doing what I wanted to do!

Looking forward to your future mods!

Thanks...I know the look isn't for everyone...I remember your home made rack, reading back when you built my outlook has changed a bit
I tried to keep in mind all the things I LIKED about some of the available aftermarket racks. I primarily am looking for function, looks will be secondary (keeping in mind beauty is in the eye of the beholder)and I know lots of folks will think it's butt. I think once the light bar and front fairing go on it will take on a clean, different look. I actually love the wheels and silver accents on the white TEP's. I'm planning on painting the light bar silver.


Looking super cool so far Mrs. Pat.

Thanks queerbait...it really means a f'in lot to me you like it.

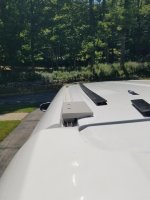
I have to clean and wax the roof and add the additional bars. I'm also cutting that that pain the ass shark fin with a handsaw...carnage picks to follow...hopefully it will work after I give it a haircut. I think I have a spot to also mount the charge controller.

More updates to follow, thanks for looking.
 

Attachments

  • 20160707_193334.jpg
    20160707_193334.jpg
    134.6 KB · Views: 2,092
Thanks...I know the look isn't for everyone...I remember your home made rack, reading back when you built my outlook has changed a bit
I tried to keep in mind all the things I LIKED about some of the available aftermarket racks. I primarily am looking for function, looks will be secondary (keeping in mind beauty is in the eye of the beholder)and I know lots of folks will think it's butt. I think once the light bar and front fairing go on it will take on a clean, different look. I actually love the wheels and silver accents on the white TEP's. I'm planning on painting the light bar silver.


Thanks queerbait...it really means a f'in lot to me you like it.

I have to clean and wax the roof and add the additional bars. I'm also cutting that that pain the ass shark fin with a handsaw...carnage picks to follow...hopefully it will work after I give it a haircut. I think I have a spot to also mount the charge controller.

More updates to follow, thanks for looking.

Look dumbfvck- instead of cutting the fin why don't you just make a cover plate from some of that cheap ass aluminum you have laying around?

What am I going to do with you...
 
I had originally went ahead and used a 5 amp fuse in the solar slot...thinking it would never put out 5 amps, especially just lying flat, and not angled at the sun. Went to check to see what the amps on the controller were when I hoped in the truck at 730..and the controller is reading zip...I was like wtf is going on...crapped out already?

So I checked the fuse and sure enough it was blown. Today is much more direct sun, and the the panel is cranking out 5.5 amps, and they battery was as high as 14.2 V's when I checked....it's finally getting the juice it deserves! I replaced the 5 amp fuse with a 10amp.


Got the 42" curved light bar installed...not wired yet. It's an Amazon El cheapo...but all in all pretty bright. I did tighten down all the heads on the glass...they all needed several turns to snug them up.


Got the 42" curved light bar installed...not wired yet. It's an Amazon El cheapo...but all in all pretty bright. I did tighten down all the heads on the glass...they all needed several turns to snug them up.


That looks flippin' sweet Pat!


How much was that light bar??
 
Got the 42" curved light bar installed...not wired yet. It's an Amazon El cheapo...but all in all pretty bright. I did tighten down all the heads on the glass...they all needed several turns to snug them up.
Love it!
 

Attachments

  • image.jpeg
    image.jpeg
    100.6 KB · Views: 1,623
Finished up the rack...installed the awning...next will be the Rotopax mounts.

Cut the shark fin with a hadsaw...lol...suck it Toyota...what a waste of plastic.


Last edited:
Pat, I've been meaning to ask...how are your lam x fogs holding up/working for you? Looks like a good change-up for all of the heavy rain/thunderstorms down here in S. Florida. Thanks!
 
Pat, I've been meaning to ask...how are your lam x fogs holding up/working for you? Looks like a good change-up for all of the heavy rain/thunderstorms down here in S. Florida. Thanks!

So far so good Bro...no real sign of wear to date. One of the cheapest mods to date...very happy!
 

Members online

Forum statistics

Threads
278,310
Messages
3,554,080
Members
248,016
Latest member
Advally Service

Trending content

Back
Top