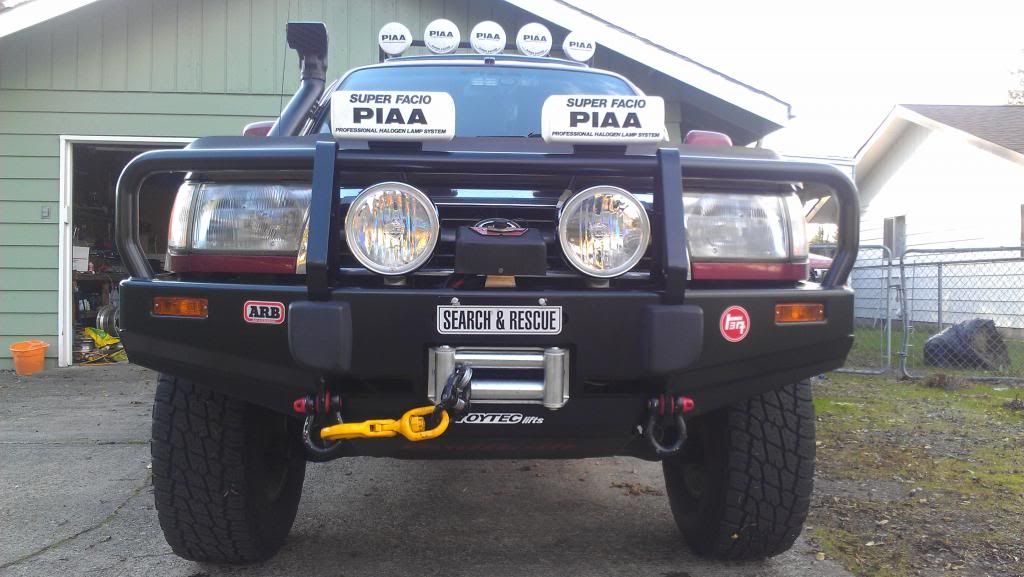
the Rescue Runner build thread

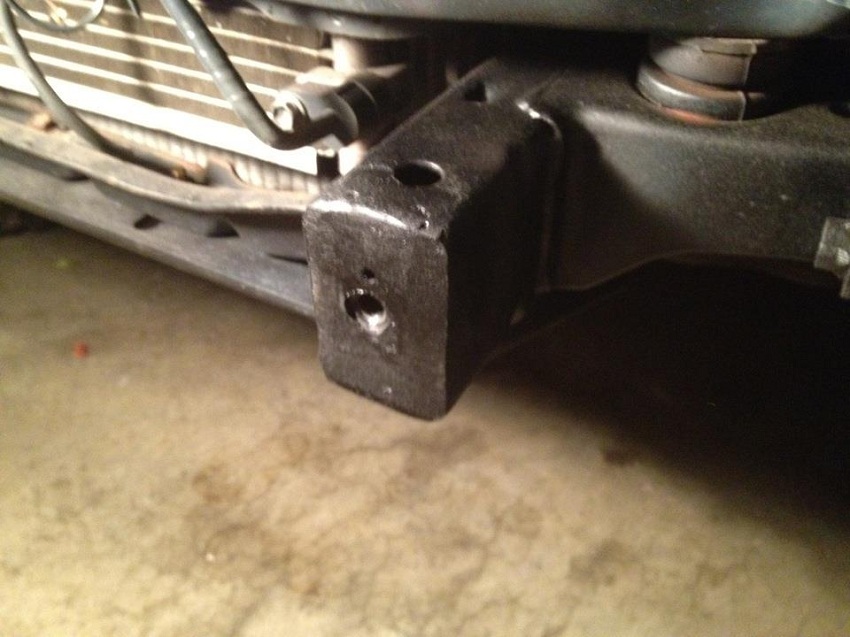
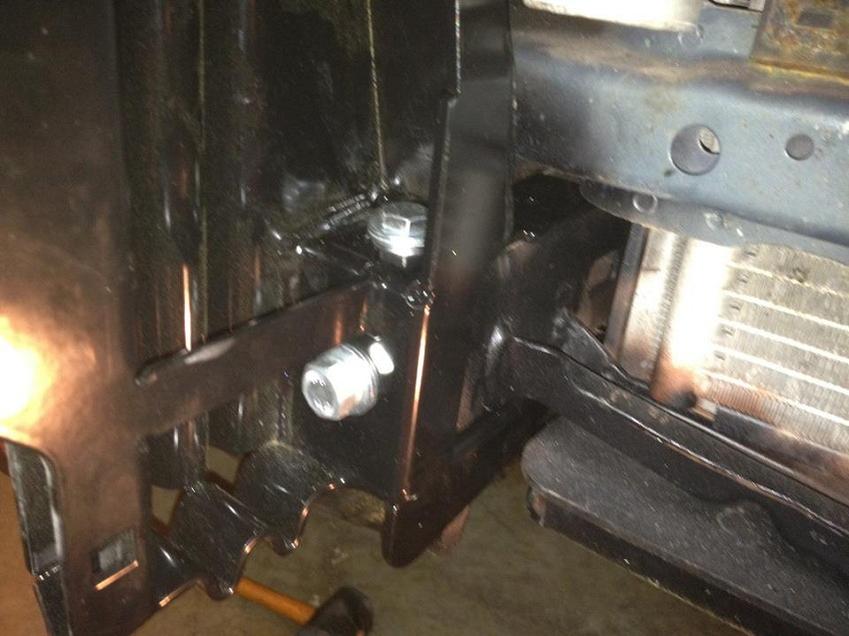
Do you have any plans to run a bolt through the endcap? That's what I did on mine to give me a little more hold to the bumper. I don't know if it matters all that much to the strength of the mount, but I know some others have done it as well.

75610d1352854757-rescue-runner-build-thread-endcap.jpg

75609d1352854749-rescue-runner-build-thread-arbbumpermount.jpg

I'm about to order my own ARB 34230-20 and was wondering how critical it is to have that bolt through the frame endcap perfectly centered?
Or in other words, how much wiggle room do those ARB frame brackets offer so the bumper itself still ends up evenly lined up horizontally?
 
I'm about to order my own ARB 34230-20 and was wondering how critical it is to have that bolt through the frame endcap perfectly centered?
Or in other words, how much wiggle room do those ARB frame brackets offer so the bumper itself still ends up evenly lined up horizontally?

Its tight. Not crazy though. If you line it up close to center you should be able to fit the bolt. Mine aren't perfect by any means and I didn't have to enlarge the hole any. If it does end up not lining up perfect you can grind the hole a little bigger and it won't damage the integrity of the mount.
 
Its tight. Not crazy though. If you line it up close to center you should be able to fit the bolt. Mine aren't perfect by any means and I didn't have to enlarge the hole any. If it does end up not lining up perfect you can grind the hole a little bigger and it won't damage the integrity of the mount.

are your holes threaded, or did you weld a nut to the inside of the plate (in which case, do you happen to know the thread pitch?)?
 
are your holes threaded, or did you weld a nut to the inside of the plate (in which case, do you happen to know the thread pitch?)?

So what I did will make more sense once you get the bumper. You get these frame extension boxes. What I did was cut the part with the nut and on long side from that. Then I slid the L (shape you get once you cut it) into the frame and welded the front and the side (a rosette weld through a stock hole in the frame). This way I used a bolt from the ARB hardware bag. If you do this make sure you weld it with the bolt in place. That way the heat doesn't deform the nut.

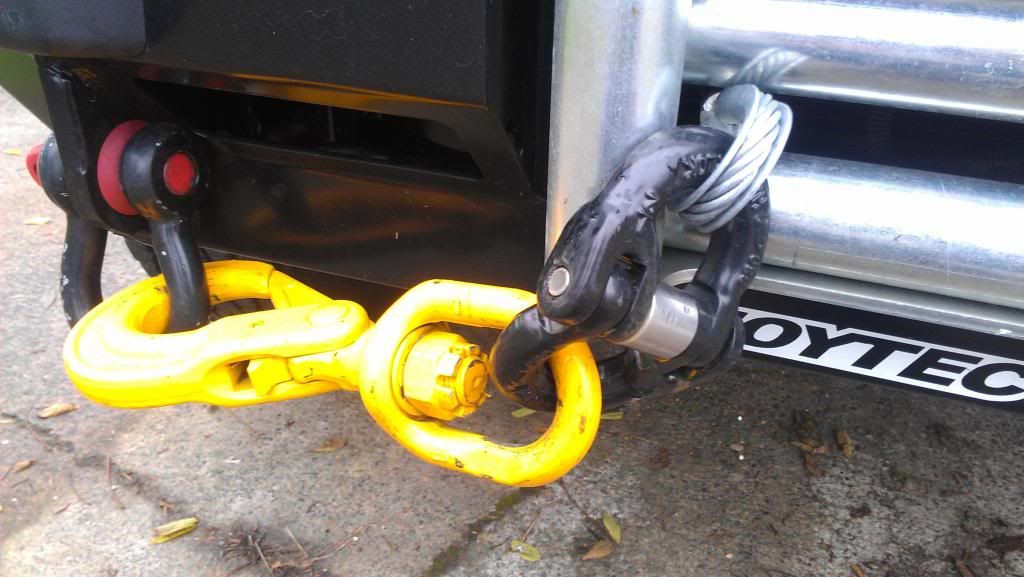
You didn't ask me but I'll answer anyways. I have a similar rubber thing to stop my shackles from clanging. I used a shank washer (beveled like the one you see) on both sides with the same diameter as the pin. I had to use an extra washer too as it still wasn't tight enough. You can get it all at Lowes.


On a different note. How is the light output with the lights that far back on your rack [MENTION=60147]the kid[/MENTION] ? I've been debating adding some to mine.
 
I'm about to order my own ARB 34230-20 and was wondering how critical it is to have that bolt through the frame endcap perfectly centered?
Or in other words, how much wiggle room do those ARB frame brackets offer so the bumper itself still ends up evenly lined up horizontally?

Isaac, which clevis D-shackles are those? In particular, I am interested in those red bushings you are using to keep your D-shackles from clanging around...

there is enough room that you do not have to take a mic to get it perfect, just get it close to center (use a tape or ruler ect.) and go with that. what i did was ended up welding in a plate of 3/8" steel for the cap, then i drilled that with a pilot hole(small first initial hole) and then went up to the bolt size desired(make sure its going to fit through the opening in the bracket and make sure to leave a couple of mm of wiggle room for imperfections) and then i tapped that hole with the matching thread pitch of my bolt. i figured that would be easier than drilling a huge hole and trying to weld a nut in that hole and hold it perfectly level and straight.... if i was doing this all over again i would have drilled the hole in my new end cap/plate and welded the nut on the that while it was on the bench before i put that cap in my frame, but i wasnt thinking and forgot to do that so i was forced to do this. -at least i used a 3/8" plate to make my end caps out of lol.

its not critical, as long as you are not going to be winching, but if you plan on putting a winch on and doing any pulling then id do it, actually scratch that, id do it with out a winch, cause you never know when you are gonna use your bumper and its tow points to yank someone out of a ditch or over a rock ect or have yourself yanked from that situation so yeah id do it even with out a winch. also that vertical through bolt at the end of the frame, the "pinch" bolt, its the one that goes clear through the frame, you need that one, i initially did not install that bolt and that was a mistake. even without the winch, the front of my bumper nose dived and that caused the "wings"(the part that goes along the sides back under the fender up to the tire) to push up into my fenders and rub the paint off my fenders and the powder coating off my bumper. those bolts, if i had installed them like i should have would of prevented the bumper from deflecting down like that, they also prevent a lot of vibration as well. -my bumper would bounce around like my brush guard would and i didnt like that. also the with out those bolts and only useing the 4 lower blots like i initially did, caused the brackets to bend and i had to carefully heat them up and bend them back when i re-did the bumper when i put the winch in. all in all, having to go back and redo all of that cost me more time and hassle than it was worth. it took me twice as long to fix that than it did to install the bumper -lesson learned lol


as for those red rubber bushings that i have on my tow hooks, they are simply a "ball-cock washer" that you can get at almost any hardware store or plumbing store. -i went to home depot and lowes but i could not find them by themselves at either of the stores close to me so i just went to a plumbing store and got them. i think they were like $.75 each and you need two per shackle. i was lucky and my store had them in red or black so i got the red ones. with my shackles the through pin was larger than the hole in the ball-cock washer, so i had a hell of a time getting them on their initially but once you get them on there and they are on there for a while they will stretch out and not be as much of a PITA to do the next time when you need to put a strap on them or what ever you use them for. -i even tried using some sil-glyde but it was a bear to do.
 
On a different note. How is the light output with the lights that far back on your rack [MENTION=60147]the kid[/MENTION] ? I've been debating adding some to mine.

its great, i love them up high like that, the only thing i wish was different and its easily do-able, -im just lazy right now and havent gotten around to doing it, is putting them on a switch, so i can use them for work lights or camp set up ect. they are great! they light up the whole area behind the truck and dont cast long shadows(cause they are up high and typically higher than anything else). right now i am not running my roof rack, and have another pair of the same lights mounted down below under my bumper on either side of the tow-receiver hitch. they are wired the same way off the relay triggered by my backup lights at the tail lights. and while they work great as well, if there is a rock or a log back there they cast long shadows and the contrast from light to dark can make things harder to see, but its still 10x better than the stock backup lights that are barely zippo rated...

when i put my rack back on, im probably gonna leave the lights down below my bumper and have a set up on the rack as well. if im going wheeling its just two bolts and two wires that are easy to remove so i dont smash the lower ones on rocks.
 
there is enough room that you do not have to take a mic to get it perfect, just get it close to center (use a tape or ruler etc.) and go with that. what i did was ended up welding in a plate of 3/8" steel for the cap, then i drilled that with a pilot hole (small first initial hole) and then went up to the bolt size desired (make sure it's going to fit through the opening in the bracket, and make sure to leave a couple mm of wiggle room for imperfections), and then i tapped that hole with the matching thread pitch of my bolt. i figured that would be easier than drilling a huge hole and trying to weld a nut in that hole and hold it perfectly level and straight.... if i was doing this all over again, i would have drilled the hole in my new end cap/plate and welded the nut on that while it was on the bench before i put that cap in my frame, but i wasn't thinking and forgot to do that, so i was forced to do this. -at least i used a 3/8" plate to make my end caps.

it's not critical, as long as you are not going to be winching, but if you plan on putting a winch on and doing any pulling, then i'd do it, actually scratch that, i'd do it without a winch cause you never know when you are gonna use your bumper and its tow points to yank someone out of a ditch or over a rock etc, or have yourself yanked from that situation, so yeah, i'd do it even without a winch. also that vertical through bolt at the end of the frame, the "pinch" bolt, it's the one that goes clear through the frame, you need that one, i initially did not install that bolt, and that was a mistake. even without the winch, the front of my bumper nose dived and caused the "wings" (the part that goes along the sides, back under the fender, up to the tire) to push up into my fenders and rub the paint off my fenders and the powder coating off my bumper. those bolts, if i had installed them like i should have, would of prevented the bumper from deflecting down like that, they also prevent a lot of vibration as well. -my bumper would bounce around like my brush guard would, and i didn't like that. also, without those bolts, and only using the 4 lower bolts like i initially did, caused the brackets to bend, and i had to carefully heat them up and bend them back when i re-did the bumper when i put the winch in. all in all, having to go back and redo all of that cost me more time and hassle than it was worth. it took me twice as long to fix that than it did to install the bumper -lesson learned

as for those red rubber bushings that i have on my tow hooks, they are simply a "ball-cock washer" that you can get at almost any hardware store or plumbing store. -i went to home depot and lowes, but i could not find them by themselves at either of the stores close to me, so i just went to a plumbing store and got them. i think they were like $.75 each, and you need two per shackle. i was lucky, and my store had them in red or black, so i got the red ones. with my shackles, the through pin was larger than the hole in the ball-cock washer, so i had a hell of a time getting them on there initially, but once you get them on there and they are on there for a while, they will stretch out and not be as much of a PITA to do the next time when you need to put a strap on them or whatever you use them for. i even tried using some sil-glyde, but it was a bear to do.


thanks for the the reply and all the tips

I do plan on mounting the new Warn M8000 sitting I have on the shelf in the garage, so I plan to box the frame as recommend here
 
bought a B&M 70255 for a power steering cooler today, not sure where im gonna mount it but i figured it was a good idea being as though 2 winters ago i burned up a PS pump doing a snow wheeling trip... if i cant find a place to mount this then i think im gonna get a cooltube for the PS and look at my options for mounting that. the cooltube would i think add more volume but im not sure that that is necessary. also im gonna add a magnafine inline filter to the PS system. the 70255 was a no brainer at $25 open box special.
 
bought a B&M 70255 for a power steering cooler today, not sure where im gonna mount it but i figured it was a good idea being as though 2 winters ago i burned up a PS pump doing a snow wheeling trip... if i cant find a place to mount this then i think im gonna get a cooltube for the PS and look at my options for mounting that. the cooltube would i think add more volume but im not sure that that is necessary. also im gonna add a magnafine inline filter to the PS system. the 70255 was a no brainer at $25 open box special.

I never realized the PS ever needed a cooler or a filter. Benefits?
 
well under heavy use you can burn up the pump by overheating the fluid... ive done this once two years ago in the snow, it was also the begining of my steering racks demise. ever sense then it has leaked and its just gotten worse...
 
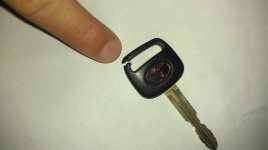
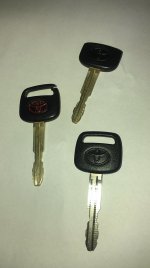
so i found a new upgrade for those pesky black dealer keys that keep braking... idk if any of you have been having this issue, but i have gone through like 5 of these things sense i bought the truck, and two just this year... now they arent the most expesive key at like $11.33 -$10.20 my cost but still no sense i spending $20 a year on keys for your vehicle. -i know i know, i could just do what everyone else does and just use the metal key.... I DONT WANT TO lol its that simple, its easy for me to pick out my key in my pocket without having to look at it, i can just feel it. and the plastic cover has the nice embossed toyota logo, and it doesnt rattle or jingle as much as a solid metal key would. so the other day i was thinking "boy i wish my 4runner key was as nice as my wifes yaris keys..." i mean that thing is softer, bendable but yet ridged enough to hold a key ring easily.
961205_10151862623688735_2058185723_n.jpg

1167810_10151862603508735_567492172_n.jpg

anyhow off to the dealer today to get another new key, i have my key code of my vin number so they can look it up and just cut me a new key from that and im good to go. i get the new key and again look at it and think "wonder how long this one will ask?" and go out to my truck and just as im sitting there i see my wifes spare keys in my console and i get an idea... i grab her key and put them side by side, they look the same so i put her key in the ignition. it fits! it slides in perfectly, so i pull it out and inspect them even closer, they are the same thickness, the groves are in the same place and have the same gap, the width of the key is the same, the length of the key is the same... the only thing that i can see to be different is the head. so i grab her key and head back inside.

back at the counter the guy who just made my key has this look of oh no... he asks if there is something wrong with the key. i say no but i want to see if we can do something. i proceed to show him the two keys, and explain my issues with the standard 4runner key. then i ask if i can have my 4runner key pattern cut into a blank yaris key with the better nicer fob/handle/backing. he and a couple other guys look at it and figure "i dont see why not" and so he double checks what i want and confirm with me everything and goes back and 2 min later i have a new upgraded/dated key. i pay for this one as well list price of $14.97 -$13.47 my cost and im out the door. it works perfectly and looks great.

bottom line here is i have a new key that has a newer better handle on it that wont brake like all my others have.
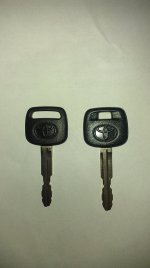
part numbers for the blank keys are as fallows;
stock 97 4runner bank key: 90999-00185 (left)
stock 07 yaris blank key:90999-00199 (right)
1290077_10151862612453735_171306390_n.jpg

i dont know why toyota has not superseded to this new key as again the key shaft is identical in every way. so if you like me have been having issues with your keys breaking you might want to ask for the 00199 key over the 00185 next time you go get a key
 

Attachments

  • 961205_10151862623688735_2058185723_n.jpg
    961205_10151862623688735_2058185723_n.jpg
    43.4 KB · Views: 2,290
  • 1167810_10151862603508735_567492172_n.jpg
    1167810_10151862603508735_567492172_n.jpg
    61.7 KB · Views: 2,328
  • 1290077_10151862612453735_171306390_n.jpg
    1290077_10151862612453735_171306390_n.jpg
    61.4 KB · Views: 2,210
Last edited:
thanks for that tip!

I, too, have a broken 4Runner key, so I may head to my local stealership on Tuesday and get this done...
 
I don't have to sell, but for the right price I would. I would like something bigger. And with less miles. It would be nice to not stress things when towing and to have more room for the family to grow, and honestly have a little more luxury... 100 series mmmmm
 
Last edited:

Members online

Forum statistics

Threads
278,309
Messages
3,554,070
Members
248,016
Latest member
Advally Service

Trending content

Back
Top