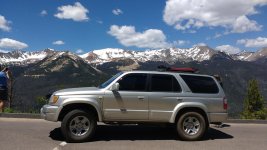
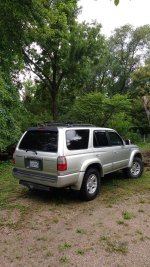
The Sciencemobile

I experienced a trans issue in a V6 Nissan twice, actually on Hwy 50 heading up the hill just East of Sacramento. The fix for me was a trans flush. The old fluid heated up going up the hill and made the trans act funny, wouldn't shift out of 3rd gear so I had to pull over and let it cool before proceeding. Old, overheated fluid being the problem.

Anyway new fluid in there solved the issue. For a 4Runner, an external trans cooler is always a good idea as well, for cooler temps, and keeping things separate from the radiator.
 
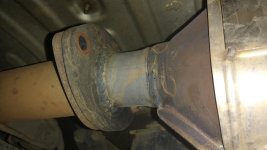
Somewhere in Utah an exaust bolt started to loosen, then at Mesa Verde it decided it's part in our journey was at an end. I packed a small selection of metric bolts and nuts in common sizes, and an m8 x45 or so was the closest thing I had so it's on there for now. I bought some m10x40s in Durango. If they fit, I'll put one in instead of the m8, and have one as a spare. The other bolt of the two that hold the flanges between the cats together, was also loose, and two of the three nuts at the Y pipe were also loose.
 

Attachments

  • IMG_20170623_202842217.jpg
    IMG_20170623_202842217.jpg
    125.1 KB · Views: 906
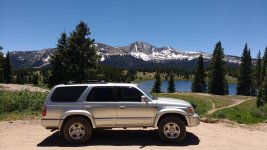
Still having a great time. The transmission got over 230 once on a pass. The next bit of mod money will be on a transmission cooler, an it will get a filter and fresh atf, or maybe a flushing when we get back. In other news, I figured out how to attach photos with my phone today
 

Attachments

  • IMG_20170624_130008893.jpg
    IMG_20170624_130008893.jpg
    137.5 KB · Views: 908
Still having a great time. The transmission got over 230 once on a pass. The next bit of mod money will be on a transmission cooler, an it will get a filter and fresh atf, or maybe a flushing when we get back. In other news, I figured out how to attach photos with my phone today


You likely don't need a new filter. The trans filter is really just a metal screen that can be cleaned and re-used. Saves you $30-$40 over purchasing a new one.

New fluid and a trans cooler should net a nice improvement in temps and a happier trans.

Great pic BTW.

Justin
 
You likely don't need a new filter. The trans filter is really just a metal screen that can be cleaned and re-used. Saves you $30-$40 over purchasing a new one.

New fluid and a trans cooler should net a nice improvement in temps and a happier trans.

Great pic BTW.

Justin

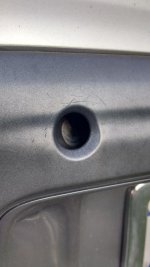
Thanks for the heads up! I'll skip the filter, and put that money towards the cooler, probably the larger of the common ones. I will bypass the trans cooler part of the radiator, even though it is brand new. At least it was brand new a week ago, it has 2000 miles on it now.We made it to Kansas City, MO with only a small hitch. The hatch lock mechanism decided to play hide and seek in Estes Park, Co. We can still lock and unlock it with door buttons, and work the window with the dash button. I will still pull the interior trim off when I have the chance to look at it. It might just be a fastener that fell out or something simple.
 

Attachments

  • IMG_20170627_191400697_HDR.jpg
    IMG_20170627_191400697_HDR.jpg
    137.4 KB · Views: 861
Thanks for the heads up! I'll skip the filter, and put that money towards the cooler, probably the larger of the common ones. I will bypass the trans cooler part of the radiator, even though it is brand new. At least it was brand new a week ago, it has 2000 miles on it now.We made it to Kansas City, MO with only a small hitch. The hatch lock mechanism decided to play hide and seek in Estes Park, Co. We can still lock and unlock it with door buttons, and work the window with the dash button. I will still pull the interior trim off when I have the chance to look at it. It might just be a fastener that fell out or something simple.

The back bezel is a pain to take off. I have a post in my build thread where I list the steps and if you search it you'll find info as well. The screws holding the key cylinder on are small, loose and not very strong in the plastic. They probably broke out.
 
The back bezel is a pain to take off. I have a post in my build thread where I list the steps and if you search it you'll find info as well. The screws holding the key cylinder on are small, loose and not very strong in the plastic. They probably broke out.
Wow reading your thread reminds me of how spoiled I am where I live, where rust doesn't destroy everything. One of the 4runners I test drove before buying this one had bad frame rust, you couldn't tell though from the Craigslist ad though cause the rust had been spray painted over black. The body was great actually, but the frame had holes I could put fingers through, half assed scary rear body mounts booger welded in over big frame patches, and huge swollen sections flaking. I pulled off a handful of the frame flakes from by the uca mount and showed them to the owner. He was not concerned. He also thought it was a California car, which it obviously was not.

Anyway, fixing the lock cylinder seems a pain in the butt. I think I just might wait till I get home to tackle it. Until then it will get a piece of duct tape, in case it rains.
 

Attachments

  • IMG_20170625_125821409_HDR.jpg
    IMG_20170625_125821409_HDR.jpg
    139.5 KB · Views: 866
  • IMG_20170625_123541729.jpg
    IMG_20170625_123541729.jpg
    137.7 KB · Views: 868
Wow reading your thread reminds me of how spoiled I am where I live, where rust doesn't destroy everything. One of the 4runners I test drove before buying this one had bad frame rust, you couldn't tell though from the Craigslist ad though cause the rust had been spray painted over black. The body was great actually, but the frame had holes I could put fingers through, half assed scary rear body mounts booger welded in over big frame patches, and huge swollen sections flaking. I pulled off a handful of the frame flakes from by the uca mount and showed them to the owner. He was not concerned. He also thought it was a California car, which it obviously was not.

Anyway, fixing the lock cylinder seems a pain in the butt. I think I just might wait till I get home to tackle it. Until then it will get a piece of duct tape, in case it rains.

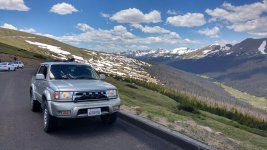
Sorry, but I feel compelled to shop myself into every pic of a 4Runner that is sagging in the rear. Something about it just feels right after I'm done...

 
Sorry, but I feel compelled to shop myself into every pic of a 4Runner that is sagging in the rear. Something about it just feels right after I'm done...


So that is why mpgs went down! I thought it was the weight from the Unnecessary and unused firewood I have hauled 2000 miles. The signs on that road say that due to the elevation; "side effects" of "medication" may be increased. I bet it was a fun time up there :smokin:
 
Good times in Kansas City, hanging out with family. The duct tape on the hatch lock hole is holding, despite the epic Midwestern rains. We went to q39 for some epic bbq, the likes of which I can't find in the Bay area.
 

Attachments

  • IMG_20170629_135443736.jpg
    IMG_20170629_135443736.jpg
    133.6 KB · Views: 808
  • IMG_20170628_204227173.jpg
    IMG_20170628_204227173.jpg
    143 KB · Views: 797
Looks good. What MPG are you getting on the highway on the long stretches?
On long pretty flat stretches we are getting a bit over 22 mpg! Even with all the mountain passes, we are still averaging a bit over 21 this trip. Having the current mpg and average mpg numbers on the scanguage make a big difference, because it is a constant reminder to not put my foot in it too bad.

I have no science to back this up, because it's all on different streaches of road, but I think that 87 gets better mpg then 85, and 89 even better then 87. Gas was so cheap in the Midwest, and now Texas, that I spring for better gas too.
 
We are back from the trip. Put almost 6,000 miles on the 4runner in two and a half weeks. Damage report is;
1) Drivers door power lock works intermittently. Might just need playing with and lube. Started doing this in Kansas City, Mo
2) Hatch lock cylinder retreated into the rear hatch, in Esetes Park, Co.
3) Hatch power lock cylinder works intermittently, some times will not lock, sometimes will not lock. Problem is fixed by pushing in on the door while hitting unlock, or moving the rear window slightly. I suspect it has to do with internal linkage being compromised First happened a little south of Albuquerque, NM
4) Loose/Missing exhaust hardware. Jury rigged with spare hardware until in town where I got proper hardware.
5) The transfer case shifted itself in to neutral, apparently, off and on, had no self movement possible. Got towed to a transmission shop. Worked off the trailer. Possibly something heat related, it was in the mid 90s, and had just gained 5000 feet of elevation in the last 30 miles. Couldn't replicate problem, worked ever since, put another 5,600 miles on it after that. That happened about lunchtime the day we left outside South Lake, CA

Overall a great trip, and the 4runner was good to us.

<a data-flickr-embed="true" href="https://www.flickr.com/photos/38032720@N06/35662376402/in/dateposted-public/" title="IMG_20170706_130054057_HDR"><img src="https://farm5.staticflickr.com/4236/35662376402_0e452c8d4d_b.jpg" width="576" height="1024" alt="IMG_20170706_130054057_HDR"></a><script async src="//embedr.flickr.com/assets/client-code.js" charset="utf-8"></script>
^ I know someone knows where this is, and probably has a picture of their 4runner in front of it as well.
As I have time I will upload pictures and stuff. There are a few pre-trip mods I did before leaving, and lots of 4runner pictures and videos.
 
Fuse Box and Power Inverter

Wanting to hook up some electrical accessories, I got a fuse box. I have owned vehicles in the past with inline fuse holders hidden here and there, and wanted to avoid that sort of ghetto wiring practices on the 4runner.
<a data-flickr-embed="true" href="https://www.flickr.com/photos/38032720@N06/35189031052/in/dateposted-public/" title="IMG_20170506_114234860"><img src="https://farm5.staticflickr.com/4195/35189031052_fe05b661b8_b.jpg" width="1024" height="576" alt="IMG_20170506_114234860"></a><script async src="//embedr.flickr.com/assets/client-code.js" charset="utf-8"></script>
Immediately returning to ghetto wiring practices, I mounted it with zip ties on top of the stock fuse box cover.
<a data-flickr-embed="true" href="https://www.flickr.com/photos/38032720@N06/34545535863/in/dateposted-public/" title="IMG_20170506_115755979"><img src="https://farm5.staticflickr.com/4262/34545535863_63fc51d5d8_b.jpg" width="576" height="1024" alt="IMG_20170506_115755979"></a><script async src="//embedr.flickr.com/assets/client-code.js" charset="utf-8"></script>
I then wired up the positive with some wire I stole (er, recycled) off of a non-functioning jump start battery kit.
<a data-flickr-embed="true" href="https://www.flickr.com/photos/38032720@N06/35189029452/in/dateposted-public/" title="IMG_20170506_131505619"><img src="https://farm5.staticflickr.com/4213/35189029452_433baf01aa_b.jpg" width="576" height="1024" alt="IMG_20170506_131505619"></a><script async src="//embedr.flickr.com/assets/client-code.js" charset="utf-8"></script>
I ran a variety of wires in the cab, through a hole in the rocker then a hole under the door step trim.
<a data-flickr-embed="true" href="https://www.flickr.com/photos/38032720@N06/34968332440/in/dateposted-public/" title="IMG_20170528_175211174"><img src="https://farm5.staticflickr.com/4233/34968332440_eb9812263f_b.jpg" width="576" height="1024" alt="IMG_20170528_175211174"></a><script async src="//embedr.flickr.com/assets/client-code.js" charset="utf-8"></script>
I have a power inverter I wanted to hook up, simple right? Things got… complicated…
<a data-flickr-embed="true" href="https://www.flickr.com/photos/38032720@N06/34545533603/in/dateposted-public/" title="IMG_20170506_181403493"><img src="https://farm5.staticflickr.com/4229/34545533603_3582cb511e_b.jpg" width="576" height="1024" alt="IMG_20170506_181403493"></a><script async src="//embedr.flickr.com/assets/client-code.js" charset="utf-8"></script>
I don’t want to have the inverter in the way, and have a whole bunch of wires all over. So naturally I hard wired it from the fuse box, through a switch.
<a data-flickr-embed="true" href="https://www.flickr.com/photos/38032720@N06/34545547823/in/dateposted-public/" title="IMG_20170524_195913901"><img src="https://farm5.staticflickr.com/4241/34545547823_5e7a46cd85_b.jpg" width="576" height="1024" alt="IMG_20170524_195913901"></a><script async src="//embedr.flickr.com/assets/client-code.js" charset="utf-8"></script>
It needs to be pretty though.
<a data-flickr-embed="true" href="https://www.flickr.com/photos/38032720@N06/35225801451/in/dateposted-public/" title="IMG_20170524_200640884"><img src="https://farm5.staticflickr.com/4222/35225801451_52208241f1_b.jpg" width="576" height="1024" alt="IMG_20170524_200640884"></a><script async src="//embedr.flickr.com/assets/client-code.js" charset="utf-8"></script>
I zip tied it up behind the ash tray area. I put some switches to the lower left of the steering wheel. The one on the bottom turns the inverter on/off. The top left switch is for bumper Leds, the other one is to be decided still. There are lots of fun options.
<a data-flickr-embed="true" href="https://www.flickr.com/photos/38032720@N06/35225815421/in/dateposted-public/" title="IMG_20170528_201813362"><img src="https://farm5.staticflickr.com/4281/35225815421_96bd8f5a94_b.jpg" width="576" height="1024" alt="IMG_20170528_201813362"></a><script async src="//embedr.flickr.com/assets/client-code.js" charset="utf-8"></script>
The outlet comes of the little ashtray door. I have about 2 feet of available wire that can be pulled out, or shoved back in. I bet if I took the time I could modify the ash tray and plug end so the plug can fit in the ash tray, but haven’t really looked into it.
<a data-flickr-embed="true" href="https://www.flickr.com/photos/38032720@N06/35991687795/in/dateposted-public/" title="IMG_20170713_221503086"><img src="https://farm5.staticflickr.com/4295/35991687795_d5105e79a3_b.jpg" width="576" height="1024" alt="IMG_20170713_221503086"></a><script async src="//embedr.flickr.com/assets/client-code.js" charset="utf-8"></script>
The three outlet plug.
<a data-flickr-embed="true" href="https://www.flickr.com/photos/38032720@N06/35991691235/in/dateposted-public/" title="IMG_20170713_221552502"><img src="https://farm5.staticflickr.com/4296/35991691235_1fc511e20c_b.jpg" width="1024" height="576" alt="IMG_20170713_221552502"></a><script async src="//embedr.flickr.com/assets/client-code.js" charset="utf-8"></script>
After some good use I can say I am happy how this turned out. There was many a day on our recent trip where between phones and cameras, we had all three outlets busy charging something. This isn't really an exciting, or sexy mod, but it is one of the most used.
 
Got these off amazon, I wanted to be able to have a little ventilation, even in the rain. I got the ones that fit in the channel, having heard stories of the outside mount ones falling off at inopportune moments. I don’t really care for the look too much. The function is nice though.
<a data-flickr-embed="true" href="https://www.flickr.com/photos/38032720@N06/35225803681/in/dateposted-public/" title="IMG_20170524_185730392"><img src="https://farm5.staticflickr.com/4288/35225803681_4b42e8c4cb_b.jpg" width="576" height="1024" alt="IMG_20170524_185730392"></a><script async src="//embedr.flickr.com/assets/client-code.js" charset="utf-8"></script>
Another amazon purchase, I just think these are the coolest things. It wasn’t super expensive, and it is small and easy to store. Just having it is good peace of mind.
<a data-flickr-embed="true" href="https://www.flickr.com/photos/38032720@N06/35225806971/in/dateposted-public/" title="IMG_20170522_182211370"><img src="https://farm5.staticflickr.com/4235/35225806971_98d828c57b_b.jpg" width="1024" height="576" alt="IMG_20170522_182211370"></a><script async src="//embedr.flickr.com/assets/client-code.js" charset="utf-8"></script>
<a data-flickr-embed="true" href="https://www.flickr.com/photos/38032720@N06/34545548903/in/dateposted-public/" title="IMG_20170522_182308204"><img src="https://farm5.staticflickr.com/4211/34545548903_b54471b66c_b.jpg" width="1024" height="576" alt="IMG_20170522_182308204"></a><script async src="//embedr.flickr.com/assets/client-code.js" charset="utf-8"></script>
 
There's some serious science goigng on there!!! You are probably aware, but some inverters don't produce a pure sine wave and may harm certain electrical devices. Not sure which ones hurt what, just a thought. For battery chargers, the cheapo inverter is probably OK.
 
There's some serious science goigng on there!!! You are probably aware, but some inverters don't produce a pure sine wave and may harm certain electrical devices. Not sure which ones hurt what, just a thought. For battery chargers, the cheapo inverter is probably OK.

I did some half-assed research on that subject when I bought this power inverter five years ago, and a little more when we got the GoPros. I didn't really learn much. I remember that quality control on the Harbor Freight inverters was supposedly iffy, what a surprise! Apparently some of them don't produce a pure sine wave. I don't know if mine does or not. I saw on the internet somewhere that the GoPros aren't particularly sensitive to irregular sine waves though, and we have been charging the point and shoot camera with this inverter for years. So in a nutshell, I did a minute amount of research, didn't quite understand it, and called it good. :hiding:
 
Before leaving I had some maintenance to do, so I went on amazon and bought these. I bought it all on amazon because of the two day prime shipping. I am sure they can be found cheaper elsewhere, for longer shipping times, but I did all this a few days before leaving so my options were limited.
<a data-flickr-embed="true" href="https://www.flickr.com/photos/38032720@N06/35991993475/in/dateposted-public/" title="IMG_20170616_175227688"><img src="https://farm5.staticflickr.com/4295/35991993475_8a41ab8503_b.jpg" width="1024" height="576" alt="IMG_20170616_175227688"></a><script async src="//embedr.flickr.com/assets/client-code.js" charset="utf-8"></script>
First is a GearWrench 3916D Universal Ball Joint Separator.
https://www.amazon.com/gp/product/B003YVWHOE/ref=oh_aui_detailpage_o08_s00?ie=UTF8&psc=1
This thing did its job well, and is a good tool investment. No harm was done to the rubber boot. The ball joints did not pop right out, but I put some preload on them with the separator, and with a few taps with the hammer the tie rods popped right out.
<a data-flickr-embed="true" href="https://www.flickr.com/photos/38032720@N06/35950366026/in/dateposted-public/" title="IMG_20170617_120124749"><img src="https://farm5.staticflickr.com/4307/35950366026_be99be337e_b.jpg" width="1024" height="576" alt="IMG_20170617_120124749"></a><script async src="//embedr.flickr.com/assets/client-code.js" charset="utf-8"></script>
I also got some genuine Toyota lower ball joints. Having no idea how old the old ones were, changing them out was the smart thing to do. I know this because smart people told me, and I listened.
<a data-flickr-embed="true" href="https://www.flickr.com/photos/38032720@N06/35152216864/in/dateposted-public/" title="IMG_20170616_175240341"><img src="https://farm5.staticflickr.com/4312/35152216864_67fbeede00_b.jpg" width="1024" height="576" alt="IMG_20170616_175240341"></a><script async src="//embedr.flickr.com/assets/client-code.js" charset="utf-8"></script>
<a data-flickr-embed="true" href="https://www.flickr.com/photos/38032720@N06/35152210504/in/dateposted-public/" title="IMG_20170617_130732005"><img src="https://farm5.staticflickr.com/4312/35152210504_bcef4cd4b0_b.jpg" width="576" height="1024" alt="IMG_20170617_130732005"></a><script async src="//embedr.flickr.com/assets/client-code.js" charset="utf-8"></script>
<a data-flickr-embed="true" href="https://www.flickr.com/photos/38032720@N06/35181407623/in/dateposted-public/" title="IMG_20170617_130739514"><img src="https://farm5.staticflickr.com/4314/35181407623_edf8cd788a_b.jpg" width="1024" height="576" alt="IMG_20170617_130739514"></a><script async src="//embedr.flickr.com/assets/client-code.js" charset="utf-8"></script>
<a data-flickr-embed="true" href="https://www.flickr.com/photos/38032720@N06/35152211764/in/dateposted-public/" title="IMG_20170617_120135381"><img src="https://farm5.staticflickr.com/4304/35152211764_522b6645d2_b.jpg" width="576" height="1024" alt="IMG_20170617_120135381"></a><script async src="//embedr.flickr.com/assets/client-code.js" charset="utf-8"></script>
Doing the ball joints was not super difficult or involved. I am glad I did it for two reasons. 1) It is good preventative maintenance. 2) THERE WAS NO COTTER PIN IN THE DRIVERS SIDE CASTLE NUT! After marveling at the lack of a cotter pin for a few moments, I put the ratchet on there and it came off easy, way too easy. With no cotter pin the nut was already spinning off. Apparently the shop I took it to do the halfshaft also forgot it, or failed to bend it over, at the same time they were screwing up the brakes and tie rod. I am so glad people on this board got me to do the LBJs; otherwise my little trip could have gone very bad. I put the 4 bolts in with blue Loctite, torqueing in steps, and torqued all fasteners to spec.

 
Also new is a Denso radiator. I have heard that the koyo radiators are best. Denso is also an OEM Toyota supplier though so I have confidence in it’s quality. Changing the radiator out was easy. While it was out I used compressed air to blow out as many of the dead bugs from the ac condenser as I could. The coolant was switched to green at some point in its life so I left it green. I also am using the built in transmission cooler still. I will be bypassing it someday for a large, separate transmission cooler. I am not really worried about pink milkshake, since the radiator is new, but I would like to keep the transmission fluid temps out of the 230s.
<a data-flickr-embed="true" href="https://www.flickr.com/photos/38032720@N06/35821168592/in/dateposted-public/" title="IMG_20170617_175343108"><img src="https://farm5.staticflickr.com/4328/35821168592_bcfbdc66b7_b.jpg" width="1024" height="576" alt="IMG_20170617_175343108"></a><script async src="//embedr.flickr.com/assets/client-code.js" charset="utf-8"></script>
<a data-flickr-embed="true" href="https://www.flickr.com/photos/38032720@N06/35950361496/in/dateposted-public/" title="IMG_20170617_175347793"><img src="https://farm5.staticflickr.com/4298/35950361496_25aeffab22_b.jpg" width="1024" height="576" alt="IMG_20170617_175347793"></a><script async src="//embedr.flickr.com/assets/client-code.js" charset="utf-8"></script>
Had no idea how old the plugs were, so I took them out.
<a data-flickr-embed="true" href="https://www.flickr.com/photos/38032720@N06/35859250711/in/dateposted-public/" title="IMG_20170603_130605744"><img src="https://farm5.staticflickr.com/4299/35859250711_6b46408a77_b.jpg" width="1024" height="576" alt="IMG_20170603_130605744"></a><script async src="//embedr.flickr.com/assets/client-code.js" charset="utf-8"></script>
<a data-flickr-embed="true" href="https://www.flickr.com/photos/38032720@N06/35603240470/in/dateposted-public/" title="IMG_20170603_142646246"><img src="https://farm5.staticflickr.com/4327/35603240470_100970a6a0_b.jpg" width="576" height="1024" alt="IMG_20170603_142646246"></a><script async src="//embedr.flickr.com/assets/client-code.js" charset="utf-8"></script>
They surprisingly were not totally awful; I retired these plugs and put new ones in.
<a data-flickr-embed="true" href="https://www.flickr.com/photos/38032720@N06/35859249121/in/dateposted-public/" title="IMG_20170603_130704019"><img src="https://farm5.staticflickr.com/4308/35859249121_480e79c0be_b.jpg" width="1024" height="576" alt="IMG_20170603_130704019"></a><script async src="//embedr.flickr.com/assets/client-code.js" charset="utf-8"></script>
While the intake hoses were disconnected I wiped out all the oil from the throttle body. And there was a ton of it.
<a data-flickr-embed="true" href="https://www.flickr.com/photos/38032720@N06/35859252461/in/dateposted-public/" title="IMG_20170603_122818415"><img src="https://farm5.staticflickr.com/4307/35859252461_27b29a8717_b.jpg" width="1024" height="576" alt="IMG_20170603_122818415"></a><script async src="//embedr.flickr.com/assets/client-code.js" charset="utf-8"></script>.
I should take it off and give it a thorough cleaning one of these days.
 
This is one of my favorite mods. It is the same thing I did in the tracker, but with a different switch. I got these LED strips off amazon. They come with 3m adhesive on the back that I used to mount them. The adhesive has lasted for two+ years on the tracker, so I am confident they will last on the 4runner.
<a data-flickr-embed="true" href="https://www.flickr.com/photos/38032720@N06/35152237994/in/dateposted-public/" title="IMG_20170603_165355430_HDR"><img src="https://farm5.staticflickr.com/4315/35152237994_5186e5e101_b.jpg" width="576" height="1024" alt="IMG_20170603_165355430_HDR"></a><script async src="//embedr.flickr.com/assets/client-code.js" charset="utf-8"></script>
There is a face of the lateral hood structural ribbing that is conveniently at about the perfect angle, so I stuck them to that. Some of the hood insulation was hanging in the way, a razor blade fixed it.
<a data-flickr-embed="true" href="https://www.flickr.com/photos/38032720@N06/36192785096/in/dateposted-public/" title="IMG_20170728_195941975"><img src="https://farm5.staticflickr.com/4300/36192785096_b6a8385d39_b.jpg" width="576" height="1024" alt="IMG_20170728_195941975"></a><script async src="//embedr.flickr.com/assets/client-code.js" charset="utf-8"></script>
The loom is mounted with zip ties through holes drilled in the inner steel of the hood in some cases, but mostly holes in the insulation.
<a data-flickr-embed="true" href="https://www.flickr.com/photos/38032720@N06/36067834832/in/dateposted-public/" title="IMG_20170728_200008127"><img src="https://farm5.staticflickr.com/4296/36067834832_cd47c4879c_b.jpg" width="576" height="1024" alt="IMG_20170728_200008127"></a><script async src="//embedr.flickr.com/assets/client-code.js" charset="utf-8"></script>
The wire is run down through the hollow bits of the hood, and transitions from hood to body by the driver’s side hinge.
<a data-flickr-embed="true" href="https://www.flickr.com/photos/38032720@N06/36233569745/in/dateposted-public/" title="IMG_20170728_200030120"><img src="https://farm5.staticflickr.com/4296/36233569745_d6c482d257_b.jpg" width="1024" height="576" alt="IMG_20170728_200030120"></a><script async src="//embedr.flickr.com/assets/client-code.js" charset="utf-8"></script>
I made a bracket for the switch out of some old flat bar left over from another project.
<a data-flickr-embed="true" href="https://www.flickr.com/photos/38032720@N06/35603240050/in/dateposted-public/" title="IMG_20170603_155529035"><img src="https://farm5.staticflickr.com/4319/35603240050_c0a74cc69d_b.jpg" width="576" height="1024" alt="IMG_20170603_155529035"></a><script async src="//embedr.flickr.com/assets/client-code.js" charset="utf-8"></script>
The switch is some aftermarket one from the junkyard, had it for years, knew it would come in handy eventually.
<a data-flickr-embed="true" href="https://www.flickr.com/photos/38032720@N06/35992041735/in/dateposted-public/" title="IMG_20170603_160209093"><img src="https://farm5.staticflickr.com/4291/35992041735_98707b9302_b.jpg" width="1024" height="576" alt="IMG_20170603_160209093"></a><script async src="//embedr.flickr.com/assets/client-code.js" charset="utf-8"></script>
<a data-flickr-embed="true" href="https://www.flickr.com/photos/38032720@N06/36192785716/in/dateposted-public/" title="IMG_20170723_211036901"><img src="https://farm5.staticflickr.com/4315/36192785716_5919c16707_b.jpg" width="1024" height="576" alt="IMG_20170723_211036901"></a><script async src="//embedr.flickr.com/assets/client-code.js" charset="utf-8"></script>
The leds look very blue here, and the color temperature is a bit blue. The street lights are very yellow in this parking lot and the contrast makes it look bluer. You get a good idea of how bright they are though. The lights are bright enough that you could read fine print on a book sitting anywhere in the engine compartment.
<a data-flickr-embed="true" href="https://www.flickr.com/photos/38032720@N06/36067831172/in/dateposted-public/" title="IMG_20170728_200107003"><img src="https://farm5.staticflickr.com/4317/36067831172_1e7ebf1234_b.jpg" width="576" height="1024" alt="IMG_20170728_200107003"></a><script async src="//embedr.flickr.com/assets/client-code.js" charset="utf-8"></script>
<a data-flickr-embed="true" href="https://www.flickr.com/photos/38032720@N06/35955272596/in/dateposted-public/" title="IMG_20170614_210339011"><img src="https://farm5.staticflickr.com/4308/35955272596_bfca100c11_b.jpg" width="576" height="1024" alt="IMG_20170614_210339011"></a><script async src="//embedr.flickr.com/assets/client-code.js" charset="utf-8"></script>
Since I have these lights, It is easy to check fluids or do oil changes at night. The underside needs them now.
 

Members online

Forum statistics

Threads
278,310
Messages
3,554,078
Members
248,016
Latest member
Advally Service

Trending content

Back
Top