Tigger's Build and Mis-Adventures

Let's make it look a little different

Decided I needed to tone down the glare a little from the hood and add a bit of a personal touch to the Toy.

Started picking out the color of the hood wrap and graphics that I am designing.

153242d1428827048-hood-wrap-graphics-wrap1.jpg


153243d1428827051-hood-wrap-graphics-wrap2.jpg


153244d1428827056-hood-wrap-graphics-wrap3.jpg
 
So I thought I would show some of the process of cutting, weeding, masking and installing graphics.

I was initially thinking of doing 4Runner under the wrap then thinking about something a little larger. Then I learned about the history of the Toyota logo. Didn't really like the very first one, but found the second one pretty cool. It isn't a fully accurate logo since the initial company name was Toyoda and not Toyota. The change was made to reduce the number of strokes in the logo from 10 to 8 (which is considered a good number in the Japanese culture) Toyota Logo History

We found a scrap piece of vinyl that had been laminated and was about the right size, so did a quick layout and cut and install on the hood to see how it looked. Then we wrapped over it so it looks as if the hood-wrap is embossed.

154051d1429332245-hood-wrap-graphics-graphics-1.jpg


154052d1429332249-hood-wrap-graphics-graphics-2.jpg


154053d1429332259-hood-wrap-graphics-graphics-3.jpg


154054d1429332264-hood-wrap-graphics-graphics-4.jpg


154055d1429332269-hood-wrap-graphics-graphics-5.jpg


154056d1429332276-hood-wrap-graphics-graphics-6.jpg
 
The first machine is a cutter. This machine will take a piece of vinyl and cut out any pattern you want. The second one is a printer cutter. It will print any design you want on up to 53 inch by 60 feet, then cut it if it's a cut pattern. This is the type a machine that full vehicle wraps are printed on.

The next pics are what's called weeding. This is the process of removing the unneeded vinyl so the desired pattern is left.

In an effort to save some vinyl we split the pattern at the door seam. This requires very accurate measurements.

154057d1429332570-hood-wrap-graphics-graphics-7.jpg


154058d1429332574-hood-wrap-graphics-graphics-8.jpg


154059d1429332580-hood-wrap-graphics-graphics-9.jpg


154060d1429332584-hood-wrap-graphics-graphics-10.jpg


154061d1429332588-hood-wrap-graphics-graphics-11.jpg


154062d1429332593-hood-wrap-graphics-graphics-12.jpg


154063d1429332598-hood-wrap-graphics-graphics-13.jpg


154064d1429332603-hood-wrap-graphics-graphics-14.jpg


Then we move on to masking the pattern. This allows you to remove intricate patterns from the backing paper so it can be transferred to the surface.

You then line up the pattern, remove the backing paper and squeegee the pattern to the surface. (there is a detailed method to this procedure.Let me know if you want more details on it)

Then you remove the mask and your graphic in now finished.

154065d1429332945-hood-wrap-graphics-graphics-15.jpg


154066d1429332951-hood-wrap-graphics-graphics-16.jpg


154067d1429332955-hood-wrap-graphics-graphics-17.jpg


154068d1429332961-hood-wrap-graphics-graphics-18.jpg


154069d1429332967-hood-wrap-graphics-graphics-19.jpg


154070d1429332972-hood-wrap-graphics-graphics-20.jpg


154071d1429332977-hood-wrap-graphics-graphics-21.jpg


154072d1429332983-hood-wrap-graphics-graphics-22.jpg
 
Last edited:
Here we have the finished layout. I like the design. I will probably remove the rear and move it higher. The curve on the back is strong enough to reflect the black on the bumper and it blends into the design. I need to move it higher to create a separation between the reflection and graphic.

154073d1429333211-hood-wrap-graphics-graphics-23.jpg


154074d1429333215-hood-wrap-graphics-graphics-24.jpg


154075d1429333250-hood-wrap-graphics-graphics-25.jpg


154076d1429333260-hood-wrap-graphics-graphics-26.jpg


154077d1429333264-hood-wrap-graphics-graphics-27.jpg


154078d1429333268-hood-wrap-graphics-graphics-28.jpg
 
On the trip to Big Bear, I got tangled up in some rocks. The skid plates did not fare so well. The aluminum is not a good choice at all if you are thinking about doing any type of rock crawling. They cannot handle the weight of the 4runner. They are just not designed in a way to stand up to hits. They are too flat and have little structural support designed into them. Not trying to bash on RCI, as I know there are space limitations and such. Just can't recommend these for much more than deflecting things from damaging components. With that said, they did do their job and prevented any damage to vital parts underneath, so in that sense, they worked very well.
 
Last edited:

Attachments

  • HID-1.jpg
    HID-1.jpg
    83.2 KB · Views: 2,216
  • HID-2.jpg
    HID-2.jpg
    94.2 KB · Views: 2,623
  • HID-3.jpg
    HID-3.jpg
    90.4 KB · Views: 2,217
  • HID-4.jpg
    HID-4.jpg
    86.6 KB · Views: 2,230
  • HID-5.jpg
    HID-5.jpg
    89.3 KB · Views: 2,211
  • HID-6.jpg
    HID-6.jpg
    103.3 KB · Views: 2,204
  • charleston1.jpg
    charleston1.jpg
    114.2 KB · Views: 2,222
  • charleston2.jpg
    charleston2.jpg
    136.7 KB · Views: 2,196
Last edited:
Trip to Mt. Chalreston

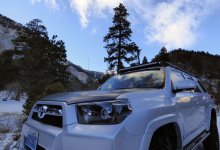
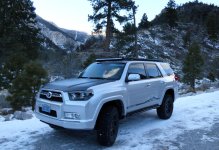
Took a drive up to Mt. Charleston yesterday and had a late lunch at the lodge. (Good pizza) (4/29/15)

Got a few shots of the 4R against the mountain backdrop but ran into some real asses on the way down.

155755d1430442921-vegas-crew-roll-call-lunch-lodge.jpg


155756d1430442926-vegas-crew-roll-call-lodge-deck-view-1.jpg


155757d1430442932-vegas-crew-roll-call-lodge-deck-view-2.jpg


155758d1430442937-vegas-crew-roll-call-mountain-view-front.jpg


155760d1430442949-vegas-crew-roll-call-mountain-view-tail.jpg


155761d1430442954-vegas-crew-roll-call-wild-mules.jpg


164674d1436691923-post-up-your-silver-4runners-mountain-view-full-corner.jpg
 
A few weeks ago I got in on the Bussman rtmr fuse block group buy. Engine bay wiring was going to be a mess so needed a way to clean it up.

This was the route I started with. There would have been several relays attached here and not very organized. (parts are loose as I did a quick reassemble for pics)

6ymyrqJ.jpg


Here are a few pics of the fuse block. Tacoma Pros did a great on these.

L0umcXi.jpg


mpVJNxq.jpg


Here is where I chose to mount it. The aluminum bracket is blank on the back so you can drill the mounting holes wherever you need them.

MRBjmwA.jpg


The cap they included didn't cover the positive side very well, so I found an old one I had from an inverter. I sliced the side so I could slip the positive cable through it and then pull it over the post when finished. It seems to work well and should help prevent shorts. I moved the cap they provided to the ground post.

DLWyyWy.jpg


I used some water tight connectors and heat shrink. Not top of the line but should work fine for this application.

EqIYaP9.jpg


kbb5uSy.jpg


PR7Vl1u.jpg


UgF698I.jpg


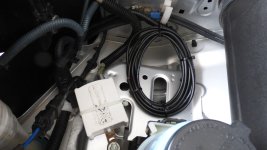
So here it is all closed up and mounted. Power was ran to the breaker for the stereo, and ground to the body ground to the right of the battery. (the extra looped wire is for the rock lights)

t1QoalH.jpg


I went ahead and wired up the switches for the compressor and rock lights. I have the compressor, but haven't mounted it yet and need to redo the rock lights as the ones I used (very old LEDs) had very little light output. I will just need to complete the wiring under the hood and add fuses to the appropriate spot.

KbxC2L8.jpg


As you can see, the amber lights don't match the stock orange.

d7b89TS.jpg


Over all I am very pleased with it. It is now just a simple 2 wire connection for each addition. Much simpler and cleaner.

 
Any way to get to the led lamp inside the switches? I can send you orange printed on clear vinyl to "tint" the light. Maybe something close to tomato red like the old Oracal stuff I have? It'll need to be printed on clear or you won't have nearly enough light coming through.

You can call me tomorrow, I'll be working in the shop most of the day.
 
Any way to get to the led lamp inside the switches? I can send you orange printed on clear vinyl to "tint" the light. Maybe something close to tomato red like the old Oracal stuff I have? It'll need to be printed on clear or you won't have nearly enough light coming through.

You can call me tomorrow, I'll be working in the shop most of the day.

There is a thread on how to swap out the LEDs and which ones to get. I have it bookmarked and will get around to it some day....
Or maybe make you do it next time I am up that way :hello:
 
Big Bear 11-14-2015

Met up with some fellow T4R members for a short 3 hour, I mean 7 hour run near Big Bear.
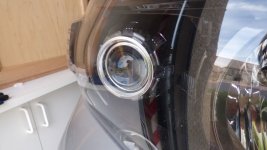
A few pics from Saturday's run.
Meeting spot in Green Valley Lake
buWIkVq.jpg

QLpUeRx.jpg


The line up waiting for a lost participant...
0cquSzb.jpg

7LRoMqA.jpg


Regrouping
ELYPr6U.jpg

C6yq3mI.jpg

rrW4LIv.jpg


Bio-Break
GvJs0dO.jpg

RFyoVHb.jpg

ifOfIKr.jpg

lMdOFIH.jpg

bO1u2B6.jpg


Top of the world
FN52uJ4.jpg

AGmeXMn.jpg

AcISY7L.jpg

LzysDUD.jpg

jfMNcz3.jpg
 
Tigger needs bigger springs in his tail. 2" isn't cutting it.
0yXiST5.jpg

RKrZJBK.jpg


My minions building a bridge. (I left about $10 of aluminum on that rock)
WaXSdq5.jpg

Eaxe4cq.jpg

QO5EO1N.jpg


So much for being off the trail by noon.... Yay night runs
x5znaPB.jpg
 
Last edited:
Don't be fooled by Brian! He enjoyed every second of that run!!!

Including the carnage!!! You should see what he used to do with his Rubicon!

BWAAAAHAHAHAHHAAAAAA!!!!


Now, get that skid outta there and have someone reinforce it. Gonna be expensive though, aluminum is not cheap! And figure out which rear bumper you're gonna go with next, that plastic is not pretty now that its all tweaked!

:fish:
 

Members online

Forum statistics

Threads
278,315
Messages
3,554,104
Members
248,016
Latest member
Advally Service

Trending content

Back
Top