TorqueOfTheDevil’s Build Thread ..::1UZ-FE VVTi Hilux Surf::..

Yup that always cracked me up...
Toyota are guilty of it themselves with their very odd English sayings.

JDM MR2
2577570836_43fd8d864c.jpg


JDM Estima
EstimaWriting.jpg


They had an equally insane one for the Hilux surf, but I can't find it!!


Anyway...

I got more parts today!!
Parts1.jpg


I also popped into my local transmission shop to get a quote of getting the gears set (pinion spacing and backlash) on my front and rear diffs.

WHOOOA Where did you find CF middle console parts?:jaw::jaw:
 
So not all my mods go entirely to plan...

As mentioned earlier I do occasionally browse the Japanese Yahoo auctions for rare and different truck parts, as well as Ebay USA (hey it's all rare and exotic for us!)..

One thing I discovered was that in Japan, the Toyota Chaser had the same part number for the clock as our trucks, I also found out that they did an upgraded clock for the Chaser that was self setting mega accurate radio controlled.

I'll have some of that I thought... I've never seen it done!

Clock1.jpg

A few weeks my radio controlled clock arrived... I fitted it, powered it up, all in all it seemed awesome...

Clock2.jpg


Apart from the fact that the radio controlled time signal doesn't appear to work outside of Japan.

So now I have a pretty much totally standard functioning clock, with a radio controlled logo on it, that runs in back up Quartz mode. :rofl:

You win some you lose some I guess!
 
So not all my mods go entirely to plan...

As mentioned earlier I do occasionally browse the Japanese Yahoo auctions for rare and different truck parts, as well as Ebay USA (hey it's all rare and exotic for us!)..

One thing I discovered was that in Japan, the Toyota Chaser had the same part number for the clock as our trucks, I also found out that they did an upgraded clock for the Chaser that was self setting mega accurate radio controlled.

I'll have some of that I thought... I've never seen it done!

Clock1.jpg

A few weeks my radio controlled clock arrived... I fitted it, powered it up, all in all it seemed awesome...

Clock2.jpg


Apart from the fact that the radio controlled time signal doesn't appear to work outside of Japan.

So now I have a pretty much totally standard functioning clock, with a radio controlled logo on it, that runs in back up Quartz mode. :rofl:

You win some you lose some I guess!

There is, unfortunately, no global standard for transmitting atomic time.

Japan uses JJY (https://en.wikipedia.org/wiki/JJY) and we use something else.

I would have thought your fancy big-screen "Tunage System" has a Radio Clock Sync function? :)

Don't let me down, Cha*lie!
 
[MENTION=138011]TorqueOfTheDevil[/MENTION] saw in another thread you're on the hunt for diff builders. Check out East Coast Gear Supply. They ship worldwide and after research I found I couldn't even do it myself much cheaper than they are asking. Got my front 4.88 gears for $640 US shipped. You'd be more for shipping and I know nothing about tarifs but I imagine it'd be cheaper than 700+UK.
 
[MENTION=138011]TorqueOfTheDevil[/MENTION] saw in another thread you're on the hunt for diff builders. Check out East Coast Gear Supply. They ship worldwide and after research I found I couldn't even do it myself much cheaper than they are asking. Got my front 4.88 gears for $640 US shipped. You'd be more for shipping and I know nothing about tarifs but I imagine it'd be cheaper than 700+UK.


Thanks! In retrospect I should have bought "built up" units.. but as you guessed was trying to save shipping weight. You live and learn I guess.

I actually emailed them twice when trying to order all the parts, they ignored my emails (for a $2000+ order!... as did all pro offroad) In the end I got them from Randy's ring and pinion, who were very helpful.

I've found a local (ish) axle builder.. its a small operation so I've spoken to the guy who will actually do the work.. they gave a WAY better quote.. so I'mhoping to drop it all off later today!
 
Diffs have been sent off!!

AX9.jpg


Hopefully the little 1 Series won't stink of trans oil.

I'm so paranoid when anything is done on my truck and I'm not the one doing it, or there to see what's done..
 
I'be been considering a Prado axle for a while, where did you get yours? To my knowledge they never had them here in the U.S. Was the Prado locally sold there in the U.K.?

Sorry I missed this.

We got the Landcruiser Colorado, which was the Export name for the Prado (Kinda like the difference between Surf and a 4Runner)

I think Toyota's logic was not to export the Colorado/Prado to the same market as the 4runner as they were so similar it might have an impact in the more expensive landcruiser sales. -at least that's what I heard, as we did natively get the 2nd gen 4Runner, but they never gave us the 3rd gen.

I only went for the Prado as I specifically didn't want the Elocker, as I will get more benefit, more of the time from a Truetrac.

As with most of my stuff I got it from Ebay... a 6 hour round trip away!

The joke being that I ended up buying a new axle housing anyway, so I could have just got the more common Landcruiser Colorado one with an eLocker.
 
Good news!

The axle shop just called to tell me that my front and rear diffs are ready for collection! Day off tomorrow followed by 4 days of next week off... time to get building!

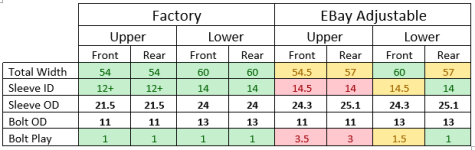
In other updates, I have run over the "Ebay adjustable arms" and taken lots of measurements compared to stock. As you can see there are a few bits that are not in spec...

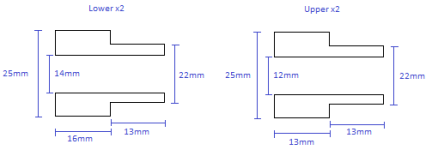
I have been seriously helped out by a fellow V8 Surfer, who is machining me up some new high misalignment spacers, and a upper poly bush sleeve.

The old Diesel engine is being collected tomorrow too, and the guy that is having that has a press so is going to do my rear wheel bearings.

Hopefully I will then have everything I need to do some serious progression next week!

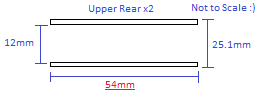
I've also included my highly technical schematics for the correct misalignment spacers for the Heim joints on these Ebay arms.

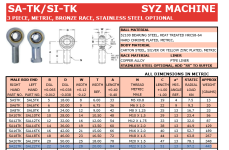
The specs for the supplied Heims are also uploaded, and highlighted.

I wil aslo need to shave 1.5mm off each side of the upper arm bush carriers, and add some side shims for the rear bushes (ideally 1.5mm thinck M14 washers each side....)
 

Attachments

  • Suspension.PNG
    Suspension.PNG
    11.7 KB · Views: 861
  • Charlie Spacers.png
    Charlie Spacers.png
    3 KB · Views: 827
  • Charlie Bush insert II.png
    Charlie Bush insert II.png
    2.2 KB · Views: 794
  • heim.PNG
    heim.PNG
    109.7 KB · Views: 885
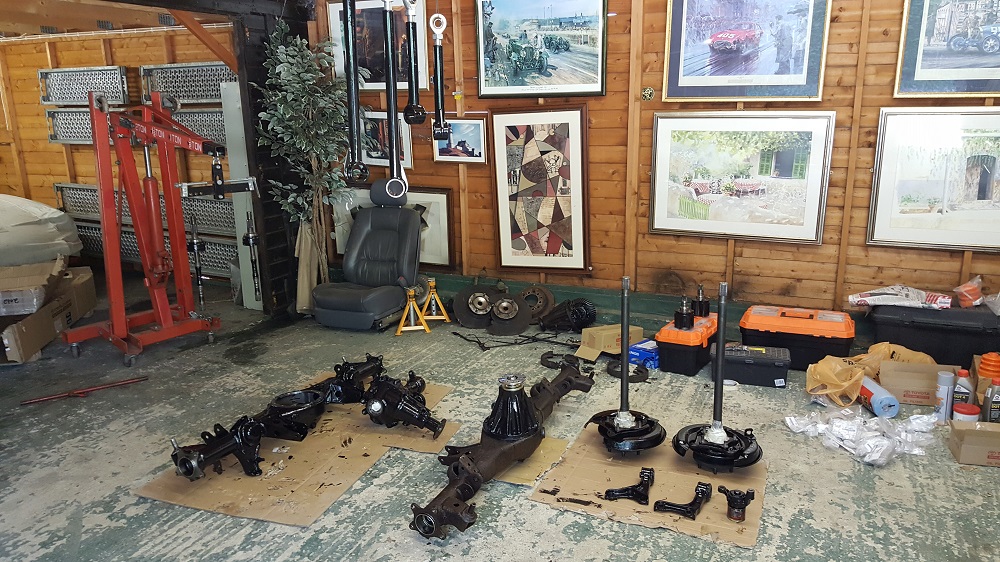
So I had a few days off work... and decided to make some progress! :banana:

AX10.jpg

I collected the diffs from the shop. They said the front one was super easy, bot the rear was miles off and took a few attempts to get into spec. The marking dye was still on the crown wheel and the contact positions looked good.

There was a slight issue when putting them in my car them into my car, the guy DROPPED the rear diff! It wasn't strictly his fault, the container it was in failed and it slipped out. Luckily is landed on the cast casing and everything all still seems to be true and straight... it's a bit annoying though.. I now have a nagging feeling that it might not be perfect..

Being slightly OCD about my truck really is a curse sometimes! :gun4:

AX11.jpg

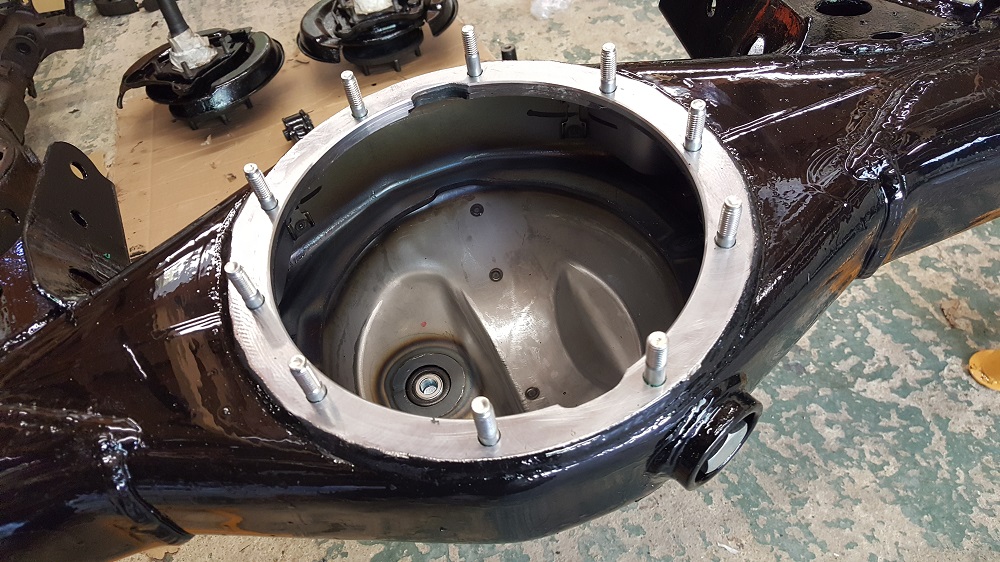
It was time to get on with POR15ing everything... it's the first time I've used this stuff, its nice and easy to work with and seems to give great results.

AX12.jpg

POR15 EVERYTHING!!! I used the old axle housing as a safe way to hold the rear diff when painting... It actually came apart really well in the end, every single nut and bolt came undone without sheering.

AX13.jpg

I got the rear wheel bearings pressed out/in by Tony at 4x4toys.co.uk. he had to make a new tool for the Landcruiser rear axle to do it in his press but he is now prepared for future ones!

SP1.jpg

While I was there I picked up a front pair of spare hub carriers.. so I can refurb them and fit the Total Chaos weld on gussets without having my truck off the road any longer.

AX14.jpg

It's so nice working with new parts :)

AX15.jpg

Close up of the rear diff carrier... Yukon 4.88 fitted (with spline adapter) and Trutrac.

AX16.jpg

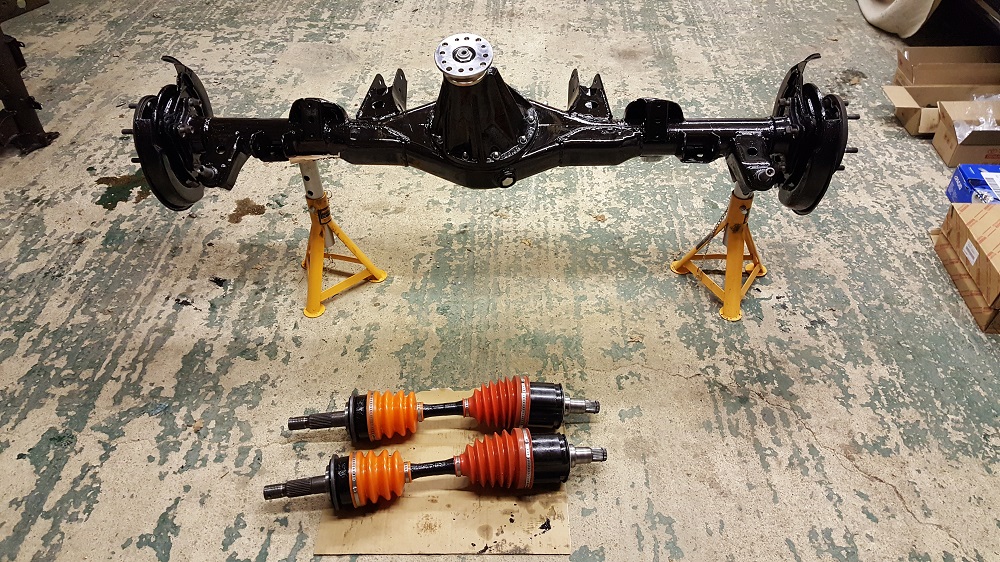
I had a spare set of front drive shafts from when I replaced them last time (torn boot laziness) I decided while the diff was out to get both sets together, test the CVs and see what was the best set, then paint them up and reboot them.

The inner boots are lengthened "High angle" ones from Toyota Truck Specialists - Off Road Solutions I actually bought them 4 years ago (I know it seems a bit excessive ordering CV boots internationally) but I was fed up of tearing rubber ones... they have been transplanted to three driveshafts now and I can't recommend them enough.

The outer CV boots are Polyurethane from Japanese 4x4 Parts | 4x4 Accessories | 4x4 Spares.. They feel a lot better than the factory ones, but I can't comment on durability yet.

I wish the colours matched....


AX17.jpg

Axles almost ready for fitting.

I have rebuild the rear callipers too and still need to reassemble the handbrake mechanism..

I'm still waiting on a couple of parts from Toyota before I'm fully ready to fit.

I decided to replace the factory metal brake lines, unfortunately they are Japan supply and still on their way over (hopefully for next weekend) I also have a set of Goodridge stainless braided brake lines finished in red to replace the rubber sections, and a new Toyota handbrake cable.

 
Last edited:
Regarding the Ebay adjustable rear arms, I decided they could be "improved" too...

LNK1.jpg

The misalignment spacers that the came with weren't very good, as mentioned in my earlier post (#55), they were badly machined, badly finished, and not the right size... if you are being fussy.

I also didn't like that the upper arms were a little too wide and the bush would rub against the axle upright, so I decided to shave 3mm off the upper bush ends.

LNK2.jpg

I don't have a milling machine so I cheated a bit and used a belt sander.. it was only 1.5mm to be removed from each side, and this seemed to be the easiest way to do it with my limited tools giving the best result.

LNK3.jpg

You can see the difference between my modified and the standard thickness (Out the box, uppers and lowers were the same width)

LNK4.jpg

I rubbed down the rears ready for repainting (POR15... obviously)

One of the guys from the Hilux surf group is an expert machinist and was able to take my measurements and turn me some lovely misalignment spacers of the correct size. He also made me some bush inserts that were a more appropriate length and had the same bolt clearances as factory Toyota.

He also made me a very attractive, lightweight water pump pulley for the V8!

LNK5.jpg
LNK6.jpg


LNK7.jpg
PUL1.jpg


Scott, I really can't thank you enough!
Our surf/4Runner community is awesome!

LNK8.jpg

In the mean time, the suspension arms were being POR15'd. they are now black and very shiny.
 
Last edited:
This week however hasn't been entirely without drama...

On Thursday, tired and slightly hungover after seeing my parents that had just returned from holiday..

I managed to have a few disasters that day... and should have just stayed in bed.. :tape:

Worse still they were pretty much entirely my fault with no excuses!
First of all I was rushing trying to refit the rear axle seals, and instead of finding the perfect size draft to tap them in, used the 1/2" end of a socket extension to gently tap around the diameter until it was in place.. a job I've done many times before without any issue at all.. I'm not sure if it was harder as it was a new axle housing or not, but I managed to distort the metal part of the seals. :doh:

A slight panicked call to my local Toyota dealership and they managed to get me replacement seals for the next morning. That's good service!

It got worse however once I started on the rear handbrake reassembly. I needed to reposition one of the axle stands to allow my to fit the crank assembly. Sure enough there was a creak and a crash and the axle fell off the stand.. landing on the brake disk cover, which with no disk underneath it folded right over and ended up a very misshapen mess.
As you can imagine there was a lot of shouting and swearing.. I lifted it back up and looked at the damage (sorry no pics, far to much rage to think of such things)

I set about it with a collection of hammers, mole grips, flat bladed screwdrivers and a crow bar and I must say it actually doesn't look too bad now. It will never be quite perfect (which as you have probably gathered by now really REALLY annoys me) but if I didn't mention it, I doubt anyone would notice, and it looks no worse than most brake disk shields as they are rarely 100% straight.

Again I'll say how impressed I was with the POR15 finish, it stood up to much hammering pounding and reshaping very well. the finish only started failing when I was hitting it with the pointy bit of a crow bar. Needless to say it's been sanded back and repainted now.

The issues weren't over yet... I did something really stupid next... which in my defence is a result In a mistake in the TSRM!!

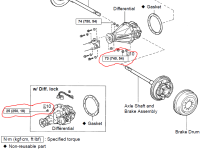
I took note of all the torque settings and started torqueing up everything as it should be, at the time I did think "that's weird, and a crazy amount of torque for a very small nut and stud"... even when tightening it up I thought "This doesn't feel right" checked the numbers again and carried on, stripping the thread on one nut.

It turns out that the TSRM states that the diff carrier bolts should be torqued up 3x more than they should be.. and like an idiot I didn't question my gut instinct...

I attached a screenshot.. spot the error!!!

Needless to say, the stud and nut were very easily removed (yay new parts come undone nicely too) and replacements are on order from Toyota, to arrive on Tuesday.

My final straw was when I went to re install everything at the front of the truck to at least get the front off axle stands.

I'd previously lifted the front diff in (it was heavy, I don't really want to ever do that alone again) and decided to quickly fit the driveshaft's and get it all back together.

It turns out that the hub nut thread on the drivers side driveshaft is utterly wrecked where it looks like it had been hit with a hammer.

I seem to recall that when I bought those 4 years ago after CV boot failure it was damaged on arrival (used parts, I figure older still good OEM Toyota is better than new pattern part) I was slightly annoyed but used the other shaft and stored it away... flash forwards 4 years I was comparing all my driveshafts and looking at play and CV condition, I didn't think to test the thread on the hub shaft... having totally forgotten one of them was damaged.

My job tomorrow is to pull those and refit the ones I had taken off before this job, which were actually ok... POR15 is currently awaiting its second coat before I go to bed!
 

Attachments

  • fail.PNG
    fail.PNG
    65.7 KB · Views: 977

Members online

Forum statistics

Threads
278,316
Messages
3,554,111
Members
248,016
Latest member
Advally Service

Trending content

Back
Top