
My wife and I are planning a 1700-mile cross-country move, and will be towing a U-Haul 6x12 Cargo trailer with our 4Runner. Between the research I had been doing, and the strong encouragement of a friend of mine, I decided to go ahead and install a transmission cooler to avoid any issues with the transmission puking its guts out or spraying overheated fluid out in the Appalachians.
There had been a little bit of talk on here about these things, but didn't see enough "how-to" or any pics of how it's done, so I figured I'd try and help out for those in the future who'd like to do the same. My pictures are sub-par, but hopefully they help someone out there.
I just got a Derale D13503 plate-fin cooler from etrailer.com . It measures 11" x 8-3/4" x 7/8". Not pictured are the nylon "through-the-radiator" zip ties, the 4' of hose and 4 included little hose clamps. Impressions are that this is a high quality piece...no signs of cheapness or shortcuts being taken. Here's the direct link for the part: Transmission Coolers by Derale for 2006 4Runner - D13503 4 feet of hose is kind of exactly as much as you'll need, so I went ahead and bought myself some more hose at the local auto-parts store so that I had some leeway in routing these things. It was cheap insurance against not having enough hose. There was no use for the included fitting....it is a universal-fit cooler.

I've seen some threads where people are mounting these things forgoing the use of those nylon zip-ties, instead using fabricated metal brackets to hard-mount their coolers. I went with a different school of thought.
I actually do think it's best to mount these right to another heat exchanger. To benefit the most from the airflow created by the fan shroud and cooling fan, I went with the recommended installation and put it on the front of the A/C condenser. I can say that when the engine is running, you can feel the air being pulled through the front of it with your hand up against it. This way, you get cooling not only at highway speeds, but at rest/idle, as well.
I was able to mount it right in front of the fan by carefully pulling it up from under the passenger side of the front bumper and sliding it behind all the supports, horns and stuff and into place. It may be worthwhile to remove the horns for installation, but I didn't. The black cover on top of the radiator support was also removed for easier access. Also, make sure to attach your hoses to the unit before installing...it would be a lot more difficult to do so once it's on the delicate condenser. One thing that will be necessary is to carefully unbolt the radiator to properly fasten the zip ties. You will need to be able to access the rear of the AC condenser to fasten the ties to it. DO NOT RUN THEM THROUGH BOTH THE CONDENSER AND THE RADIATOR. Not only will this put unnecessary pressure on both, but it will make radiator replacement difficult down the road. I did not take pictures of this part of the procedure, but there are two nuts/bolts on each side of the radiator that you'll need to remove. Be extremely careful in moving it.

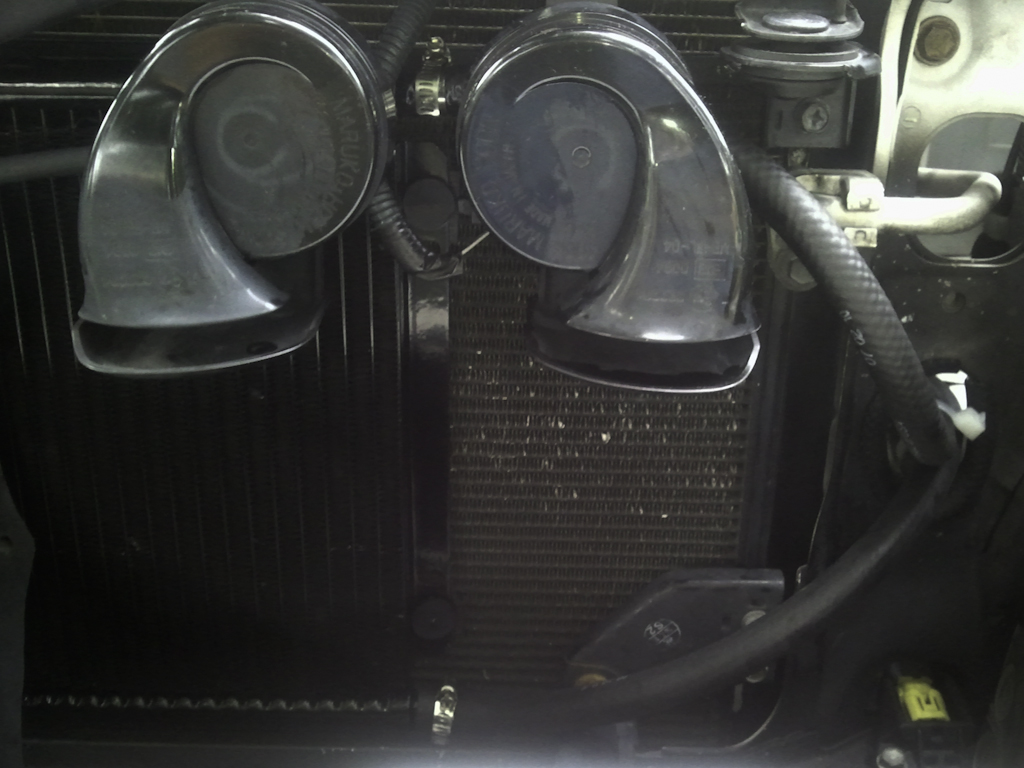

I used a pass-through near the driver's side headlight to route the hoses. I would strongly recommend doing what I did and put some split unused hose around the edges of this to prevent any chafing or cutting from the bare metal edge of this hole. Pay a lot of attention to your hose routing all throughout your plumbing to avoid any rubbing or cutting issues, as those can leave you stranded on the side of the road. I used a few industrial strength zip-ties to keep the hoses in order and away from the edges of that pass-through.

Here is a picture to help orient you for the next one, so you can see what's what on the back of the radiator. Looking down, from over top of the battery & left fender.
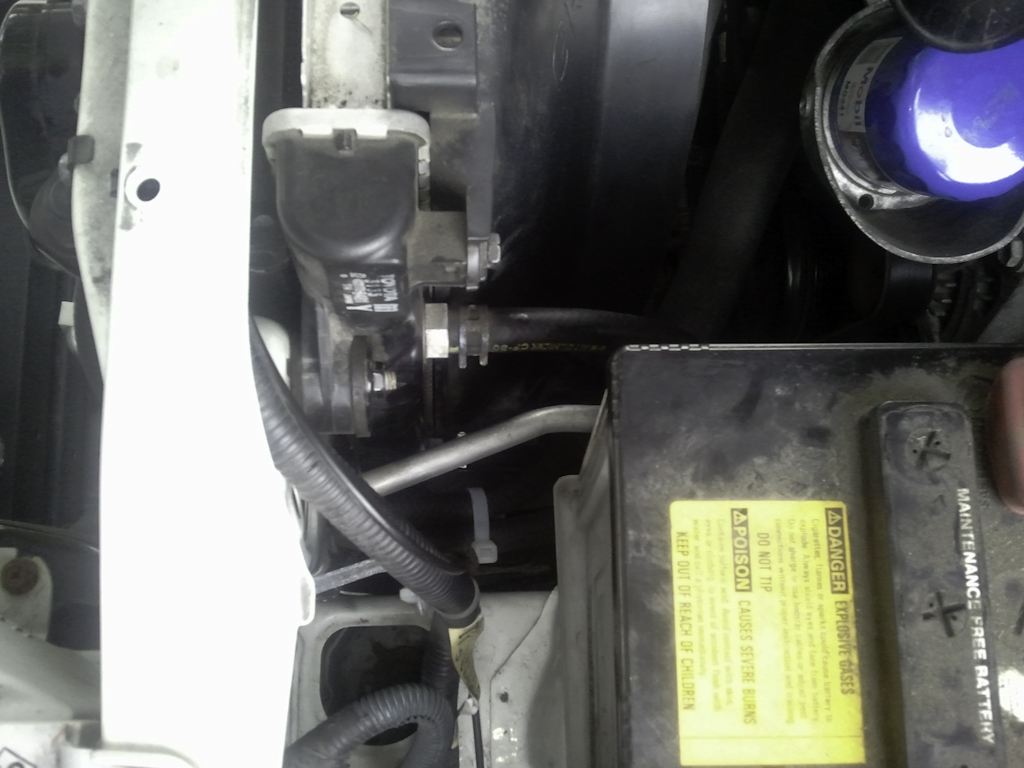
The top fitting is the input to the radiator from the hot-side of the transmission. Virtually every recommendation I had read was to let the fluid pass-through the radiator first and then divert it through the new aux. cooler before sending it back to the transmission, and this is how I did it. The fitting towards the bottom of the radiator is the one I tapped out of...I just slid the hose onto it and fastened with a hose-clamp. That hose then passes through the radiator support hole and to the cooler. I fed it to the lower side of the cooler, as there is no preferred "direction" to send fluid through it.

This last picture is kind of hard to see where it was taken from, but it was from below the front driver's side tire, basically. After sending the output of the new cooler's hose through that radiator support pass through, I sent it directly down and right to the hard line going back to the transmission. It's as simple as sliding it on and fastening with another hose clamp. I'd recommend removing the steel underguard for easier access. I had some trouble removing one of the bolts for mine, since someone had stripped the head of it, so I actually had to do this without taking mine off....it really sucked.

All in all, very simple installation, I did not add any fluid, nor did I spill more than about a teaspoon's worth. The plates on this cooler are very thin, so I don't see it holding very much fluid at all, but for safe measure, you may want to verify your fluid level after the job and watch carefully for leaks for a couple days to make sure everything's in order.
I've now driven it a couple times...there is a distinct difference in the temperatures of the cooler input and output hoses, so I think it's going to do its job very well once I really start to put some heat on it.
I think I would do this to every new auto-trans vehicle I buy, as these will prolong your transmission life by a lot.
There had been a little bit of talk on here about these things, but didn't see enough "how-to" or any pics of how it's done, so I figured I'd try and help out for those in the future who'd like to do the same. My pictures are sub-par, but hopefully they help someone out there.
I just got a Derale D13503 plate-fin cooler from etrailer.com . It measures 11" x 8-3/4" x 7/8". Not pictured are the nylon "through-the-radiator" zip ties, the 4' of hose and 4 included little hose clamps. Impressions are that this is a high quality piece...no signs of cheapness or shortcuts being taken. Here's the direct link for the part: Transmission Coolers by Derale for 2006 4Runner - D13503 4 feet of hose is kind of exactly as much as you'll need, so I went ahead and bought myself some more hose at the local auto-parts store so that I had some leeway in routing these things. It was cheap insurance against not having enough hose. There was no use for the included fitting....it is a universal-fit cooler.
I've seen some threads where people are mounting these things forgoing the use of those nylon zip-ties, instead using fabricated metal brackets to hard-mount their coolers. I went with a different school of thought.
I actually do think it's best to mount these right to another heat exchanger. To benefit the most from the airflow created by the fan shroud and cooling fan, I went with the recommended installation and put it on the front of the A/C condenser. I can say that when the engine is running, you can feel the air being pulled through the front of it with your hand up against it. This way, you get cooling not only at highway speeds, but at rest/idle, as well.
I was able to mount it right in front of the fan by carefully pulling it up from under the passenger side of the front bumper and sliding it behind all the supports, horns and stuff and into place. It may be worthwhile to remove the horns for installation, but I didn't. The black cover on top of the radiator support was also removed for easier access. Also, make sure to attach your hoses to the unit before installing...it would be a lot more difficult to do so once it's on the delicate condenser. One thing that will be necessary is to carefully unbolt the radiator to properly fasten the zip ties. You will need to be able to access the rear of the AC condenser to fasten the ties to it. DO NOT RUN THEM THROUGH BOTH THE CONDENSER AND THE RADIATOR. Not only will this put unnecessary pressure on both, but it will make radiator replacement difficult down the road. I did not take pictures of this part of the procedure, but there are two nuts/bolts on each side of the radiator that you'll need to remove. Be extremely careful in moving it.
I used a pass-through near the driver's side headlight to route the hoses. I would strongly recommend doing what I did and put some split unused hose around the edges of this to prevent any chafing or cutting from the bare metal edge of this hole. Pay a lot of attention to your hose routing all throughout your plumbing to avoid any rubbing or cutting issues, as those can leave you stranded on the side of the road. I used a few industrial strength zip-ties to keep the hoses in order and away from the edges of that pass-through.
Here is a picture to help orient you for the next one, so you can see what's what on the back of the radiator. Looking down, from over top of the battery & left fender.
The top fitting is the input to the radiator from the hot-side of the transmission. Virtually every recommendation I had read was to let the fluid pass-through the radiator first and then divert it through the new aux. cooler before sending it back to the transmission, and this is how I did it. The fitting towards the bottom of the radiator is the one I tapped out of...I just slid the hose onto it and fastened with a hose-clamp. That hose then passes through the radiator support hole and to the cooler. I fed it to the lower side of the cooler, as there is no preferred "direction" to send fluid through it.
This last picture is kind of hard to see where it was taken from, but it was from below the front driver's side tire, basically. After sending the output of the new cooler's hose through that radiator support pass through, I sent it directly down and right to the hard line going back to the transmission. It's as simple as sliding it on and fastening with another hose clamp. I'd recommend removing the steel underguard for easier access. I had some trouble removing one of the bolts for mine, since someone had stripped the head of it, so I actually had to do this without taking mine off....it really sucked.
All in all, very simple installation, I did not add any fluid, nor did I spill more than about a teaspoon's worth. The plates on this cooler are very thin, so I don't see it holding very much fluid at all, but for safe measure, you may want to verify your fluid level after the job and watch carefully for leaks for a couple days to make sure everything's in order.
I've now driven it a couple times...there is a distinct difference in the temperatures of the cooler input and output hoses, so I think it's going to do its job very well once I really start to put some heat on it.
I think I would do this to every new auto-trans vehicle I buy, as these will prolong your transmission life by a lot.


