

chris360hawks
New member
My buddy and I acquired this supercharger from some people on craigslist. It was on their Tacoma and making noise because it needed a rebuild. They didn't know how and didn't really want to mess with fixing it. So we swapped them a stock intake manifold I had laying around for their supercharger for free. All that was involved was our labor and intake manifold to complete the swap for them. Here is a video of the supercharger before we pulled it off of their truck:
TRD Supercharger 1st Gen Noise - YouTube
It didn't sound too pretty!
The tools and parts you will need to complete this rebuild are:
-1 Shop Press
-1 Professional Machinist (makes this job a lot easier!)
- Various Sockets/Pressing Tools
-1 Messed Up TRD Supercharger
-1 6303 Nachi Bearing Open C3 - $11
-1 6204 Nachi Bearing Open C3 - $7
-2 6203 Nachi Bearing Open C3 - $16 for both
-2 Rear Needle Bearings (Purchased these from Rolling Performance, part number on box is F-65477.1 or 6002544) - $20 for both
-1 Supercharger Coupler (Also from Rolling Performance) - $30
-1 Viton Nose Seal (Rolling Performance) - $13
-2 4oz Bottles of AC Delco Supercharger Oil - $9/bottle
-2 Rotor Pack Seals (The only place to find the correct sizes for these two seals is from Jon Bond Performance, they are expensive
https://jonbondperformance.com/inde...ducts_id=285&zenid=r69t5cr7jfom646vvseh0c2e37 ) - $65 for both
- 1 Tube of Permatex Red Gasket Maker - $15
So the total cost for all the materials is roughly $200. If this is your first time pressing in bearings it would probably be smart to buy a extra bearing or two since they are cheap. If you don't get them pressed in perfectly straight it is easy to tweak them and trash the bearing. Ask me how I know.
The first step is to pull the pulley and nose cone off of the blower.

Then you can pry the rotor plate off of the supercharger housing to get the rotor pack out.

As you can see on the inside of the housing the rotors were contacting the housing in a couple of places. This was due to the bearings being shot. Luckily the rotors didn't gouge the case and we were just able to clean up the case and the rotors.


The next step was to remove the C Clip on the front of the nose cone and press the shaft and bearings out of the nose of the supercharger. Here is a picture of the shaft, bearings, couplers, and pulley all pressed apart.

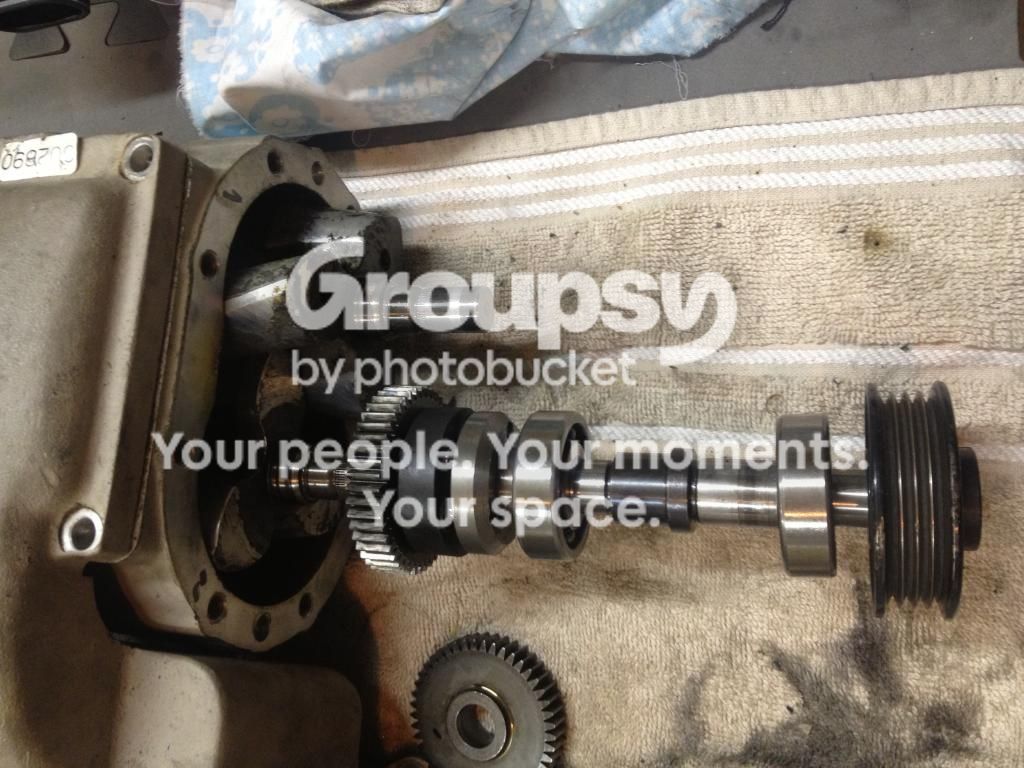

We then pressed the straight cut tooth gears and rotors off of the rotor plate. We marked with a sharpie what gear and rotor went on which side of the plate that way we could put it back together the same way.


Once we got the rotors off we started cleaning them up and realized that the coating that comes on them had started to wear off from contacting the inside of the supercharger housing and rotor plate a little bit. So we just got some paint stripper and stripped the coating off to bare aluminum. They are a lot prettier that way anyway!
Once you press the rotors and straight cut gears off of the rotor plate you will see two bearings in the rotor plate. Press these old bearings out. Once the bearings are out you will see two seals in there. Remove these seals. They might be hard to get out due to them being glued in. One trick that might work is to cut the seal in half and then pull it out with pliers. Just be careful not to damage the aluminum rotor plate. I don't have pics of this process.
We then removed removed the intake manifold from the actual supercharger unit itself. This was pretty easy. There is one nut on a stud that is difficult to access so we had to grind down a 10mm wrench to get the wrench to fit around the nut properly.

We then cleaned all the sealing surfaces along with the inside of the supercharger casing. If you wanted to port the supercharger this would be the time to do that. We decided not to.
With the supercharger casing and intake manifold separated you are able to access the two rear needle bearings. We pressed the old ones out and the new ones in.

We then resealed the mating surfaces of the intake manifold and supercharger housing with permatex gasket maker and put them back together.
After that we went back to our rotor plate and installed our seals. We opened them up according to this video Jon Bond Performance has on YouTube. We put a dab of red locktite on them and pressed both of the seals into the rotor plate. Then pressed in the two 6203 bearings.
Eaton Supercharger Rebuilding: How to properly install PTFE rotor pack seals by Jon Bond Performance - YouTube
We then pressed in the rotors one at a time along with the straight cut tooth gears. We rotate them with the gears to make sure the rotation was free and smooth. They may make a little bit of contact noise at this stage if they are out of the supercharger housing because they are not being supported by the rear needle bearings.

Then we sealed the supercharger housing and slid the rotor pack assembly into the housing. Make sure the rear of the rotors go into the needle bearings fully.


To rebuild the nose shaft we pressed on the bearing that sits inside the nose on the shaft and the coupler. We then tried to press in the bearing that sits behind the pulley on the nose cone. We had difficulty with this for some reason. The bearings kept getting tweaked when pressing them in and were getting ruined. What we did was heated up the bare nose cone to 250 degrees in the oven for about 15 minutes and froze the bearing in the freezer. After that the bearing dropped right in without even having to be pressed. Then we pressed the shaft into the nose cone. You need to keep the bearing that goes behind the pulley from moving when pressing in the shaft. The best way to do this is with a socket or a circular piece of pipe that fits on the outer race of the bearing that you can put against the press while you press in the shaft. Once the shaft, two nose cone bearings, and coupler are all pressed together spin them to check for any sticking points or grinding noises. If you have any you need to press it apart and check the bearings to see where you messed up. Then you can install your new viton seal and C Clip on the shaft of the nose cone. We then pressed on the pulley to the shaft. Then seal the rotor plate and install your nose cone. Then just fill with oil! Sorry I don't have more pics of the nose cone rebuild process, but Rockdawg has a good writeup for that.


After you get the nose cone reattatched and supercharger filled with fresh oil you are basically done! Just reseal and install the old elbow on the back of the supercharger. There should also be zero play in the supercharger now!
TRD Supercharger 1st Gen Noise - YouTube
It didn't sound too pretty!
The tools and parts you will need to complete this rebuild are:
-1 Shop Press
-1 Professional Machinist (makes this job a lot easier!)
- Various Sockets/Pressing Tools
-1 Messed Up TRD Supercharger
-1 6303 Nachi Bearing Open C3 - $11
-1 6204 Nachi Bearing Open C3 - $7
-2 6203 Nachi Bearing Open C3 - $16 for both
-2 Rear Needle Bearings (Purchased these from Rolling Performance, part number on box is F-65477.1 or 6002544) - $20 for both
-1 Supercharger Coupler (Also from Rolling Performance) - $30
-1 Viton Nose Seal (Rolling Performance) - $13
-2 4oz Bottles of AC Delco Supercharger Oil - $9/bottle
-2 Rotor Pack Seals (The only place to find the correct sizes for these two seals is from Jon Bond Performance, they are expensive
https://jonbondperformance.com/inde...ducts_id=285&zenid=r69t5cr7jfom646vvseh0c2e37 ) - $65 for both
- 1 Tube of Permatex Red Gasket Maker - $15
So the total cost for all the materials is roughly $200. If this is your first time pressing in bearings it would probably be smart to buy a extra bearing or two since they are cheap. If you don't get them pressed in perfectly straight it is easy to tweak them and trash the bearing. Ask me how I know.
The first step is to pull the pulley and nose cone off of the blower.

Then you can pry the rotor plate off of the supercharger housing to get the rotor pack out.

As you can see on the inside of the housing the rotors were contacting the housing in a couple of places. This was due to the bearings being shot. Luckily the rotors didn't gouge the case and we were just able to clean up the case and the rotors.


The next step was to remove the C Clip on the front of the nose cone and press the shaft and bearings out of the nose of the supercharger. Here is a picture of the shaft, bearings, couplers, and pulley all pressed apart.


We then pressed the straight cut tooth gears and rotors off of the rotor plate. We marked with a sharpie what gear and rotor went on which side of the plate that way we could put it back together the same way.


Once we got the rotors off we started cleaning them up and realized that the coating that comes on them had started to wear off from contacting the inside of the supercharger housing and rotor plate a little bit. So we just got some paint stripper and stripped the coating off to bare aluminum. They are a lot prettier that way anyway!
Once you press the rotors and straight cut gears off of the rotor plate you will see two bearings in the rotor plate. Press these old bearings out. Once the bearings are out you will see two seals in there. Remove these seals. They might be hard to get out due to them being glued in. One trick that might work is to cut the seal in half and then pull it out with pliers. Just be careful not to damage the aluminum rotor plate. I don't have pics of this process.
We then removed removed the intake manifold from the actual supercharger unit itself. This was pretty easy. There is one nut on a stud that is difficult to access so we had to grind down a 10mm wrench to get the wrench to fit around the nut properly.

We then cleaned all the sealing surfaces along with the inside of the supercharger casing. If you wanted to port the supercharger this would be the time to do that. We decided not to.
With the supercharger casing and intake manifold separated you are able to access the two rear needle bearings. We pressed the old ones out and the new ones in.

We then resealed the mating surfaces of the intake manifold and supercharger housing with permatex gasket maker and put them back together.
After that we went back to our rotor plate and installed our seals. We opened them up according to this video Jon Bond Performance has on YouTube. We put a dab of red locktite on them and pressed both of the seals into the rotor plate. Then pressed in the two 6203 bearings.
Eaton Supercharger Rebuilding: How to properly install PTFE rotor pack seals by Jon Bond Performance - YouTube
We then pressed in the rotors one at a time along with the straight cut tooth gears. We rotate them with the gears to make sure the rotation was free and smooth. They may make a little bit of contact noise at this stage if they are out of the supercharger housing because they are not being supported by the rear needle bearings.

Then we sealed the supercharger housing and slid the rotor pack assembly into the housing. Make sure the rear of the rotors go into the needle bearings fully.


To rebuild the nose shaft we pressed on the bearing that sits inside the nose on the shaft and the coupler. We then tried to press in the bearing that sits behind the pulley on the nose cone. We had difficulty with this for some reason. The bearings kept getting tweaked when pressing them in and were getting ruined. What we did was heated up the bare nose cone to 250 degrees in the oven for about 15 minutes and froze the bearing in the freezer. After that the bearing dropped right in without even having to be pressed. Then we pressed the shaft into the nose cone. You need to keep the bearing that goes behind the pulley from moving when pressing in the shaft. The best way to do this is with a socket or a circular piece of pipe that fits on the outer race of the bearing that you can put against the press while you press in the shaft. Once the shaft, two nose cone bearings, and coupler are all pressed together spin them to check for any sticking points or grinding noises. If you have any you need to press it apart and check the bearings to see where you messed up. Then you can install your new viton seal and C Clip on the shaft of the nose cone. We then pressed on the pulley to the shaft. Then seal the rotor plate and install your nose cone. Then just fill with oil! Sorry I don't have more pics of the nose cone rebuild process, but Rockdawg has a good writeup for that.


After you get the nose cone reattatched and supercharger filled with fresh oil you are basically done! Just reseal and install the old elbow on the back of the supercharger. There should also be zero play in the supercharger now!
Last edited:


