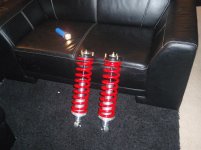
trying to pre-assemble coilovers

racedirt1 is right, you need the compressors that go on the outside of the coil like in Elton's pic. Compressing these things is the worst part of the job, you could always bring it to a shop and have them do it for you. It can be very very dangerous if one lets loose on you. And make sure the top plate is lined up correctly so that the 3 top plate bolts are lined up with the bottom shock bolt - you won't be able to turn the shock later with the pressure on it.

Also, remember to just take the 4 bolts out that hold each lower ball joint on to make enough room to get the new strut assembly in and the old one out. In other words, do not separate any ball joints (a lot of people do and end up ruining them), the 4 bolts are easy and will provide more than enough room.
 
And make sure the top plate is lined up correctly so that the 3 top plate bolts are lined up with the bottom shock bolt - you won't be able to turn the shock later with the pressure on it.


Ok, this is the only thing worrying me now... how am I supposed to know I have the top plate lined up with the bottom shock bolt???

was confident and about to put them together, now, a little worried
 
before you release the tension on the coil compressors, do a mock fit; just make sure the bottom mount lines up, then twist the top plate until the three bolts are in the general area they need to be. it doesn't need to be perfect, there is a tiny bit of give.

also there is no bolt pattern of the top bolts, it's an equilateral triangle, so it can be installed in any direction.

I say that because Camrys have the three studs at different lengths so the top can only go in one way.
 
before you release the tension on the coil compressors, do a mock fit; just make sure the bottom mount lines up, then twist the top plate until the three bolts are in the general area they need to be. it doesn't need to be perfect, there is a tiny bit of give.

also there is no bolt pattern of the top bolts, it's an equilateral triangle, so it can be installed in any direction.

I say that because Camrys have the three studs at different lengths so the top can only go in one way.

got ya...

I saw that it was a triangle LOL... ok, Im getting started
 
Ok,

my problem is not getting the coils compressed enough,

I got them plenty compressed to get the give I need, my problem is this..

the thread is not long enough for the bushing that came with the shock, the bushing that came with the top plate and the bushing for the top

the only two ways I can reach the threading is to:

Use the bushing that came with the shock as the lower bushing and take out the bushing that came with the top plate, and then I can fit the bushing, washer and nut on top

or

I can use the bushing that came with the shock, use the bushing in the top plate and no bushing on top and no washer...

ill have the pics up in a minute,

keep in mind, the Coil is completely out of the picture right now... I the height of the list of everything that Bryan lists:

nut
washer
bushing
top plate (with bushing installed)
bushing
washer
dust boot

is way to much for the threading... its too short
 
For example,

<a href="http://www.mediafire.com/imageview.php?quickkey=uh32vrydmzf&thumb=4"><img src="http://www.mediafire.com/imgbnc.php/6000983a698c1292f9dfd8648dc54ac64g.jpg" border="0"></a>

in this picture, you see the lower bushing that came with the shock and just the bushing thats in the top plate... the top plate will be flush with the collar of the bushing there and leave only millimeters to put the nut on, I cant even fit a washer under it.

If I take the "collared" bushing out of the top plate and use what looks to be a "collar" on the shocks bushing, which fits nicely, then I can get the full top bushing on it.

<a href="http://www.mediafire.com/imageview.php?quickkey=jmwmen0jm5m&thumb=4"><img src="http://www.mediafire.com/imgbnc.php/98a2c94385c68453daf582439330ab354g.jpg" border="0"></a>
 
WOW, I almost didnt think that it would work... using all the bushings and filing some down,

I actually took some vice grips, and a teenie saw I have and went in the kitchen and sawed 1 of the toyota ones in half and then sawed about 3/4 off the 2 that came with the top plate,

sure nough!! Victory! for one anyways... have to finish cutting the other one and then compress the springs, I will be ready to go prob by 11 or midnight, which means a short sleep and up at 6:30 to head over to Ron's!

<a href="http://www.mediafire.com/imageview.php?quickkey=2kzw0ntgww1&thumb=4"><img src="http://www.mediafire.com/imgbnc.php/45ccad0ceae602d4e840b4c8946ae9e74g.jpg" border="0"></a>
 
sure nough!! Victory! for one anyways... have to finish cutting the other one and then compress the springs, I will be ready to go prob by 11 or midnight, which means a short sleep and up at 6:30 to head over to Ron's!
</a>

looks good see you in the morning! :party:
 

Attachments

  • P1160001.jpg
    P1160001.jpg
    135.8 KB · Views: 462
:party: Wohoo! finally, I can't wait to see the pics after you get everything in. Congrats on getting everything together on time:trophy:
 
So, I got to Rons just after 7am this morning,

TheGreenMonster showed up with its driver sometime after 8 and Sn0wrunner was fashionably late,

when we started, I got a pic of the height on the driver and passenger sides
Driver:37.75
Passenger: 38.25

<a href="http://www.mediafire.com/imageview.php?quickkey=mnzmjuzjerd&thumb=4"><img src="http://www.mediafire.com/imgbnc.php/80f86c3e52af9e1b180c10e6fdc1afd54g.jpg" border="0"></a>

The guys were all great,
Here they are working on my rig, while I take a pic! LOL, seriously, they did a ton of work on my runner, we had several problems to solve.

1st one of the top plate bolts wouldnt come undone, it kept spinning inside the assembly, we couldnt get anything in to hold it from spinning because the coils were putting pressure on the coil spacers and blocking us from putting anything inside to stop the rotating nut,

so, we decided to cut it free,

<a href="http://www.mediafire.com/imageview.php?quickkey=mkxgrmiirf4&thumb=4"><img src="http://www.mediafire.com/imgbnc.php/65fc88ac929d336b98cdaa4865e3a32c4g.jpg" border="0"></a>

then I had mock lined up both of the top plates, lined up both of them the same, driver side had to readjust and passenger was perfect, go figure!

after the lift...

<a href="http://www.mediafire.com/imageview.php?quickkey=myzng2mwjzt&thumb=4"><img src="http://www.mediafire.com/imgbnc.php/d52aab70fb323da840b59a7f4572a3e54g.jpg" border="0"></a>

Driver:40.25

The adjustable coilovers are only supposed to lift it to 3.5 inches, and the spacers were 2.5 but my front coils had to be over 100k miles, so the coils were just completely toast...

we had some more problems with the lower shock bolt freezing to the bushings on the shock, but the guys figured that one out and we averted destroying anything getting it out.

Driver side
<a href="http://www.mediafire.com/imageview.php?quickkey=3xmdmjmhtfj&thumb=4"><img src="http://www.mediafire.com/imgbnc.php/d8a612604cae3be7ade3892ebf9ab61c4g.jpg" border="0"></a>

Passenger side:
<a href="http://www.mediafire.com/imageview.php?quickkey=nzzjjmjewyq&thumb=4"><img src="http://www.mediafire.com/imgbnc.php/1026f5270e5899aa313ed6874ef30bcc4g.jpg" border="0"></a>

Then we got all our Runners together for a pic! Keep in mind, I had to take my Roof Rack off so I could fit in the garage..

<a href="http://www.mediafire.com/imageview.php?quickkey=zmlmmcn11ov&thumb=4"><img src="http://www.mediafire.com/imgbnc.php/2b82f557901b9d324491890d0bb1744c4g.jpg" border="0"></a>
 
Cvs already leaking,

and Im hurtin...

thanks so much again to Ron Helmuth, Sn0wrunner and Greenmonster, I literally couldnt have done it without them...

I havent wrenched on a car like that in years...

Getting an alignment done now.
 
Cvs already leaking,

and Im hurtin...

thanks so much again to Ron Helmuth, Sn0wrunner and Greenmonster, I literally couldnt have done it without them...

I havent wrenched on a car like that in years...

Getting an alignment done now.

get that diff drop in and throw some hose clamps on the boots and you'll be set
:guitar3:
 
get that diff drop in and throw some hose clamps on the boots and you'll be set
:guitar3:

Did the diff drop and the alignment...

had them wash off the bottom of the car, will have to wash the upper boot cuz its still got some grease on it, not sure if it was from before or after the diff drop...

think its ok,

and what is stock height to the top of the fender with 16's??
 

Members online

Forum statistics

Threads
278,312
Messages
3,554,089
Members
248,016
Latest member
Advally Service

Trending content

Back
Top