Under-Hood Engine Light

mbumpus11

Member
Lots of people have done this, but everyone does it a different way.

I was helping jump a friend's battery the other night and thought that it was time for a light under the hood because I couldn't see anything at all.

Items:

2 foot "Neutral White" LED strip from oznium.com - $25 - link: Waterproof Ribbon LED Strips
Waterproof marine switch by Perko - $15 - link: PERKO Push-Button Electrical Switch | West Marine
16 gauge electrical wire - had on hand

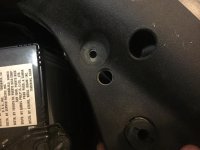
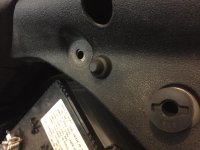
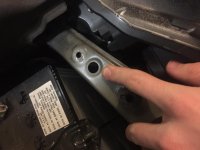
After removing the front plastic piece in the engine bay held on by the snap-clips, there is a hole roughly 5/8" in diameter just between the hood bumper and one of the holes for the snap-clips.

I marked from the underside with a sharpie, then used a 5/8" drill bit to drill out the hole to expose it.

Then I mounted the light to my hood where I knew I wanted it to be via the 3M sticky backing that comes already attached to the LED strip.

Ran wires for length, cut wires, wrapped wires together in black electrical tape sheathing. Fished wires under the hood mat and towards the driver's-side hinge of the hood. Zip tied one zip to the hinge support to control the wires to not get caught in closing of the hood. Routed wires down the side of my engine bay, then used male/female connectors to link up wires to switch. Mounted switch into pre-drilled hole.

Installed inline fuse and connected to battery.

Pushed button, and voila! Let there be light!

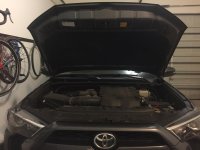
Pic 1: Engine before light installation
Pic 2: location of OEM hole in body supports
Pic 3: Plastic cover with hole drilled
Pic 4: Switch installed (that little triangular rubber piece is the waterproof cap)
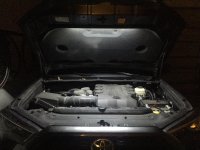
Pic 5: Engine bay in the dark with light on
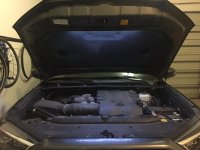
Pic 6: Engine bay with garage lights on (for comparison to beginning, and light is neutral white, but appears blue here)
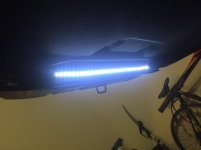
Pic 7: LED light strip itself and lit up

Additionally, I have had these LED light strips on vehicles in the past and they had been exposed to the elements in Texas. Had them on my previous vehicle for ~8 years and never had a problem with shorting/flickering/not working. Very good quality!
 

Attachments

  • IMG_7064.jpg
    IMG_7064.jpg
    120.6 KB · Views: 5,853
  • IMG_7065.jpg
    IMG_7065.jpg
    127.1 KB · Views: 3,150
  • IMG_7066.jpg
    IMG_7066.jpg
    130.9 KB · Views: 3,128
  • IMG_7067.jpg
    IMG_7067.jpg
    134.3 KB · Views: 3,021
  • IMG_7068.jpg
    IMG_7068.jpg
    135.3 KB · Views: 3,718
  • IMG_7069.jpg
    IMG_7069.jpg
    125.3 KB · Views: 4,044
  • IMG_7070.jpg
    IMG_7070.jpg
    115.2 KB · Views: 3,119
Register to hide this ad
Lots of people have done this, but everyone does it a different way.

I was helping jump a friend's battery the other night and thought that it was time for a light under the hood because I couldn't see anything at all.

Items:

2 foot "Neutral White" LED strip from oznium.com - $25 - link: Waterproof Ribbon LED Strips
Waterproof marine switch by Perko - $15 - link: PERKO Push-Button Electrical Switch | West Marine
16 gauge electrical wire - had on hand

After removing the front plastic piece in the engine bay held on by the snap-clips, there is a hole roughly 5/8" in diameter just between the hood bumper and one of the holes for the snap-clips.

I marked from the underside with a sharpie, then used a 5/8" drill bit to drill out the hole to expose it.

Then I mounted the light to my hood where I knew I wanted it to be via the 3M sticky backing that comes already attached to the LED strip.

Ran wires for length, cut wires, wrapped wires together in black electrical tape sheathing. Fished wires under the hood mat and towards the driver's-side hinge of the hood. Zip tied one zip to the hinge support to control the wires to not get caught in closing of the hood. Routed wires down the side of my engine bay, then used male/female connectors to link up wires to switch. Mounted switch into pre-drilled hole.

Installed inline fuse and connected to battery.

Pushed button, and voila! Let there be light!

Pic 1: Engine before light installation
Pic 2: location of OEM hole in body supports
Pic 3: Plastic cover with hole drilled
Pic 4: Switch installed (that little triangular rubber piece is the waterproof cap)
Pic 5: Engine bay in the dark with light on
Pic 6: Engine bay with garage lights on (for comparison to beginning, and light is neutral white, but appears blue here)
Pic 7: LED light strip itself and lit up

Additionally, I have had these LED light strips on vehicles in the past and they had been exposed to the elements in Texas. Had them on my previous vehicle for ~8 years and never had a problem with shorting/flickering/not working. Very good quality!

Dang it! another mod! I keep telling myself I am done! Great write up. Added to my never ending list!:ybrick:
 
Nice writeup on it! I'd only change one thing, that switch is insanely expensive, and you have to press it to turn on/off. I'd just throw a cheapo pin switch in there and let it automatically turn on whenever the hood is opened, off when its shut.

Amazon.com: 1 X 2-3/4 Polycarbonate Pin Switch: Car Electronics

Doing some testing on a roll of led's I have here, if I can get them waterproofed, I will probably do this mod too.

Sadly, Toyota used to put lights into their vehicles for under-hood work in the dark, my '85 supra has one mounted in the engine bay and is on a 7 or 8 foot cord! Guess they don't do that anymore.
 
Looks good! It looks as if Toyota added some insulator material to the underside of the hood, or am I looking at it wrong. I have a 2014 and its just bare metal in there?
 
Nice writeup on it! I'd only change one thing, that switch is insanely expensive, and you have to press it to turn on/off. I'd just throw a cheapo pin switch in there and let it automatically turn on whenever the hood is opened, off when its shut.

Amazon.com: 1 X 2-3/4 Polycarbonate Pin Switch: Car Electronics

Doing some testing on a roll of led's I have here, if I can get them waterproofed, I will probably do this mod too.

Sadly, Toyota used to put lights into their vehicles for under-hood work in the dark, my '85 supra has one mounted in the engine bay and is on a 7 or 8 foot cord! Guess they don't do that anymore.

Yeah, I was pretty bummed at the price of the switch, but for as inconspicuous it is plus the waterproof/dustproof feature with it being so close to the front is what made it worth it for me. Marine switch...boat stuff is always overpriced anyway!

Looks good! It looks as if Toyota added some insulator material to the underside of the hood, or am I looking at it wrong. I have a 2014 and its just bare metal in there?

My hood came with that matting inside and under the hood; not sure why yours wouldn't have it, too??
 
Looks good! It looks as if Toyota added some insulator material to the underside of the hood, or am I looking at it wrong. I have a 2014 and its just bare metal in there?

He has a trail premium, I bet you have an SR5, right? Mine doesn't have the padding either, 2011 SR5. :mad:
 
There's a bunch of posts about it here, but if you just wanna buy one and install it, here's a link to the part:

Toyota - INSULATOR, HOOD Part Number: 53341-35160

And, it looks like these are the clips to hold it in:

Toyota - CLIP Part Number: 90467-A0003

From the link I found, it says you'll need 10 of them. I might just do this, just to see if it reduces any more interior noise!:suspicious:

For $171 + $12 that's hard to swallow, for what its worth my understanding was this was a standard feature on limits' all years, and then has recently been standard across models in 2015+. Not 100% sure on that info though hopefully others will chime in.
 
Lots of people have done this, but everyone does it a different way.

or we do it the Anti-Dark way.

BeeRad over on the TW (tacoma world) forums has been making and selling kits for a while. Nothing but good reviews. I bought a set from him. Havent been able to install it, stupid 68+ degrees for proper adhesion blah blah blah lol. but i will install it as soon as able! its too cool not to. and like you said there is a need for underhood lighting on our rigs at night.

more info o nt he anti-dark kits.

Hood Lighting Kits - 1st & 2nd Gen - Ongoing group buy

also they work on the 4runner, see [MENTION=130932]wild_turkey[/MENTION] 's build thread.

just giving people options here. Your setup works. but others should know they can buy a complete kit from a fellow toyota lover, taco enthusiast, and forum member if they want.
 
I have a 2014 trail premium and it didn't come with that.

Well, I'm confused then. I'm gonna guess again then, and say it must have been a part of some special package.

Only reason I see getting one is to be able to install soundproofing under it and using that to cover it up! That's all I'd want it for, as all the reviews in the other threads say it really didn't do anything for sound cuz its a quarter inch thick.

Anyways, sort of a hijack from the original thread, sorry about that OP!!!
 
I believe all 2010-2013 Limiteds had the insulation (none of the other pre-facelift models had it), then in 2015+ all models had it come standard.
 
or we do it the Anti-Dark way.

just giving people options here. Your setup works. but others should know they can buy a complete kit from a fellow toyota lover, taco enthusiast, and forum member if they want.

I'm sure its a nice kit, but for 80 bucks on their website, it just looks like a 3 foot length of standard 5050 LED light strips and a 4 dollar pin switch. If it is just a strip of stick-on led strip lighting, one can buy that on amazon for about 15 bucks, and with the amount of knowledge here in this forum, it would be super-simple to wire in! I think I can build that whole thing for under 20 bucks.

Wire from ground bolt, run it to led strip, other wire to pin switch, wire there to fuse link, then connect to +12V at battery.

As for this lighting setup, I've been inspired to do this over the next week when I can find a little time. I already have a roll of LED lighting that I've used for other projects, and still have close to 15 feet left of the strip just sitting on my workbench, so I'll just order in a pinswitch and look for a fuse holder around my shop.
 
I already have a roll of LED lighting that I've used for other projects, and still have close to 15 feet left of the strip just sitting on my workbench, so I'll just order in a pinswitch and look for a fuse holder around my shop.

you sound very well equipped. good for you!

As for me I will stick with Anti-Dark, supporting a forum member and fellow yota enthusiast is good enough for me. the cost i paid was for ease of it all in a box right to my door with all the necessary bits to complete the job instead of time spent searching, selecting, and receiving just to find out it isn't exactly what i wanted and then returning and repeating.
 
Nice write-up and I appreciate.

That said...flashlight...glove box.

Used to do that. Have a handheld spotlight in the back at all times. Sometimes you need both hands! *enter this handsfree mod*

you sound very well equipped. good for you!

As for me I will stick with Anti-Dark, supporting a forum member and fellow yota enthusiast is good enough for me. the cost i paid was for ease of it all in a box right to my door with all the necessary bits to complete the job instead of time spent searching, selecting, and receiving just to find out it isn't exactly what i wanted and then returning and repeating.

I'm impressed by your undying support for the product you use, but you didn't have to hijack my thread to promote it. Had I seen the product before my install, I might have bought it! Really! However, I would have changed the hood pin because in the middle of the day I don't need the light under my hood. I chose to have a manual on/off switch. Additionally, the lighting difference in your chosen product and my set up is about 1 foot of LEDs. I did this mod to light up my engine bay. I didn't do this mod to light up everything within a 20 foot radius of my engine bay.

I know you're a toyota enthusiast and a fantastic forum member...you're more active than me (per number of posts)! But that also means that you understand the benefit of figuring something out on your own, and sourcing your own parts to do a modification that you think you need.

I'm glad you have what you need with your product, and if you need help installing I would love to help!

That being said, we've achieved the same thing and I can say "I built that" with my particular system, so I hope your under hood lights bring you as much use and joy (once installed) as I know mine will for years and years to come.
 
Nice write up and Mod.
As for the off topic hood insulator. That is way over priced. There is two to five dollars worth of push button retainers there . On the high side ,a fifty dollar hood insulator.
I know I'm living in the past.
 
you didn't have to hijack my thread to promote it. Had I seen the product before my install, I might have bought it! Really!

not trying to hijack. just trying to make this option available in the correct thread. to aid in the future when a newbie searches for under hood lighting or engine bay lighting or something like that and locates this thread.

I know you're a toyota enthusiast and a fantastic forum member...you're more active than me (per number of posts)! But that also means that you understand the benefit of figuring something out on your own, and sourcing your own parts to do a modification that you think you need.

I try to DIY as much as possible to be honest. ive just dealt with a lot of lemons/misrepresented stuff from amazon recently and dealing with that BS wasn't worth my time. So thank you for posting up your amazon link. that will help others avoid any hassle who want to go the DIY route!

also nice write up. :thumb3: you doing one for cheap and reliable rock lights anytime soon???
 

Members online

Forum statistics

Threads
278,304
Messages
3,554,041
Members
248,016
Latest member
Advally Service

Trending content

Back
Top