**Urban Runner Stereo Replacement Information**

[MENTION=130045]SteveAndStaci[/MENTION] unfortunately the plug on the urban runner is not similar to the stock plug on other runners. its not as simple as going to your local car auto shop and picking up a harness. it is super simple to swap out though. if the new kenwood is a double din it will fit just fine and the urban runner trim will fit nicely around it. look on the site for steps on how to take the dash apart. pull the tomtom unit out. carefully splice the wires and match them up with the new units harness. and put it back in. it took me about 30mins to do it but ive been doing car stereos for years and can rip a car apart in mins. someone with less experience maybe an hour to 90mins.

Thanks leftyguns. I'm assuming it will make sense when I see it... but when you say "splice the wires," I assume I'll have to cut the wires on both and connect them together with electrical twisty connectors? Or are there push pins the wires are inserted into in the back of the stereo? Seems like a lot of wires... are we talking like 15-20? I'm most worried about what my wife will do when I can't get her steering wheel buttons or something working right!

I'm also puzzled because some on this forum say all double-DIN stereos fit the Urban Runner trim just fine. Others say they had to buy a two-piece bolt-in trim. I guess I should just bite the bullet and work through issues as they arise, lol.
 
[MENTION=130045]SteveAndStaci[/MENTION] it will be a lot of wires, two for each speaker, power, ground, constant, antenna, steering controls, lights and so on....I would use heat shrink or butt connectors. twisting them together with electrical tape will not hold.


check out my old thread:
http://www.toyota-4runner.org/engin...installed-pioneer-avic-x920bt.html#post697500

the first post has links in it on how to take the dash apart, the wiring guide and what to get for the steering wheel controls. these should be enough to get you going
 
SteveAndStaci-

It may sound intimidating, but if you take your time, it will all come together. Taking the dash apart is a bit tricky. There are a few hidden screws that are shown in the link on how to take the dash apart.

Here's a link to a thread that I contributed to a while ago when I replace the TomTom head unit in my 2009 Urban Runner. There are a lot of wires, but if you leave some slack on them, you should be able to get them to stow them so that you can install the head unit.

http://www.toyota-4runner.org/engines-suspension-wheels-tires-audio-accessories/43345-**urban-runner-stereo-replacement-information**.html

Good luck, and reply back if you have any questions.
 
Read through all the links on this thread

I di this replacement at the beginning of the year. See my post above. the post by Fish Eye is the start.

You will have to cut the wires coming out of the harness.

In my post there is a wiring diagram. It isn't that hard everything is color coated. Some people solder the connections, I used these:
Posi-Products? Car Stereo Connectors 16 connectors for installing a new car stereo at Crutchfield.com

I think I ordered extras from ebay.

A speaker replacement would be a better sound improvement than just replacing the head unit. No matter how good the head unit is if you have lame speakers it won't matter. I did the speakers first and the sound improvement was very noticeable.

Speakers and head unit took 3 days. Day one took apart the doors and installed the speakers. Then tested the sound.
Day 2 disassembled the head unit. Day 3 put everything back together with the new head unit, amp, and subwoofer.

I studied for a month before taking the plunge. Best car upgrade I ever did and the first time I ever installed a car stereo. Use the trim ring that the TomTom uses, it gives a stock look.

Read through the links first on the Fish Eye post and then the propman posts, then the links on my post. That should be enough.

I bought a trim removal tool kit.

The Kenwood will fit.
 
Last edited:
I di this replacement at the beginning of the year. See my post above. the post by Fish Eye is the start.

You will have to cut the wires coming out of the harness.

In my post there is a wiring diagram. It isn't that hard everything is color coated. Some people solder the connections, I used these:
Posi-Products? Car Stereo Connectors 16 connectors for installing a new car stereo at Crutchfield.com

I think I ordered extras from ebay.

A speaker replacement would be a better sound improvement than just replacing the head unit. No matter how good the head unit is if you have lame speakers it won't matter. I did the speakers first and the sound improvement was very noticeable.

Speakers and head unit took 3 days. Day one took apart the doors and installed the speakers. Then tested the sound.
Day 2 disassembled the head unit. Day 3 put everything back together with the new head unit, amp, and subwoofer.

I studied for a month before taking the plunge. Best car upgrade I ever did and the first time I ever installed a car stereo. Use the trim ring that the TomTom uses, it gives a stock look.

Read through the links first on the Fish Eye post and then the propman posts, then the links on my post. That should be enough.

I bought a trim removal tool kit.

The Kenwood will fit.

Thanks jrhess. I'm hoping the new head unit will improve sound good enough for me. I noticed when I'm listening to music through the AUX port from my iPhone, the sound quality is much better (plenty good for me). Listening to the radio, the sound quality is awful. I'm hoping that means the speakers are at least decent.

How necessary is the trim removal kit? I didn't know such a thing existed. Where did you find it? If its absolutely needed, I should probably get it on order right away. I just got notification that some of the stereo stuff was delivered at my front door today (I'm still at work).

Just out of curiosity... once I cut the harness, is this something that unplugs from the other end so I can connect all the wires from my kitchen table? Or am I going to have to be working in the car with poor lighting in the small opening?
 
Read through all the links on this thread

I was able to unplug the connector from the harness, bring it inside and then make the connections on my work bench. I think I left the connector plugged into the TomTom, disconnected the connector from the car and didn't cut it until I was inside. Leave enough wire for you to work with.

Compared to replacement speakers such as these (Focal IC 690TOY 6"x9" 2-way speakers designed to fit select Toyotas at Crutchfield.com, this email just came today!) the stock speakers are barely adequate IMHO. But maybe you can do that another day.

I removed all the door panels and everything you need to remove the head unit and used a kit like this: http://www.amazon.com/Panel-Window-Molding-Upholstery-Removal/dp/B009QLBDSW/ref=sr_1_4?s=automotive&ie=UTF8&qid=1442430802&sr=1-4&keywords=trim+removal+tool
just because I wanted to be careful and not ruin anything.

Good luck!
 
Last edited:
Just out of curiosity... once I cut the harness, is this something that unplugs from the other end so I can connect all the wires from my kitchen table? Or am I going to have to be working in the car with poor lighting in the small opening?

I HU that I have came with a generic connector. It plugged into the back of the HU, and on the other end, were bare wires. I basically installed butt connectors on all of the wires at the bench, and zip tied them together so that it wouldn't be too crazy. (You might want to stagger the length of the wires so that all of the butt connectors don't wind up at the same spot in the harness bundle, creating a large bulge.)I took that whole assembly out to the truck to work. I disconnected the harness from the back of the HU, and I cut off the factory connector off the factory harness, and used the wiring diagram to match up the wires. I did all of the speakers first, and did the +12V and GROUND last. This way, I can remove the new harness that I connected with the butt connectors when I want to pull just the HU.

Take your time...you will be able to do it if you have some patience. You're right, the lighting inside the dash in the 4Runner is poor. I would suggest doing this during the day, and get a good flashlight to light up what's behind the dash so that you can see what you're doing.

Your local automotive store should have the butt connectors. If not, I found these on Amazon, and they look like the ones I used. These are nicer in that you can heat shrink them when you're done.

http://www.amazon.com/3M-Heat-Shrink-Connector-Piece/dp/B008HMHJDO
 
Last edited:
I need help!! I'm very lost. I bought a new Kenwood DNX572BH with Navigation, Bluetooth, and SiriusXM. I have my Eclipse stereo and hardness out. I've connected the speakers and the steering wheel controls (using Axxess ASWC-1). I haven't installed in the vehicle and tested yet because I have a LOT of extra wires. I've read absolutely everything I could find on this forum. The Crutchfield wiring diagram for the Urban Runner doesn't seem to be exactly accurate. I have many wires left over... can someone tell me where these go?
  • R+ (gray with orange stripe)
  • L+ (White with black stripe)
  • R- (Black with orange stripe)
  • L- (Blue with white stripe)
  • TX+ (Green with red stripe)
  • TX- (Green with black stripe)
  • ILL +B (orange with white stripe)
  • ILL - (orange)
  • SPD (pink)

For the 12V constant (yellow), do I just make a three-way connection between the old Eclipse harness, my new harness that came with the Kenwood unit, and the Axxess steering wheel control harness?

This is going to sound dumb (but I'm not good with electrical), but what about all the black ground wires? There are three black ground wires from the old Eclipse harness, one from the new Kenwood harness, one from the Axxess steering wheel control harness, and a brown/black wire that needs to be ground to the chassis. Did you guys just connect all these ground wires together? Once the harness is plugged back into the vehicle, I assume the black wire is already grounded somewhere under the hood.

For the GPS, did you guys just use the GPS antenna wire from the Eclipse unit or did you route a new GPS antenna that came with your new Head Unit?

Lastly... I saw this answered before when searching the forum but I can't find it again. Where does everyone recommend routing the SiriusXM antenna wire?
 
Need help fast!! New Head Unit

I need help!! I'm very lost. I bought a new Kenwood DNX572BH with Navigation, Bluetooth, and SiriusXM. I have my Eclipse stereo and hardness out. I've connected the speakers and the steering wheel controls (using Axxess ASWC-1). I haven't installed in the vehicle and tested yet because I have a LOT of extra wires. I've read absolutely everything I could find on this forum. The Crutchfield wiring diagram for the Urban Runner doesn't seem to be exactly accurate. I have many wires left over... can someone tell me where these go?
  • R+ (gray with orange stripe)
  • L+ (White with black stripe)
  • R- (Black with orange stripe)
  • L- (Blue with white stripe)
  • TX+ (Green with red stripe)
  • TX- (Green with black stripe)
  • ILL +B (orange with white stripe)
  • ILL - (orange)
  • SPD (pink)

For the 12V constant (yellow), do I just make a three-way connection between the old Eclipse harness, my new harness that came with the Kenwood unit, and the Axxess steering wheel control harness?

This is going to sound dumb (but I'm not good with electrical), but what about all the black ground wires? There are three black ground wires from the old Eclipse harness, one from the new Kenwood harness, one from the Axxess steering wheel control harness, and a brown/black wire that needs to be ground to the chassis. Did you guys just connect all these ground wires together? Once the harness is plugged back into the vehicle, I assume the black wire is already grounded somewhere under the hood.

For the GPS, did you guys just use the GPS antenna wire from the Eclipse unit or did you route a new GPS antenna that came with your new Head Unit?

Lastly... I saw this answered before when searching the forum but I can't find it again. Where does everyone recommend routing the SiriusXM antenna wire?

I'm sorry to BUMP this so soon, but I'm desperate... heading out of town tomorrow and need to get this figured out and put back together! Any insight you can provide would be much appreciated.
 
Read through all the links on this thread

Hi,
I used the gps antenna that came with the new head unit. I mounted it right above the head unit inside the dash using the mounting tape/magnet that came with it. It works great.
I bundled the ground wires together and grounded the unit using one of the screws that mounts into the vehicle right below the head unit.
I routed my XM satellite antenna on the roof above the front windshield in the passenger side corner, routed the wire in the groove alongside between the front glass and the molding along the passenger side, under the molding into the door hinge area, then up under the glove box into the head unit area. I used electrical tape to keep the antenna wire in place in the door hinge area.

It is true you don't use every wire from the harness. I f you look through my links above you will see 2 wiring diagrams. Double check using both.

I am not sure about the steering controls, but it has to be grounded and you can power it using the yellow lead.

Hope this helps and isn't too late for you.
 
Hi,
I used the gps antenna that came with the new head unit. I mounted it right above the head unit inside the dash using the mounting tape/magnet that came with it. It works great.
I bundled the ground wires together and grounded the unit using one of the screws that mounts into the vehicle right below the head unit.
I routed my XM satellite antenna on the roof above the front windshield in the passenger side corner, routed the wire in the groove alongside between the front glass and the molding along the passenger side, under the molding into the door hinge area, then up under the glove box into the head unit area. I used electrical tape to keep the antenna wire in place in the door hinge area.

It is true you don't use every wire from the harness. I f you look through my links above you will see 2 wiring diagrams. Double check using both.

I am not sure about the steering controls, but it has to be grounded and you can power it using the yellow lead.

Hope this helps and isn't too late for you.

Thanks. Trust me, I've spent a ton of time studying every related link in this thread and on the forum. I created a 30-pg word document combining everyone's diagrams, instructions, and useful comments into one doc. I guess I'll plug it in when I get home and give it a shot without connecting all the wires. It seems like I should be using the illumination wires (ILL +B and ILL-). However, my Kenwood just has a single illumination wire. Not sure which to use. I guess trial by error!

How did you bunch up so many ground wires to a single location?
 
Last edited:
Did you get it installed?

YES! Well, sort of. Thanks so much for your help. I decided just to plug everything into the car with the unknown wires disconnected and everything seemed to work. I didn't leave it plugged in though... I pulled it back out while I work on other things. I thought I could use the existing factory GPS antenna, but the plug was slightly different... so I still have to run and mount that. Once I have everything put back together, my intent is to post a wiring diagram on this thread that includes every single wire (including for steering wheel controls and those that go unused). I'm in Columbus for a conference this week, so I'll probably finish early next week.

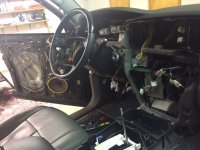
Here's all the stuff I'm working on at the same time. My wife is freaking out at the sight of her 4runner at the moment. I'm freaking out because she's driving my truck while her 4runner is in pieces!
  • New "piano black" wood steering wheel
  • New head unit with GPS/bluetooth
  • Plasti-dipping all the silver plastic trim using Anthracite Grey with Glossifier
  • Changing out all back lighting with white and blue LEDs (instrument cluster, HVAC, window switch, steering wheel controls, shifter, all switches) - I have parts out to forum member [MENTION=63211]emelianenkov[/MENTION] for making the swap for me
  • Changing out the dome lighting, map lights, door lights, and license plate lights with bright white LEDs
  • Painting the faded side mirrors
  • Replacing the scratched glass lens on the instrument cluster
  • Replace spare tire winch (cable broke)
  • All new tires
  • Two new front wheel bearing/hub assemblies (bought assemblies from Forum Member [MENTION=100129]nj636[/MENTION])
  • New interior all-weather floor liners

FullSizeRender.jpg
 

Attachments

  • FullSizeRender.jpg
    FullSizeRender.jpg
    128 KB · Views: 2,315
Last edited:
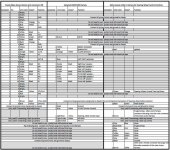
Urban Runner Aftermarket Stereo Head Unit Installation Wiring Diagram

Here's a complete wiring diagram/table that worked for me (I'm trying to attach a photo and a pdf to use whichever is easier). Each row in the table represents a connection. I installed a Kenwood DNX562BH... connections may be a bit different for different head unit stereos. Note that this ONLY applies to Urban Runners that have the Eclipse Tom Tom unit from the factory. It also assumes you use a Metra Axxess ASWC-1 for connecting your steering wheel controls. There are a lot of wires I didn't use. If you install a backup camera or aftermarket amp, you may end up using more wires. Let me know if folks have questions.

Untitled.jpg

View attachment 4runner stereo wiring.pdf
 

Attachments

I used sound deadening on the doors and had Katzkin leather installed. The Urban Runner seats are known to fall apart. The sound deadening really made a difference in the quality of the sound.
That truck will be great when your finished!!
 
I used sound deadening on the doors and had Katzkin leather installed. The Urban Runner seats are known to fall apart. The sound deadening really made a difference in the quality of the sound.
That truck will be great when your finished!!

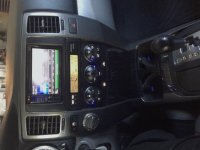
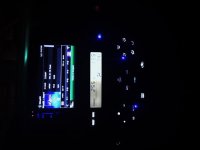
Finally got back in town and finished everything up. I love the new Head Unit. The improvement in sound (even with the factory speakers) is unbelievable. Looks sharp with the blue backlighting and the other white/blue LEDs I installed around the car to match. Also plasti-dipped the interior plastic trim to a darker glossy gray.

One thing I haven't figured out though is the steering wheel buttons. They are working fine... vol up/down, seek up/down, and mode. When the factory Eclipse was installed, the up and down arrows on the steering wheel scanned between presets. If you held them down, they would seek. My Axxess ASCW-1 harness supposedly allows programming of dual function buttons (short hold vs long hold), but haven't figured it out yet. Kenwood units also have an option in the software to change the functions, which I think is what's confusing me. There are two competing ways to do it that seem to be interfering with each other. Do I make any sense?
Interior4.jpg

Interior5.jpg
 

Attachments

  • Interior4.jpg
    Interior4.jpg
    33.8 KB · Views: 2,066
  • Interior5.jpg
    Interior5.jpg
    17.1 KB · Views: 2,008
Finally got back in town and finished everything up. I love the new Head Unit. The improvement in sound (even with the factory speakers) is unbelievable. Looks sharp with the blue backlighting and the other white/blue LEDs I installed around the car to match. Also plasti-dipped the interior plastic trim to a darker glossy gray.

One thing I haven't figured out though is the steering wheel buttons. They are working fine... vol up/down, seek up/down, and mode. When the factory Eclipse was installed, the up and down arrows on the steering wheel scanned between presets. If you held them down, they would seek. My Axxess ASCW-1 harness supposedly allows programming of dual function buttons (short hold vs long hold), but haven't figured it out yet. Kenwood units also have an option in the software to change the functions, which I think is what's confusing me. There are two competing ways to do it that seem to be interfering with each other. Do I make any sense?
View attachment 176614

View attachment 176616

return the axxess and get the idatalink maestro sw or rr if your unit supports it. its a better steering wheel adapter, plus u can program it on the web to customize your buttons. if you still want to use the axxess, there is a programmer you can use with your phone and usb, but i prefer to use idatalink since it solved all my non responsive problems i had with axxess.
 
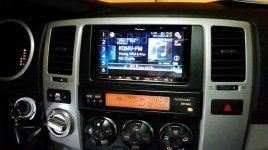
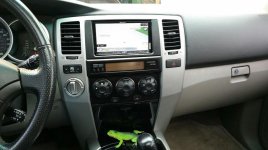
I just finished installing a Pioneer NAV on my 2008 Urban Runner. I'd like to thank everyone who has contributed to this thread so far. The info from this thread has been great!

Here is a quick list of parts:
  • Pioneer AVIC-7100NEX
  • iDatalink Maestro ADS-MSW Steering Wheel Control Adapter
  • Posi-Products Car Stereo Connectors

I have installed 3 or 4 decks before but this is the first time I get to cut the factory harness so it was a little nerve-wracking. Took me about 5 hours from start to finish, but I took my time. It was actually pretty straight forward and fairly easy. The Maestro is super easy to set up with the web programming, and the steering wheel controls work wonderfully. Like others have stated, the new stereo sounds so much better, even with the stock speakers.

Still need to do: parking brake bypass, back-up camera, mounting the microphone, aux plug, and 2 USB to switch blanks.
 

Attachments

  • ur1.jpg
    ur1.jpg
    71.6 KB · Views: 2,993
  • ur2.jpg
    ur2.jpg
    66 KB · Views: 1,966

Members online

Forum statistics

Threads
278,309
Messages
3,554,075
Members
248,016
Latest member
Advally Service

Trending content

Back
Top