Warthog Build and Adventure Thread

Way back in my younger days, I had everything I needed minus food/water in a single box that I could just throw in the back of a car, go to the store and buy a bag of food and a water jug and head to the desert on a 5 minute notice.

Course at 18-20 years old there isn't a lot of responsibility on the weekends :)

I still sort of plan outtings that way, though I've got more than just a single box I need to throw in the back now, but still only about 10 minutes to be GO ready :D
 
Way back in my younger days, I had everything I needed minus food/water in a single box that I could just throw in the back of a car, go to the store and buy a bag of food and a water jug and head to the desert on a 5 minute notice.

Course at 18-20 years old there isn't a lot of responsibility on the weekends :)

I still sort of plan outtings that way, though I've got more than just a single box I need to throw in the back now, but still only about 10 minutes to be GO ready :D

Its the external dependencies that stopped me. Prior commitments etc.

If it is all up to me.... I am good to go in 15min.... (oh.... i need to go retrieve the truck first.... tho)
 
Was it hot out there? Looks like you had a good time.

Nah it was great. Little cool actually sat and sat night. Sunday it was about 80-82 or something, warm but not bad at all.

HOWEVER I'm betting this weekend will be scorching if the SD weather is any indication :D

.. yup, at or near 100 during the day through sunday!
 
Awesome! Thanks for the report. I'm always curious about that trail when I see it on the map. I was out there, with my family and friends, from Friday night to Sunday morning and the weather was awesome. We camped in Blair Valley too, as well as hit up the Mud Caves. Unfortunately our friends have minivan so we were kinda limited.
 
Drawer system

Well my tiedown rack has worked well, but it doesn't provide any real storage space and I have to remove it every night for sleeping so I'm making something new to replace it.

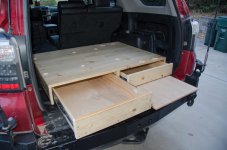
A pair of drawers with a carpeted top to match the interior will be permanently mounted in the back. On the Pass side will be a place for mounting the fridge. On the Driver side there will be a removable extension that goes up to the back of the folded seats that will be a sleeping area. The entire top will have several hideaway tiedowns for securing gear while moving, then I just need to move the gear off the sleeping area for the night. Nothing else has to be taken out.

I bought all the wood and some hardware and the fuzzy interior cloth covering material. So far the cost is $202. Some glue and drawer hatches and the tiedowns will probably push it close to 250 total.

One of the drawers will be slightly shorter than the other to accommodate a pull out utility table from beneath is as well :)

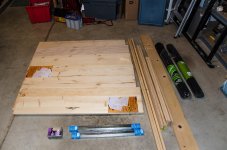
Pic of the materials. Will update as I put it together...

Drawers01.jpg

Final materials list
(Not everything shown above)
Note that this list is mostly accurate from receipts but not guaranteed to be 100% correct.
Especially if you do mods or to fit different gens. All mods require some amount of on-the-fly
engineering always :D

Wood:
* 1/4 x 3/4 x 8 foot trim molding (Drawer side/back topping)
* (2) 1 x 6 x 8 foot pine plank (Sides of main shell and drawer fronts)
* (2) 1 x 2 x 8 foot pine stick (Various places though out build)
* 1 x 12 x 48 pine panel (12 + 20 inch panel == 32inch deep platform top)
* 1 x 20 x 24 pine panel
* 1 x 24 x 48 pine panel (Sleeping extension)
* (2) 24 x 48 1/4in birch plywood (Drawer bottoms)
* (4) 3/4 x 4 x 36 "Craft" pine (Drawer sides)
* 1/4 x 24 x 48 plywood (Pull out table)

Glue:
* 1/2 bottle wood glue
* 2 cans of super 77 spray glue

Hardware:
* (2) pairs of 24 inch 150 pound drawer slides
* Box of 2.5 inch wood screws.
* (10) D ring Tie downs
* (20) sets: M6 x 30mm bolts, washer and locking nut
* (2) shallow drawer pulls (So to not hit the plastic on the rear hatch when closed)
* (2) Black barrel bolts (for securing the drawers closed)
* (20) large round head Philips screws (For attaching the metal brackets to the wood drawer frame)

I used spare bits of wood, shims and scrap metal in various places as needed.
Also used staples and staple gun already available.
Bolting to vehicle body done with on the fly welded scrap steel and existing frame nuts for rear slider tray which was removed.
Look closely at the pictures below for other details...


Covering:
* Three rolls of lightweight interior "carpeting" (Pep Boys). 2 black, one grey.
If you are not doing the bed extension, you can get away with only two rolls.
 

Attachments

  • Drawers01.jpg
    Drawers01.jpg
    108.5 KB · Views: 3,806
Last edited:
Not considering a roof top tent? It will be VERY comfortable.... all the beddings packed up top and ready..... and it comes with a 2.5-3" foam pad.... and deploy in a few minutes.... no need to reconfig what is inside the truck...

:thumb3:
 
Not considering a roof top tent? It will be VERY comfortable.... all the beddings packed up top and ready..... and it comes with a 2.5-3" foam pad.... and deploy in a few minutes.... no need to reconfig what is inside the truck...

:thumb3:

I HAVE considered that several times actually :D And in reality these drawers and internal tiedown system doesn't necessarily go to waste if I do get one.

While there are a ton of advantages, a few negatives are holding be back currently. Price, weight up top while offroading, and wind resistance lowering mileage yet another 2mpg on long trips :)

My wife really wants to get a mini trailer too.

This'll be good for me alone, but yeah either the roof top tent or a trailer for when we go together will probably be in the near future. :)
 
So much work!

Getting tons done on the Warthog this week.

Got my gas tank skid and diff skid installed. And I've been working feverishly on the rear drawers/tiedown system for the back. Of course it was twice as much work as I was imagining :D but it's going really well so far. Will be super sweet when done and with a total cost of about $300 (not including an unfortunate cost overrun due to an accident)

I'll have pictures of the build once the drawers are finished.

I do have to say that it is a special kind of hell when you have 4 power tools that you are rotating through every few minutes and the extension cord only has three sockets :mad:
 
Squeak!

Ok I got a few squeaks here and there at flex, usually some silicone spray quiets them down, urethane bushings and spring seats etc. no problem. But after last weeks offroading, a new squeak emerged that was supremely annoying. Happened at every little tiny bump in the road or when going around corners and was a machine-gun of E - E - E - E - E - E

Very "squeaky". Spare tire? No... something in the back? No... Was finally able to reproduce it I thought by pressing down/sideways on the rear bumper on the driver side. Quiet but... Turns out it my remaining bumper cover was pressing down on top of the CBI bumper on the driver side. Wasn't loud at all outside but inside the cab it really magnified!

I replaced a small piece of plastic trim that had come off on the edge of the plastic there which raised it off the bumper a tiny bit and sure enough it was gone this morning.

Amazing where a tiny bit of noise can come from and make driving hella annoying :D
 
Storage, sleeping and tiedown system

As much as I enjoyed my slide out tray and as much as my removable tiedown system worked, I still was missing having some good permanent storage.
SO I set out to build a set of storage drawers for carrying all basic camping equipment and tools, as well as a sleeping platform and a tiedown system
that didn't require being removed to sleep in the back.

So a mental image of what I wanted and a paper full of measurements after removing my slide out tray, then buying all the wood and basic hardware
as pictured earlier I got started...

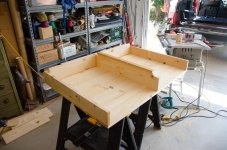
_LA27233.jpg
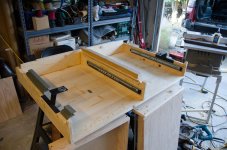
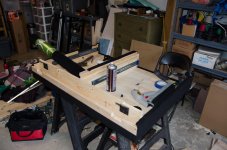
Basic shell. I am using pine planks specifically for a couple of reasons. It is somewhat lighter than plywood. And in the direction fo the grain is VERY stiff,
not requiring any further bracing across spans such as the drawer openings.


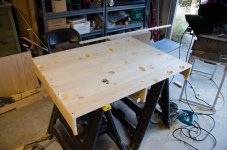
_LA27235.jpg
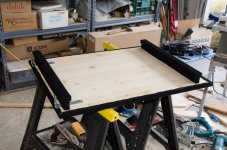
The top. I measured and placed several tie down D rings. Then routed them out so they would sit flush when not used.


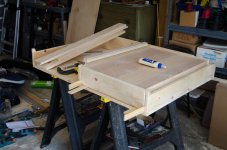
_LA27237.jpg
Making the drawers.


_LA27238.jpg
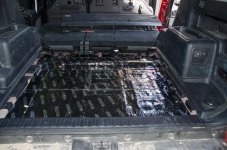
After removing the tray and the felt/wool/foam bottom(It stuck up to high to leave in) The noise from the back of the runner was MUCH louder!
So I bought some sound dampening material and it quieted right back down.


_LA27240.jpg
Drawer slides in as well as the fabricated mounting brackets to use the existing mounting locations for the slider. Also sliders for the little pull
out work tray I added.


_LA27241.jpg
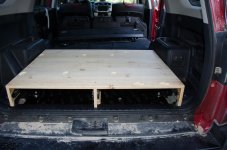
Mounted in the back.


_LA27244.jpg
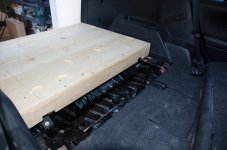
And the forward mounting brackets in use.


_LA27248.jpg
All done except for the covering!

Continued...
 

Attachments

  • _LA27233.jpg
    _LA27233.jpg
    135 KB · Views: 3,734
  • _LA27235.jpg
    _LA27235.jpg
    125.1 KB · Views: 3,707
  • _LA27237.jpg
    _LA27237.jpg
    108 KB · Views: 3,643
  • _LA27238.jpg
    _LA27238.jpg
    128.3 KB · Views: 3,682
  • _LA27240.jpg
    _LA27240.jpg
    137.3 KB · Views: 3,758
  • _LA27241.jpg
    _LA27241.jpg
    95.7 KB · Views: 3,838
  • _LA27244.jpg
    _LA27244.jpg
    95 KB · Views: 3,653
  • _LA27248.jpg
    _LA27248.jpg
    103.1 KB · Views: 3,938
Last edited:
_LA27252.jpg
Applying the fuzzy "cloth" covering. Stuff looks nice, light weight, cheap and matches the car pretty well. Course it's a serious dirt trap and grass and
sawdust get really stuck in it :P

Easy to apply, use super 77 on both surfaces, roller down, trim edges then staple where the sun don't shine :)


_LA27253.jpg
Final piece to make was the removable sleeping extension. Will be permanently installed for trips but removed so I can put the seats up for daily driving.


_LA27256.jpg
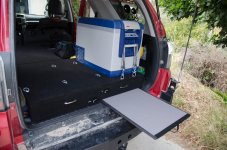
OK! Everything installed! There is a chance that the fridge might move around some though it is tied down tightly. If so I'll make more of a container
for the bottom of it.


_LA27257.jpg
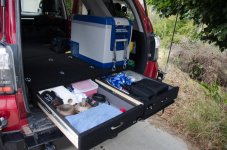
Storage! I plan on keeping all basic camping and recovery supplies so I can for short overnighters/weekend trips just pick up food and water and just
go and have everything else I need already packed.


_LA27258.jpg
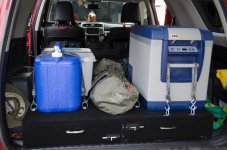
Tying down the heavy stuff for offroading.


_LA27259.jpg
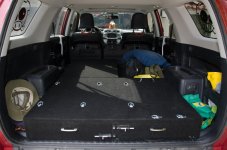
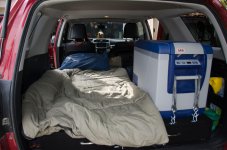
Sleeping configuration. Some stuff moved out or to the front seats, but no longer have to remove the entire tie down rack like before. I do need to
find another mattress solution now though :(


_LA27260.jpg


_LA27261.jpg
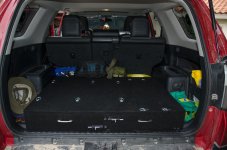
Daily driving config.

COST: $295 before tax. Including paint and glue and hardware of all kinds. Not including the scrap steel I used for the brackets. Also... not including an extra $20 I had to spend on a new pair of drawer slides due to an incredibly stupid accident during construction :D So realistically was about $350 for me in the end.

WEIGHT: The daily driving weight is 55 pounds not including extra stuff in the drawers. The sliding tray was between 30 and 35 pounds so only
an additional 20 pounds or so!

LOSS OF CARGO SPACE: The drawers are 3 inches taller than the sliding tray. SO that is lost vertical height and more lift to get things in the back.
BUT. t is /only/ three inches for a heck of a lot of utility so I am super pleased.

TIME: It took me three full weekend days an 4 2-3 hour weeknights to do the work.

TOOLS: Hand rip saw, Portable Table Saw, MIG welder, Cold metal saw, Grinder, Drill press, Hand drill, Router, Electric Stapler, Straight and
90 degree clamps, Various standard hand tools.

SATISFACTION: Extremely high :D

While it was a lot of work, it was also a lot of fun to make. And considering I saved $1500 to $1700 doing it myself and ended up with something
with even MORE utility than an off the shelf solution, it was SO worth it. Heck the money saved could go to buying a high quality 220V MIG welder,
cold saw and a drill press! So... a weeks worth of weekend and evening work and hey, a ton of free tools!

 

Attachments

  • _LA27252.jpg
    _LA27252.jpg
    124.3 KB · Views: 3,650
  • _LA27253.jpg
    _LA27253.jpg
    124.3 KB · Views: 3,648
  • _LA27256.jpg
    _LA27256.jpg
    138.9 KB · Views: 3,790
  • _LA27257.jpg
    _LA27257.jpg
    139.6 KB · Views: 14,718
  • _LA27258.jpg
    _LA27258.jpg
    98.8 KB · Views: 3,664
  • _LA27259.jpg
    _LA27259.jpg
    95.5 KB · Views: 4,366
  • _LA27260.jpg
    _LA27260.jpg
    98.4 KB · Views: 3,720
  • _LA27261.jpg
    _LA27261.jpg
    100.9 KB · Views: 3,675
Last edited:
View attachment 156932
Applying the fuzzy "cloth" covering. Stuff looks nice, light weight, cheap and matches the car pretty well. Course it's a serious dirt trap and grass and
sawdust get really stuck in it :P

Easy to apply, use super 77 on both surfaces, roller down, trim edges then staple where the sun don't shine :)


View attachment 156933
Final piece to make was the removable sleeping extension. Will be permanently installed for trips but removed so I can put the seats up for daily driving.


View attachment 156934
OK! Everything installed! There is a chance that the fridge might move around some though it is tied down tightly. If so I'll make more of a container
for the bottom of it.


View attachment 156935
Storage! I plan on keeping all basic camping and recovery supplies so I can for short overnighters/weekend trips just pick up food and water and just
go and have everything else I need already packed.


View attachment 156936
Tying down the heavy stuff for offroading.


View attachment 156937
Sleeping configuration. Some stuff moved out or to the front seats, but no longer have to remove the entire tie down rack like before. I do need to
find another mattress solution now though :(


View attachment 156938


View attachment 156939
Daily driving config.

COST: So over all the final cost was likely around $350, possibly a little less. Including paint and glue and hardware of all kinds.

WEIGHT: The daily driving weight is 55 pounds not including extra stuff in the drawers. The sliding tray was between 30 and 35 pounds so only
an additional 20 pounds or so!

LOSS OF CARGO SPACE: The drawers are 3 inches taller than the sliding tray. SO that is lost vertical height and more lift to get things in the back.
BUT. t is /only/ three inches for a heck of a lot of utility so I am super pleased.

TIME: It took me three full weekend days an 4 2-3 hour weeknights to do the work.

TOOLS: Hand rip saw, Portable Table Saw, MIG welder, Cold metal saw, Grinder, Drill press, Hand drill, Router, Electric Stapler, Straight and
90 degree clamps, Various standard hand tools.

SATISFACTION: Extremely high :D

While it was a lot of work, it was also a lot of fun to make. And considering I saved $1500 to $1700 doing it myself and ended up with something
with even MORE utility than an off the shelf solution, it was SO worth it. Heck the money saved could go to buying a high quality 220V MIG welder,
cold saw and a drill press! So... a weeks worth of weekend and evening work and hey, a ton of free tools!

Thats bad ass man! Can't wait to see it.
 
Beautiful! Really nice work, thanks for sharing. Here's a sleeping pad that a lot of folks recommended and they were right.
Exped MegaMat 10 Review - OutdoorGearLab

Went to REI this weekend to look at sleeping pads. They had the gear lab pad, I even got to try it out :D It is indeed the cadillac of sleeping pads :)

Unfortunately it is also WAY too large for my spot. It's 1 foot longer and 6 inches wider than what I could fit. I ended up getting the REI 3.5 in the 72x25 size (Still a tad too long but usable) It is surprisingly comfortable itself, can't wait to try it out :)
 
Went to REI this weekend to look at sleeping pads. They had the gear lab pad, I even got to try it out :D It is indeed the cadillac of sleeping pads :)

Unfortunately it is also WAY too large for my spot. It's 1 foot longer and 6 inches wider than what I could fit. I ended up getting the REI 3.5 in the 72x25 size (Still a tad too long but usable) It is surprisingly comfortable itself, can't wait to try it out :)

I have the REI 3.5. I like it a lot and is comfortable.

Your storage system looks awesome, I wish I had the tools to build a similar one!
 

Members online

Forum statistics

Threads
278,312
Messages
3,554,089
Members
248,016
Latest member
Advally Service

Trending content

Back
Top