What did you do to/in your 5th Gen today?!

This happened yesterday! New shoes and a lift!
4212a9c351bff2f56f2c2090ff06d6ac.jpg
ea9e2145574079860b78616ffeefdef0.jpg


Sent from my iPhone using Tapatalk
 
Bought a 2016 Trail today in grey. Pretty stoked. Got home and ordered BPS 3in lift and a Gobi rack. As well as some miscellaneous stuff off amazon. Pretty excited to have a 4Runner again after 8 years.


Now. 285s with stock wheels powder coated or painted black. Or. Whole new set.
 
The settings are programmed to the T4R. App is simply so you can access the vehicle to change settings instead of using Toyota Tech Stream. So, only have to pay once to change settings. You do not have to continue app subscription there after. You will have to have a WiFi or bluetooth OBDII plug device as well. Several threads with info on the forum.

Sent from my Moto G (4) using Tapatalk

There is a way around the Carista subscription bull. I believe if you use an outdated device you can get grandfathered in to the old offer which was $19.99 one time fee.
 
My bump

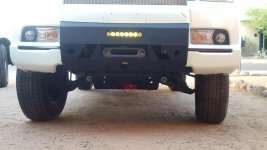
Finally got my winch bumper mounted. A lot of work and rolling in the dirt but I like how it turned out
 

Attachments

  • image.jpg
    image.jpg
    133.4 KB · Views: 914
It has been a while. I replaced the chrome lug nuts with black ones, installed oem caliper covers with aftermarket high temp decals, and changed the rear amber signal to red. Enjoy!

<img src="http://i116.photobucket.com/albums/o21/acurawei/20170603_185517_zpsraaxsinb.jpg" border="0" alt=" photo 20170603_185517_zpsraaxsinb.jpg"/>

<img src="http://i116.photobucket.com/albums/o21/acurawei/20170603_185426_zpsxdypkm61.jpg" border="0" alt=" photo 20170603_185426_zpsxdypkm61.jpg"/>

<img src="http://i116.photobucket.com/albums/o21/acurawei/20170603_185350_zpskfemivw1.jpg" border="0" alt=" photo 20170603_185350_zpskfemivw1.jpg"/>

<img src="http://i116.photobucket.com/albums/o21/acurawei/20170603_185407_zpsrrxdv0j7.jpg" border="0" alt=" photo 20170603_185407_zpsrrxdv0j7.jpg"/>

<img src="http://i116.photobucket.com/albums/o21/acurawei/20170603_1856080_zps4nl9cbnj.jpg" border="0" alt=" photo 20170603_1856080_zps4nl9cbnj.jpg"/>
 
Can I get some details on the caliper covers?


These are basically covers that goes on the outside. They come with metal brackets which you need to snap them onto the calipers. I used a plastic hammer just to make sure they are snap on tight. After that, the covers are screwed on the brackets. Everything is included when you buy the covers.
 
Thank you. What do you think might be a fair price for powder coating. I would attempt it as I have done powder coating before, but do not have a over big enough.
Around me it should be less than $100 per wheel not including tire mounting costs

Sent from my SM-G930V using Tapatalk
 
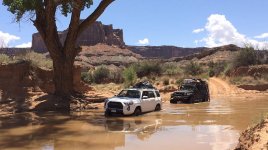
Not today, but two days ago I pulled a 5000#+ Jeep two miles from Hardscrabble CG to Labyrinth CG... through 16-18" of water at Upheaval Wash. ;)

(And yes, I am frickin' kicking myself for not buying that snatch strap before I left!:cry:)
 

Attachments

  • Upheaval Wash TOW.jpg
    Upheaval Wash TOW.jpg
    118.3 KB · Views: 1,605
Last edited:
Not today, but two days ago I pulled a 5000#+ Jeep two miles from Hardscrabble CG to Labyrinth CG... through 16-18" of water at Upheaval Wash. ;)

(And yes, I am friction' kicking myself for not buying that snatch strap before I left!:cry:)

Shouldn't this go under towing experiences with your 5th gen
 
Just hit 2000 miles so did my first oil and filter change. OEM Toyota synthetic oil and filter. Also replaced the crappy plastic oil filter housing cap with a metal one.
 
I copied this from another post when I ordered mine:

Genuine Toyota 15620-31060 Oil Filter Cap Assembly

For Toyota Trucks only: The ONLY change that you will need to do, is to take out that original perforated tube from the plastic Oil Filter Cap Assy, and switch it out with that "shorter" perforated tube [which you will discard] that's inside the new aluminum assembly.........reason being that the truck filter is longer than the Toyota sedans [no need to switch out the spring that's located under the perforated tube, as they both do the same task]. The only tool needed for the switch out, is a medium sized flat bladed screw driver, as you will be partially bending [simply by rotating the screw driver a bit] two small sheet metal petals/wings that keep the tube in place, inside the assembly. If you bend them just enough to have them pointing straight up...and now...push down on the tube, and rotate past the post [you'll see what I mean, when looking down, and inside the assembly].....and out it will come. Now, grab the longer tube, and reverse the process to install it. It's not at all difficult, or complicated...and once you see it....you'll recognize the remove/install process.

Thank you [MENTION=85467]BobsTrail[/MENTION] for the all the details. Always amazed by how helpful everyone on the forum is.
 

Members online

Forum statistics

Threads
278,317
Messages
3,554,128
Members
248,016
Latest member
Advally Service

Trending content

Back
Top