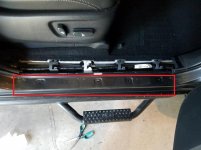
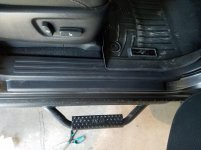
My Canvasback liners arrived. I had them run a line of red stitching on the edges to match with the TRD interior. They did a great job making these liners.
You were right near where I live. The Severn Inn has good food!
We were in NJ this weekend for a girls Lacrosse fundraiser tournament for The Cure.
Let me know next time you are around. Plus, I'm trying to get my brother-in-law to come with me to Rausch Creek and try out his new JKU. It would be cool to try and coordinate a trip for that.
My Canvasback liners arrived. I had them run a line of red stitching on the edges to match with the TRD interior. They did a great job making these liners.
Alas, I was not blessed with riches beyond my wildest dreams, ravishing looks, or being surrounded by so many gorgeous women that it would make even Dan Bilzerian blush.
You guys will have to make do with my frugality. Installed a hidden light bar with some 175lb. heavy-duty zip ties. Another glimpse into my cheap little world is my dual ditch light install. Used $3 L brackets from Lowe's. Enjoy.
Failed to install second battery kit Neither bracket fit properly due to what I think are minor changes in the 2017 model. That or I'm just being stupid.
I did get a single AGM battery installed and a voltage boosting fuse. So there is that. Hopefully the car starts tomorrow
Yes pretty sure it's in the owners manual. It keeps everything lubed up and working properly. I usually wait until rains and find a long straight 45 mph road and drive ten or so miles in 4wd.
Alas, I was not blessed with riches beyond my wildest dreams, ravishing looks, or being surrounded by so many gorgeous women that it would make even Dan Bilzerian blush.
You guys will have to make do with my frugality. Installed a hidden light bar with some 175lb. heavy-duty zip ties. Another glimpse into my cheap little world is my dual ditch light install. Used $3 L brackets from Lowe's. Enjoy.
Ditch the zip ties I made my light bar brackets from a 1"x1/4" aluminum bar stock from lowe's took maybe 10 minutes. Cut to length, put it in the vise bend a 90, drill 2 holes, rattle can black. Cost maybe $6 total. And cut down the ends of those L brackets and paint them.
Sorry that triggered my OCD lol
Did some stuff and some things Saturday only worked 3 hours it was 105 in my garage the entire time so that's all I could handle. But got 4 of the 6 bolt on 5/16" frame plates for my sliders cutout and drilled. The threaded holes in the frame are m8x1.25, the front and rear plates are attached with 4 bolts each (drivers side front has 5) The center plates will be attached with 6 bolts if I remember right. And the hardware in the picture is for mock up I'll have zinc plated 10.9 hardware with washers. So hopefully the bolts are strong enough lol
Once the last two plates are cut it should go fast this was the part I was dreading cutting 5/16 plate with a angle grinder blows. I really regret not bringing home the 20" doall vertical band saw my work was getting rid of now.
Also started planning a frame mounted swing out tire carrier that uses the stock bumper, and debating the bmc I don't rub currently with 285's but since I'm in there... I need to re-evaluate my life choices :lmao:
And...they're mounted. Everything lined up. Fit looks good. Solo effort. Took about 90 minutes and a couple of jack stands to hold up the iron while bolting.
greased my Camberg UCA bushings and added some XPEL clear film to the Driver and passenger door sills. after seeing what happened to [MENTION=116247]honda99ex[/MENTION], I figured I would be proactive. You can barely see it.







 Neither bracket fit properly due to what I think are minor changes in the 2017 model. That or I'm just being stupid.