What did you do to/in your 5th Gen today?!

Just did the DRL disable to give it a try and see how I like it. I like the LED DRLs I have but also like the look of just the side markers on - we'll see

ae928905911e20a6932d7d5b46beae25.jpg


Sent from my iPhone using Tapatalk
 
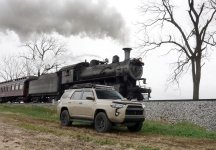
Today? Was out chasing the train

Just might do it tomorrow too.
 

Attachments

  • Runner Chasing the Train .jpg
    Runner Chasing the Train .jpg
    139.7 KB · Views: 1,057
I just replaced my entire speaker system.......factory Pro speakers are absolute GARBAGE !!!

I used the Toyota Audio Solutions wiring harness that plugs directly in between the factory head unit and whatever processor you're using. I originally used the AudioControl LC7i but decided to pick up the Toyota Audio Solutions processor that has a built in equalizer.

In the front door I'm using a set of 6 1/2" 3-way CDT Anniversary Edition components with the upstage tweeters up on the dash in place of the factory tweeters. In the rear doors I used 4" 2-way CDT Anniversary Edition components. Rear hatch fills are Rockford Fosgate Prime R1525X2 since they are a direct replacement sizing. Subs are 10" MB Quart Reference DVC's.

Fronts and rears are driven by a CDT SQL 4075 4-channel amp and the subs are run by a CDT SQL 1000 mono amp.

The goal was to hide all components and keep some level of functionality of the rear cargo section. This was actually my first attempt at a full audio install in one of my vehicles.


23167602_1666447960052873_5442552082909048649_n.jpg


23031575_1666448090052860_4246874001634106472_n.jpg


23131937_1666448260052843_4359934969940322462_n.jpg


23132090_1666448006719535_4651816412967189832_n.jpg


23032503_1666447930052876_1644839228797565299_n.jpg


23032682_1666448186719517_3195936022518631060_n.jpg


23032647_1666448296719506_1438673032872648929_n.jpg


23031651_1666448383386164_1427091915244906262_n.jpg


23130583_1666448353386167_2132859140418841222_n.jpg


22894192_1666448313386171_489149831867172373_n.jpg

Unrelated to your speaker install, but do you just pull up on the door sill pieces in the rear door openings? I got the inside part to pop up but I felt like the thinner portion that's over the rocker panels felt like it was going to break I was pulling so hard. Maybe I need to use my trim removal tools maybe??
 
Installed [MENTION=129513]bjohnston115[/MENTION] anytime backup camera along with front camera!

The first time I went off-roading in the 4Runner, it was difficult to see up over the hood, and even look out my window because the seat belt kept locking up during inclines. This should come in handy next time!

7bamjcyl.jpg


zBK5pmxl.jpg


WOa3PGcl.png
 
Installed [MENTION=129513]bjohnston115[/MENTION] anytime backup camera along with front camera!

The first time I went off-roading in the 4Runner, it was difficult to see up over the hood, and even look out my window because the seat belt kept locking up during inclines. This should come in handy next time!

7bamjcyl.jpg


zBK5pmxl.jpg


WOa3PGcl.png

Really like that front camera! How difficult was the install? Also, where did you buy another camera for the front? Thanks in advance!
 
Last edited:
Really like that front camera! How difficult was the install? Thanks in advance!

For me, anything electrical is kryptonite lol. I dont know what I'm going to do once I get a winch or another light or two lol
But it's actually not too bad now that I think about it.
The rear camera setup was pretty much plug and play and crimping it to a switch.
The front camera setup was overwhelming at the time but it's all pretty straight forward after going over his install diagrams on his website. I tapped in to the cigarette lighter. That had me confused too, as I thought I was getting power from the head unit, just like the rear camera setup.
It was difficult to try and get the front camera's RCA input through the firewall so I had to cut the cord. And then I didn't realize they were 3 separate wires inside :embarassed:. My Dad actually helped me out with it and used a heat shrink on each one.
Then I just used a dremel to get rid of the plastic for the camera. It was a lot more than I intended for it to be but it's still nice and hidden with a clean look I think.

Took me a few hours in total but I bet someone with better electrical knowledge can do this super quick. I just have a fear of wiring something incorrectly and somehow destroying the vehicle lol.


Also, the front camera was off Amazon. Went with two of these switches also.

 
For me, anything electrical is kryptonite lol. I dont know what I'm going to do once I get a winch or another light or two lol
But it's actually not too bad now that I think about it.
The rear camera setup was pretty much plug and play and crimping it to a switch.
The front camera setup was overwhelming at the time but it's all pretty straight forward after going over his install diagrams on his website. I tapped in to the cigarette lighter. That had me confused too, as I thought I was getting power from the head unit, just like the rear camera setup.
It was difficult to try and get the front camera's RCA input through the firewall so I had to cut the cord. And then I didn't realize they were 3 separate wires inside :embarassed:. My Dad actually helped me out with it and used a heat shrink on each one.
Then I just used a dremel to get rid of the plastic for the camera. It was a lot more than I intended for it to be but it's still nice and hidden with a clean look I think.

Took me a few hours in total but I bet someone with better electrical knowledge can do this super quick. I just have a fear of wiring something incorrectly and somehow destroying the vehicle lol.


Also, the front camera was off Amazon. Went with two of these switches also.

You're the man, I appreciate your thoughts and help!! Electrical is also my worst nightmare, so were are in the same boat. :shrug:
 

Step for the wife, ding protection from cars, and gravel protection. If you need more reasons, there are numerous threads dedicated to installing running boards... I went the OEM route since they are well made (no rust issues, etc), don’t reduce ground clearance, and they look right on my TRD ORP.

Why did you install a TRD billet oil cap?
 
Last edited:
For me, anything electrical is kryptonite lol. I dont know what I'm going to do once I get a winch or another light or two lol
But it's actually not too bad now that I think about it.
The rear camera setup was pretty much plug and play and crimping it to a switch.
The front camera setup was overwhelming at the time but it's all pretty straight forward after going over his install diagrams on his website. I tapped in to the cigarette lighter. That had me confused too, as I thought I was getting power from the head unit, just like the rear camera setup.
It was difficult to try and get the front camera's RCA input through the firewall so I had to cut the cord. And then I didn't realize they were 3 separate wires inside :embarassed:. My Dad actually helped me out with it and used a heat shrink on each one.
Then I just used a dremel to get rid of the plastic for the camera. It was a lot more than I intended for it to be but it's still nice and hidden with a clean look I think.
Took me a few hours in total but I bet someone with better electrical knowledge can do this super quick. I just have a fear of wiring something incorrectly and somehow destroying the vehicle lol.


Also, the front camera was off Amazon. Went with two of these switches also.
I got a second camera with my new Kenwood in dash putting in tomorrow. Trying to find a place to look UNDER the vehicle to see rocks etc if needed and it not immediately get covered with snow.
 
Why did you install a TRD billet oil cap?

LOL, exactly. Some people act as if it is their money they are spending. I still don't understand why people ask others why the do certain stuff to their car. Its not your car so doesn't matter what you think. Its like those who put 22s on a 4runner and drop them. Ugly to some? Yes, but doesn't mean you have to like it. The same can be said about our rigs by those who lower theirs but at the end of the day, we all spend money on what we love and thats our 4runners.
 
Done for now! A few updates---

Just added the wheels the other day, heated seats last week, the SSO bumper/lightbar/winch the week before that. Just trying to decide if I should leave the wheel spacers on since the TRD wheels have more offset the the stock TE wheels.
166523858.jpg

166523850.jpg

166523846.jpg

166523843.jpg
 
Unrelated to your speaker install, but do you just pull up on the door sill pieces in the rear door openings? I got the inside part to pop up but I felt like the thinner portion that's over the rocker panels felt like it was going to break I was pulling so hard. Maybe I need to use my trim removal tools maybe??


If you're talking about removing the rear door panels, you need to pull up pretty hard after removing the screws and unpopping the clips. Putting it back on is another story.....and a real pain in the ass to get back on.
 

Members online

No members online now.

Forum statistics

Threads
278,316
Messages
3,554,124
Members
248,016
Latest member
Advally Service

Trending content

Back
Top