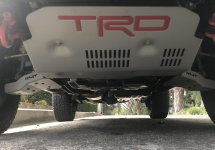
What did you do to/in your 5th Gen today?!

Thanks [MENTION=200736]ElectroBoy[/MENTION]

How hard is it just to get power to a light from the hatch? Is that easier than running a wire from the engine compartment do you think? I don't need switching etc.

I have two of these (one white one red):

398054_l.jpg


That mount here on the Rago panels that I have in the back:

gyWqbPe.png


So I just need to get power to either side of the cargo area ... the switches have their own integrated on/off.

Really, I just need it for one side. I think both sides might be overkill (those things are bright) and I really only would use the red when out camping. The white ArcLights in the hatch do a reasonable job of lighting up the cargo area as it is.

My mod requires a good amount of work, disassembly of the rear hatch panel, fishing wires, and dedication to get it done. The rubber boot is kind of a pain to fish wires through.

Another method:
You could run a dedicated constant power wire from a fuse tap in the cabin fuse box, and a GND wire from a convenient chassis bolt.

Another method:
Instead of running a dedicated fused wire from the battery as you suggest, if your two LED lights don't require a lot of current, you could consider tapping off the 12V power port in the rear cargo area. It and all the other power outlets are supplied by the 15A P/Outlet fuse. This would only supply power when the ignition is switched On, unless you have modded them to be always hot (12V). There are some threads that describe how to do this.

You'll have to remove the passenger side wheel well tray cover. There are several threads how to do this either by hand contortions and a flexible shafted screwdriver to remove two screws, or by breaking the two plastic tabs through brute force. Tap into the 12V lead (light green) and the GND wire (white/black stripe) and run it behind the plastic side panels into the headliner, punch a little hole in it, then route to your lights. I've never done this myself but others on the forum have. You'll have to search around for some more details.

What I'd suggest is working from the top down. Similar to what I did you could get into the headliner area with the rear hatch open (without creasing the headliner) and fish two wires down the D pillar, into the area behind the tail light (remove the cover plate) and then fish the wires over to the now uncovered wheel well area to make connections to the 12V and GND wires.

Maybe someone who's done something similar can verify this method.

Good luck, let us know how you did it and take photos. :thumb3:
 
Want to install fox lift kits (2-3'')

I just installed a roofrack on my kit! Really look nice! My next project will be the lift kits. I want to put the fox lift kits. 2.5-3" but not sure if I need a new set of control arms too. Will appreciate your help. Thanks!
 

I've got some waiting to install, but mine are RCI (part of my group buy order). I've been thinking about getting the R4T sliders, which look like they're just their branding of RRWs.

My "done today" was actually done for me, my EimKeith lower link skids got installed/welded in today.
 
I did mine about a month ago, of course I got mine in Pro grey. I did not have any of the issues you stated in your build. Mine fit like a glove too. These were the best priced ones out there for the TRD PRO skid.
How much damage do these avoid? Anyone have pics of a damaged LCA that would have been saved it it had a skid?
 
Just completed installing the Rago dash mount. Packaging was fantastic. Straightforward install, took about an hour taking my time. Very sturdy. You can use the long slots for cable pass throughs and tuck the USB-C or whatever you have under the dash while you have it apart.

I like the removable handmic arms on the sides, though I sort of wished they had included some small hardware to be able to attach a handmic clip. All of the CB sets come with screws which wont work here. Not a big deal though.

Great little product!
 
How much damage do these avoid? Anyone have pics of a damaged LCA that would have been saved it it had a skid?

Don’t have any pics or data, but any damage to the skids and not to the lower control arm would be a plus. I imagine one could land hard enough on an object to totally trash the LCA and the skid not help.
I don’t think anyone would disagree !
 
Just completed installing the Rago dash mount. Packaging was fantastic. Straightforward install, took about an hour taking my time. Very sturdy. You can use the long slots for cable pass throughs and tuck the USB-C or whatever you have under the dash while you have it apart.

I like the removable handmic arms on the sides, though I sort of wished they had included some small hardware to be able to attach a handmic clip. All of the CB sets come with screws which wont work here. Not a big deal though.

Great little product!

Any pics?
From driver’s seat or passenger seat is the clock area obscured at all? Thx.
 
Any pics?
From driver’s seat or passenger seat is the clock area obscured at all? Thx.

I'll post some pics tomorrow but I think it depends on how tall you are. I'm 6'4" and I have to tilt my head just a bit to see the clock, but at the same time I can mount by phone on the top with RAM attachments and see over the top with no obscurity. It's an acceptable trade off for me haha
 
Just about finished with my dual battery install. Today was getting the Redarc DC-DC installed and hooked up.

The only open item is to wire up a connector for the solar panels. Might look for a way to install a solar port similar to what is found on overland trailers. HMU if you have any ideas for the hardware and mount location.


03c75bc8ce17e2978173c2fcdcdd618a.jpg


Sent from my iPhone using Tapatalk
 

Members online

No members online now.

Forum statistics

Threads
278,316
Messages
3,554,124
Members
248,016
Latest member
Advally Service

Trending content

Back
Top