What did you do to/in your 5th Gen today?!

Picked up my rig at Freel Good Performance in Montclair, CA ....

Had them install my CVJ 9808TR axles and install the EimKieth PCK. It significantly made my ride smoother and feel very stock like. Get them install at Freel Good Performance for $200 bucks and a couple of hours wait.

51132446884_04588161cd_c.jpg


With the diff drop from ToyTec ... my angles are alot better

51132446834_b4b7d222db_c.jpg


51132446809_5ab571770f_c.jpg
 
Last edited:
Picked up my rig at Freel Good Performance in Montclair, CA ....

Had them install my CVJ 9808TR axles and install the EimKieth PCK. It significantly made my ride smoother and feel very stock like. Get them install at Freel Good Performance for $200 bucks and a couple of hours wait.


What made your ride smoother? the pck? I didn't notice a difference after having mine installed. It kind of "felt" a little more planted but I think it was just all in my head lol
 
What made your ride smoother? the pck? I didn't notice a difference after having mine installed. It kind of "felt" a little more planted but I think it was just all in my head lol

Seem more relax suspension wise ... maybe it's the combination of my latest set of mods but the rear doesn't seem to jump or be harsh as much. With the PCK ... the ride was alot harsher before. My kids noticed it as we take the same roads to their Jiujitsu everyday for the pass 3yrs and noticed all the road imperfections and every single bump. Isn't as harsh now...

Just a comparison ...
The steep angle of my panhard bar before:
50998654410_d8f1737fd4_c.jpg


Vs

Now:

51131670011_2774ca20d8_c.jpg


But it could be a combination of all the latest mods... I had extreme angles on my front axles as well. Which is the contributing factor to torn boots and my driveside axle was actually stuck. I add the diff drop and that relaxed those angles... I am 4.5" of lift in the front ... and installed remanufactured axles from CVJ which they claim was a 1" lenght. Don't know my review for on road is ... its smoother and feels planted as you said.


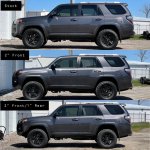
Here's a comparison of all 3 setups.
Top = is Icon Overland Springs and Icon Adjustable Pan Hard Bar
Middle = is Dobinsons 749v springs, Airlift and Icon Adjustable Pan Hard Bar
Bottom = is Dobinsons 749v springs, Airlift, Icon Adjustable Pan Hard Bar and Eimkeith PCK ...

51133553160_62ec842722_c.jpg
 
Last edited:
Seem more relax suspension wise ... maybe it's the combination of my latest set of mods but the rear doesn't seem to jump or be harsh as much. With the PCK ... the ride was alot harsher before. My kids noticed it as we take the same roads to their Jiujitsu everyday for the pass 3yrs and noticed all the road imperfections and every single bump. Isn't as harsh now...

Just a comparison ...
The steep angle of my panhard bar before:
50998654410_d8f1737fd4_c.jpg


Vs

Now:

51131670011_2774ca20d8_c.jpg


But it could be a combination of all the latest mods... I had extreme angles on my front axles as well. Which is the contributing factor to torn boots and my driveside axle was actually stuck. I add the diff drop and that relaxed those angles... I am 4.5" of lift in the front ... and installed remanufactured axles from CVJ which they claim was a 1" lenght. Don't know my review for on road is ... its smoother and feels planted as you said.


Here's a comparison of all 3 setups.
Top = is Icon Overland Springs and Icon Adjustable Pan Hard Bar
Middle = is Dobinsons 749v springs, Airlift and Icon Adjustable Pan Hard Bar
Bottom = is Dobinsons 749v springs, Airlift, Icon Adjustable Pan Hard Bar and Eimkeith PCK ...

51133553160_62ec842722_c.jpg

Have you notice any contact between the track bar and the KDSS mount after the mods? You using a OEM bar? Thank you!!
 
Have you notice any contact between the track bar and the KDSS mount after the mods? You using a OEM bar? Thank you!!

No I'm using the ICON Adjustable Panhard Bar.
I was hitting the kdss (piston side) before with just the ICON Stage 7. Once I installed the KDSS rear spacers. That fixed the issue. I have about an 1 inch of clearance when relaxed and close to half inch at full droop.

The kdss spacers are what fixed the issue of the kdss mount and panhard bar hitting.
 
Got the rear 1” spacer installed yesterday. Also threw on the Spidertrax spacers.
 

Attachments

  • 34421023-AB0D-469C-8CE7-BE2F1C9B3230.jpg
    34421023-AB0D-469C-8CE7-BE2F1C9B3230.jpg
    131.8 KB · Views: 529
OK did first part of the "2 BD lights in the cargo area - one white one red" mod last night.

[MENTION=200736]ElectroBoy[/MENTION] I appreciate the menu of options. After some thought of the options you laid out, I'm going with the "wire to the engine compartment" method. Reason = I already have a fuse block wired up running some other things, I wanted power regardless of ignition state, and if something goes wonky at some point it will be really easy to debug. I'm good with basic wiring work, but I've never tapped into things, so I want to stick with what I know and can troubleshoot easily!

Ripped off a bunch of panels in prep for interior wire run and ran the power wire through the passenger side grommet using the "no extra holes in the firewall method" and then ran some wiring loom before calling it a night.

d7LXaAy.jpg


BgL2L0y.jpg


The one thing I have yet to figure out is how to run the wire from rear door sill up to the back of the truck. I want one light on either side, so I'd like run it to the very back + under the rear hatch kick plate (plenty of room) and then up each pillar.

There seem to be two routes (1) under the wheel well cover which requires getting the cover off ("extra storage mod") and (2) under the rear carpet.

I'd like to go with (2). I can see someone who has done it here:

DSC09341_zpsm365tkte.jpg~original


DSC09335_zpsd9ewbinw.jpg~original


<s>But the quick look I took last night as it was getting dark didn't uncover any obvious routes from end of cargo area to passenger kick plate.

Anyone out there have any ideas?</s>

UPDATE:

Went out at lunch to look at it in the light. It's really easy. Just run a coathanger up from the bottom and it pops out from under the carpet in the back. Super straight run - no resistance or obstacles. Tape the wire on, pull it through, done.

5q9gsVu.jpg


I'll write up the rest of the run when I'm done with everything this weekend.

My mod requires a good amount of work, disassembly of the rear hatch panel, fishing wires, and dedication to get it done. The rubber boot is kind of a pain to fish wires through.

Another method:
You could run a dedicated constant power wire from a fuse tap in the cabin fuse box, and a GND wire from a convenient chassis bolt.

Another method:
Instead of running a dedicated fused wire from the battery as you suggest, if your two LED lights don't require a lot of current, you could consider tapping off the 12V power port in the rear cargo area. It and all the other power outlets are supplied by the 15A P/Outlet fuse. This would only supply power when the ignition is switched On, unless you have modded them to be always hot (12V). There are some threads that describe how to do this.

You'll have to remove the passenger side wheel well tray cover. There are several threads how to do this either by hand contortions and a flexible shafted screwdriver to remove two screws, or by breaking the two plastic tabs through brute force. Tap into the 12V lead (light green) and the GND wire (white/black stripe) and run it behind the plastic side panels into the headliner, punch a little hole in it, then route to your lights. I've never done this myself but others on the forum have. You'll have to search around for some more details.

What I'd suggest is working from the top down. Similar to what I did you could get into the headliner area with the rear hatch open (without creasing the headliner) and fish two wires down the D pillar, into the area behind the tail light (remove the cover plate) and then fish the wires over to the now uncovered wheel well area to make connections to the 12V and GND wires.

Maybe someone who's done something similar can verify this method.

Good luck, let us know how you did it and take photos. :thumb3:
 
Last edited:
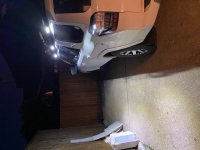
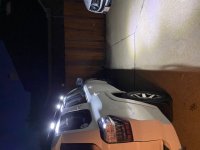
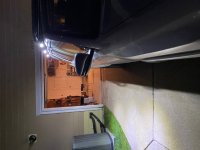
Got my side lights mounted and wired in.
 

Attachments

  • IMG_2493 (002).jpg
    IMG_2493 (002).jpg
    84.5 KB · Views: 724
  • IMG_2492 (002).jpg
    IMG_2492 (002).jpg
    75.7 KB · Views: 713
  • IMG_2494 (002).jpg
    IMG_2494 (002).jpg
    75.4 KB · Views: 717
  • IMG_2495 (002).jpg
    IMG_2495 (002).jpg
    80 KB · Views: 717
Road trip to California.
And they’re still nuts...if you were wondering.
 

Attachments

  • B909C59B-2581-4BC5-AFB2-6D71782EA989.jpg
    B909C59B-2581-4BC5-AFB2-6D71782EA989.jpg
    137.6 KB · Views: 892
  • C4FC597C-551F-4E92-8180-0BA165BB7D31.jpg
    C4FC597C-551F-4E92-8180-0BA165BB7D31.jpg
    90.4 KB · Views: 709
Road trip to California.
And they’re still nuts...if you were wondering.


As a Californian, why did you even come here? I saw one guy say that once he stepped back into Arizona, that it was nice to get out of Soviet territory! Lol!

Just about everyone is trying to escape including me!


Sent from my iPhone using Tapatalk
 
As a Californian, why did you even come here? I saw one guy say that once he stepped back into Arizona, that it was nice to get out of Soviet territory! Lol!

Just about everyone is trying to escape including me!


Sent from my iPhone using Tapatalk

I really love California. I’ll put up with the high prices and crazy people as long as I can bear it to be in a place like this for awhile.
 

Attachments

  • A50F4971-1CF9-4E88-B745-0588C5BF9209.jpg
    A50F4971-1CF9-4E88-B745-0588C5BF9209.jpg
    136.6 KB · Views: 663
I really love California. I’ll put up with the high prices and crazy people as long as I can bear it to be in a place like this for awhile.


For a while. Hahaha!

Just don’t get caught trying to do anything you could do in just about any other free state though.


Sent from my iPhone using Tapatalk
 
I got my Maxtrax today. I was hoping to get at least one, really hoping for two, up on my Rago shelf, but they're just a bit too long to do that. I tossed them in the shed for now. I'm not sure what I'm going to do with them yet. I want to get the mounting pins and LFD crossbars to mount the pins to so I can take the Maxtrax out on the roof when I'm going to be out offroading, but I still have yet to get that other stuff. No, I don't plan on keeping the Maxtrax up there permanently. I know the UV will eat them up.

 
Well yesterday was the lift and level , add vent shades and install a set of Rockblokz mud flaps. My rims hadn’t shown up yet but I was already impressed with the ride quality of the 6112’s and 5100’s. I guess I put on some blackout door pulls too.

13c67d8013762a5cb84cff87b3efed37.jpg


f2b60920b15e2ee89b2b46b3efdaa8e9.jpg


711db3bcf1d58bdee97acc7adc8a0e4a.jpg


992413d8983541828caae2ad52794f9b.jpg


Just currently waiting at the tire shop as the rims showed up !
 

Members online

Forum statistics

Threads
278,316
Messages
3,554,124
Members
248,016
Latest member
Advally Service

Trending content

Back
Top