What Did You Do To Your 3rd Gen Today?

Status
Not open for further replies.
Nice! Thank you.

Nope, I bought the car used last summer at around 209,000 miles and the belt was done about 30,000 before that. Is the pin accessible or am I going to need to pull things apart to see if there's a missing pin?

No, the pin is just used to keep tension on the tensioner until the timing belt is installed. Once the belt is installed, you pull the pin to release tension and chuck the pin in the trash. It's just there for shipping basically.

Your good! Actually, the pin is a good sign that the belt was actually replaced.
 
Blue Sea Fuse Box Installation

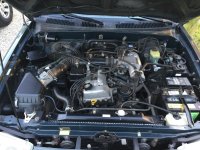
Finally finished up my "Secondary power distribution center" for my accessories AKA: engine bay wiring, also installed my RedLine Tuning hood struts, and my KC Hilite Cyclone Lights in my engine bay.

I'll put it all in my build later on with the rest of the wiring write up. It all turned out excellent for my taste. If there was ever two inexpensive weekend or afternoon projects that folks are looking to do, the hood struts and lights are on the top of the list.


Initial concept required a ton of research to see what I liked and didn't like. I wanted access to my OEM fuse cover and I wanted to conceal the relays. I Drew it out on paper and made a cardboard template first and bolted it in. This allowed me to trim and fine tune the fitment before drawing my paper template.
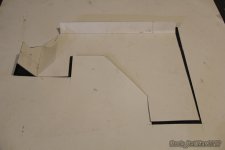
Blue Sea Distribution_1.jpg

I then laid out every possible piece where I thought it made sense. I only wanted to use the bus bar for grounds. I thought through different scenarios such as adding additional accessories, engine maintenance, installing an amp, dual batteries, inverter etc. I think this layout works the best and allows for growth.
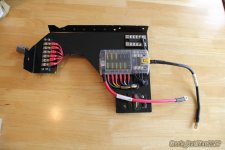
Blue Sea Distribution_2.jpg


I installed all of the relays on the underside and used butt splices, clamps, cable ties, one Deutsch connector to connect to my switches in the cockpit and keep everything secure and tidy.
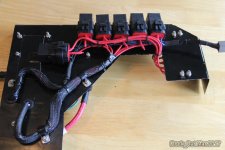
Blue Sea Distribution_3.jpg

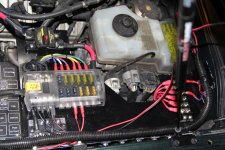
I did need to make an additional cut for the hood strut and relocate one of the relays. The struts came in before I installed it so it was prudent of me to install the struts first and make the changes necessary to fit the mounting "tray." It was just a small triangle cut.
Blue Sea Distribution_4.jpg


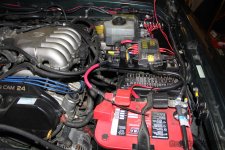
Here's a good shot from directly on. The left side of the Fuse box has relays and the right side is fused only. The colored wiring matches my switch wiring and the wiring on my terminal block. The small PIAA switches on the right next to the battery are fused only for interior LED lights in the engine bay and exterior "mood" lights.
Blue Sea Distribution_5.jpg


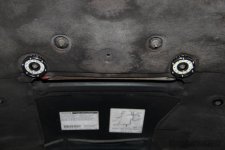
I bought the KC Hilites Cyclone lights and used the existing hood scoop bolts for some awesome engine bay lighting. Amazing little lights.
KC Hilites Engine Bay.jpg
 

Attachments

  • Blue Sea Distribution_1.jpg
    Blue Sea Distribution_1.jpg
    36.7 KB · Views: 456
  • Blue Sea Distribution_2.jpg
    Blue Sea Distribution_2.jpg
    88.9 KB · Views: 478
  • Blue Sea Distribution_3.jpg
    Blue Sea Distribution_3.jpg
    97.4 KB · Views: 458
  • Blue Sea Distribution_4.jpg
    Blue Sea Distribution_4.jpg
    139.1 KB · Views: 496
  • Blue Sea Distribution_5.jpg
    Blue Sea Distribution_5.jpg
    139.4 KB · Views: 477
  • KC Hilites Engine Bay.jpg
    KC Hilites Engine Bay.jpg
    80.2 KB · Views: 479
Last edited:
Didn't really do anything to the truck, but did get some new tyres mounted on some second hand wheels I bought for it.

These are the cheapest mud tyres I could find (made in China no doubt) - 305/70/R16s mounted on ROH 16x8 -12 offset (~4" BS) alloys:

9e9Ke8V.jpg


Next step is getting them to fit...
 
Denso'ed my '97. New Denso for my wife's 2000 SR5 a few weeks ago. After having 3 of these radiators delivered over the past month(one mis-delivered by Fedex, then redelivered), I think that the factory packing could be better.
 

Attachments

  • IMG_1708.jpg
    IMG_1708.jpg
    137.7 KB · Views: 394
Last edited:
I picked up a rear locking axle and the front to match with cvs. Not sure if better to go get ecu or build a harness. Now to get it cleaned and painted. At 168k and no leaks. I've never gone this far with a mod. I've been reading a ton so a thanks to those pioneers.

You want simplicity? Buy a 12voltguy harness ( which I would steer away from ) or buy LowRangeOffRoad harness. It's straight forward. It by passes all the ecu stuff. And it's very very simple. You run the harnes to the elocker. Plug it in and that's it. Or you can see if you are prewired, and figure out the rest. Only thing you really lose with going with a aftermarket harness is. OEM RR DIFF light. And the safety feature where it won't engage if your going fast. But this is COMMON SENSE. I went with 12voltguy harness and the switch panel. Love the switch panel. But the harness fell apart before even installing it. I received 2nd harness from him. Ended up cutting his connector of and but connecting the oem plug to his harness.

Also, extended your axle diff breather and your elocker motor breather. Looks closely the elocker has a small breather
 
Last week a buddy and I installed a Yakima loadwarrior roof basket. It has the extension and tire carrier as well. My 4runner had no OEM rack so it had to be riveted to the roof!

Please ignore my small stock winter tires haha


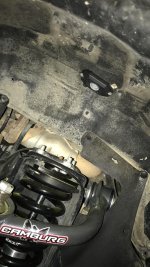
Not done today but this past week installed new uppers,struts and springs,went with total chaos uppers,bilstein 5100s and toytec eiback 3inch lift springs,doesnt ride too bad considering the rear isnt up there with the front yet, ut im gettin her there
3c4124af8027f1e0d7d857413a022b90.jpg


Sent from my SM-G900T using Tapatalk
 
What did you do to your 3rd gen today?

Ordered a pair of OEM rear shocks. Now that I know they're bad, I actually notice the mushiness in the rear end.
 
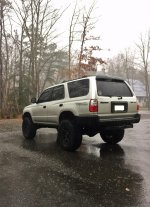
Let it get soaked in the rainstorm....

also had a mobile body shop guy do my little scratches and dings last week...did a nice job, now the only eye sore on my truck is the tiny little rock chips on the bottom of the hood! he said touch up paint with a few coats of good wax will make them not as noticable, otherwise I would have to just get the whole hood done...or find a sport hood :)
 

Attachments

  • 4runner storm.jpg
    4runner storm.jpg
    140.8 KB · Views: 497
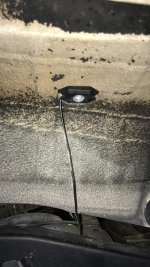
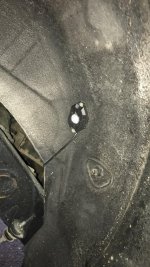
For anyone wondering how I mounted my rock lights. I wish I could get the back to look more clean without the wires hanging down but idk how to do that haha
 

Attachments

  • IMG_7097.jpg
    IMG_7097.jpg
    125.7 KB · Views: 468
  • IMG_7096.jpg
    IMG_7096.jpg
    128.4 KB · Views: 461
  • IMG_7095.jpg
    IMG_7095.jpg
    122.4 KB · Views: 474
Over the last 2 weeks on my '01 SR5:

OEM Upper Ball Joints
OEM Lower Ball Joints
OEM Outer Tie Rod Ends
OEM Lower Control Arm Bushings
OEM Steering Rack Boots
Aftermarket Front Sway Bar End Links (Stock Length)
Tundra Front Springs
Monroe Top Hats w/ Tundra Isolators
OME 906 Rear Springs
Bilstein 5100's all around
Toyo Open Country AT2 265/75/16 10-ply
Greased all U-Joints and Slip Yokes

I now have no money for parts, but the truck rides fantastic. Everything was factory, don't think the PO's even changed out the struts since 2001.
 
Over the last 2 weeks on my '01 SR5:

OEM Upper Ball Joints
OEM Lower Ball Joints
OEM Outer Tie Rod Ends
OEM Lower Control Arm Bushings
OEM Steering Rack Boots
Aftermarket Front Sway Bar End Links (Stock Length)
Tundra Front Springs
Monroe Top Hats w/ Tundra Isolators
OME 906 Rear Springs
Bilstein 5100's all around
Toyo Open Country AT2 265/75/16 10-ply
Greased all U-Joints and Slip Yokes

I now have no money for parts, but the truck rides fantastic. Everything was factory, don't think the PO's even changed out the struts since 2001.


Pics?
 

I just have this 1 pic I took for ya cause I'm at work but it looks like what you'd expect from seeing others with the same setup.

<blockquote class="imgur-embed-pub" lang="en" data-id="a/CAkqh"><a href="//imgur.com/CAkqh"></a></blockquote><script async src="//s.imgur.com/min/embed.js" charset="utf-8"></script>

I'll try to take some pictures when I get it out in the dirt in the next couple weeks.
 
Last edited:
I just have this 1 pic I took for ya cause I'm at work but it looks like what you'd expect from seeing others with the same setup.

<blockquote class="imgur-embed-pub" lang="en" data-id="a/CAkqh"><a href="//imgur.com/CAkqh"></a></blockquote><script async src="//s.imgur.com/min/embed.js" charset="utf-8"></script>

I'll try to take some pictures when I get it out in the dirt in the next couple weeks.


Are you on 4runner 5100s? If so, what perch are you set at?


Sent from my iPhone using Tapatalk
 
Are you on 4runner 5100s? If so, what perch are you set at?


Sent from my iPhone using Tapatalk

Front is on lowest perch setting to match the 906's in the rear.

I got them from Wheeler's Offroad who provided excellent service and are very recommended among the forum here. Links:

Front 5100's

Rear 5100's

I got the springs new from Camelback Toyota along with the other OEM parts.

I owe many thanks to the community here who blazed the trail in doing the Tundra lift, as well as Speedy's Garage video on the install which has all the info you need.
 
Last edited:
Front is on lowest perch setting to match the 906's in the rear.


I got them from Wheeler's Offroad who provided excellent service and are very recommended among the forum here. Links:


Front 5100's


Rear 5100's


I got the springs new from Camelback Toyota along with the other OEM parts.


Sweet! I ask cause I'm running the same set up but on the 2nd perch and now have a reverse rake and will need to correct that in the near future with either 890s or trim packers.


Sent from my iPhone using Tapatalk
 
Status
Not open for further replies.

Members online

Forum statistics

Threads
278,316
Messages
3,554,120
Members
248,016
Latest member
Advally Service

Trending content

Back
Top