What Did You Do To Your 3rd Gen Today?

Status
Not open for further replies.
well tonight i lit a fire under my ass and started stripping down my runner to install my dual transfer cases. ordered it from inchworm months ago and it's been sitting on the shelf collecting dust till now.

<a href="http://s25.photobucket.com/user/maloa/media/IMG_3926.jpg.html" target="_blank"><img src="http://i25.photobucket.com/albums/c82/maloa/IMG_3926.jpg" border="0" alt=" photo IMG_3926.jpg"/></a>

<a href="http://s25.photobucket.com/user/maloa/media/IMG_3928.jpg.html" target="_blank"><img src="http://i25.photobucket.com/albums/c82/maloa/IMG_3928.jpg" border="0" alt=" photo IMG_3928.jpg"/></a>

<a href="http://s25.photobucket.com/user/maloa/media/IMG_3929.jpg.html" target="_blank"><img src="http://i25.photobucket.com/albums/c82/maloa/IMG_3929.jpg" border="0" alt=" photo IMG_3929.jpg"/></a>
 
do you have any pictures of the finished install? i've been thinking about putting one in for numerous years, thank you good sir!

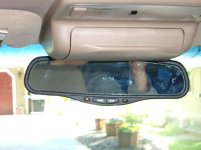
Not the best picture. This link http://www.toyota-4runner.org/3rd-g...-mirror-compass-thermometer-installation.html
has everything you need to know with pictures. My fuse box was oriented different and I used a mini fuse tap on the wiper fuse to get power. My roof console was a little different, so I had to ground it using a screw that held in the old mirror. Having the compass and temp is great but I think the auto dim might be the best feature.
 

Attachments

  • DSCF0932.jpg
    DSCF0932.jpg
    108 KB · Views: 1,249


Finally mounted up my Allpro Apex bumper for a Tacoma. Still need to add the finishing touches like paint and lights but I'm loving the way it looks so far.
 
Installed a Koyo radiator and Autocraft AGM 24F battery. My old battery would die if you left the door open for an hour or so and was manufactured in 2009 so I think it was time.
 
220k on mine bro, and they dont look anywhere near those.

Anyway, at least you got them changed out.

Did you use a pump for front diff? Its the biggest pita of the 3 imo.

Yeah, I used a fluid transfer pump on all 3... it was easy? I thought the rear was the worst because of how tough the bolts were to loosen, I used an impact on the rear drain plug (after getting fill open of course), but I had to jack up the rear to get impact gun under bottom plug. That of course lead to the plug falling in the drain pan. Actually the transfer case got me in the face too when I opened the fill plug slightly to relieve pressure and make it drain quicker. Front was easy peasy as I a) didn't lose the plugs in smelly fluid, and b) didn't get a face full of it :biggrin1:

Uhg today I went to change bushings. Rear sway bar links and bar bushings were easy, the front sucked (and continues to). Didn't have the right nuts and bolts, got some grade 8 stuff at home depot only to find it's not right either. So now I guess 4runner is down for a day or two until I get the right hardware. Even still, the new bar bushing or whatever it's called doesn't fit perfectly around the bar. Bar is definitely 26mm, new are 26mm... and the sleeve fits on other areas of the bar, but right where it should go.. it's like the bar is morphed a little or bumpy, but doesn't look or feel like rust that bubbled up. Sigh.
 
Replaced my fuel filter today. Used a WIX 33319. Surprisingly enough it was a piece of cake. PB Blaster FTW. :thumb3:
 
Got started on an oil change today and immediately ran into this issue. Luckily I can bike ride to work :dammit:

<a href="https://www.flickr.com/photos/27745746@N06/14345583173" title="DSC_7098[1] by Michael Hammond, on Flickr"><img src="https://farm3.staticflickr.com/2900/14345583173_de499d83e8_b.jpg" width="1024" height="680" alt="DSC_7098[1]"></a>
 
got the tranny adapter plate drilled out, yanked the tailhousing to pull the stock seal and bearing and mocked up the duals. gotta break it all down now, seal it up and torque down all the bolts and she'll be ready to install.

<a href="http://s25.photobucket.com/user/maloa/media/IMG_3931.jpg.html" target="_blank"><img src="http://i25.photobucket.com/albums/c82/maloa/IMG_3931.jpg" border="0" alt=" photo IMG_3931.jpg"/></a>

<a href="http://s25.photobucket.com/user/maloa/media/IMG_3934.jpg.html" target="_blank"><img src="http://i25.photobucket.com/albums/c82/maloa/IMG_3934.jpg" border="0" alt=" photo IMG_3934.jpg"/></a>
<a href="http://s25.photobucket.com/user/maloa/media/IMG_3946.jpg.html" target="_blank"><img src="http://i25.photobucket.com/albums/c82/maloa/IMG_3946.jpg" border="0" alt=" photo IMG_3946.jpg"/></a>
 
[MENTION=105563]Hootz[/MENTION]
Finally mounted up my Allpro Apex bumper for a Tacoma. Still need to add the finishing touches like paint and lights but I'm loving the way it looks so far.

Dude that's a nice bumper looks good!

? Any fitment issues?

-Thanks
 
Last edited:
Added 99 tall coils with 10mm OME trim spacers and Bilstein 4600s on rear.
(side-note: Biggest PIA is always jacking the driver's side rear and placing the stand. Pass side no prob)
 
finished lifting the 4runner. took all of 2 hours to finish what we couldnt yesterday. also got my wet okoles installed so my dirty, greasy self could take the runner for a test drive to see how we were gonna adjust the fronts.
 
finished lifting the 4runner. took all of 2 hours to finish what we couldnt yesterday. also got my wet okoles installed so my dirty, greasy self could take the runner for a test drive to see how we were gonna adjust the fronts.

Pikcha!
 
Getting ready to paint my sport hood,fender flares and powdercoating my wheels with new tires so looks like this today...
 
Last edited:
[MENTION=105563]Hootz[/MENTION]


Dude that's a nice bumper looks good!

? Any fitment issues?

-Thanks

Thanks! It's definitely not bolt on. Allpro has directions on their website. But you have to do a little cutting and welding and I had to notch out a spot in the bumper where the ac line was.
 
Finally mounted up my Allpro Apex bumper for a Tacoma. Still need to add the finishing touches like paint and lights but I'm loving the way it looks so far.

Saw one of these on a first gen tacoma the other day. His had the hoops and everything, but it's a VERY good looking bumper. I had never seen one before!
 
Yeah, I used a fluid transfer pump on all 3... it was easy? I thought the rear was the worst because of how tough the bolts were to loosen, I used an impact on the rear drain plug (after getting fill open of course), but I had to jack up the rear to get impact gun under bottom plug. That of course lead to the plug falling in the drain pan. Actually the transfer case got me in the face too when I opened the fill plug slightly to relieve pressure and make it drain quicker. Front was easy peasy as I a) didn't lose the plugs in smelly fluid, and b) didn't get a face full of it :biggrin1:

Uhg today I went to change bushings. Rear sway bar links and bar bushings were easy, the front sucked (and continues to). Didn't have the right nuts and bolts, got some grade 8 stuff at home depot only to find it's not right either. So now I guess 4runner is down for a day or two until I get the right hardware. Even still, the new bar bushing or whatever it's called doesn't fit perfectly around the bar. Bar is definitely 26mm, new are 26mm... and the sleeve fits on other areas of the bar, but right where it should go.. it's like the bar is morphed a little or bumpy, but doesn't look or feel like rust that bubbled up. Sigh.

Now that you mentioned it... I had a similar experience with the drain plug on the rear diff, and the front diff. If I remember, I had to hold my breaker bar and use my foot! Whoever did them last definitely seemed to have gone over the torque spec. The rear and transfer case don't need any pump, but the front definitely does. I had a way harder time with a pump than without for rear and transfer case.

Which bushings did you purchase for the swaybars?
 
Status
Not open for further replies.

Members online

Forum statistics

Threads
278,316
Messages
3,554,120
Members
248,016
Latest member
Advally Service

Trending content

Back
Top