What Did You Do To Your 3rd Gen Today?

Status
Not open for further replies.
Currently fighting the upper bolts on the rear body mounts. WTF Toyota?

[MENTION=119532]Road Bull[/MENTION]

Did you drill them out? These are the only bolts on my rig that I've ever had trouble with. There's no rust, I sprayed them down with Liquid Wrench last night and today. I've got a 14mm open end on there and they won't budge. There stripping. 14MM seems a bit loose. 1/2/13mm won't fit. I'm getting pissed. lol

EDIT: Screw it. It'll be way easier to get in there with the bumper off. So it'll wait till I get my bumper from Savage. lol
 
Last edited:
Fresh set of Duratracs in 265/75/16 C load to replace the previous set that was the exact same but E load. They ride buttery smooth compared to the older set.

KfdXvGTh.jpg

Nice
 
Sorry LittleCaesar no hard numbers. I just have analogy gauge only.

Know anyone with a Scangauge or Ultragauge or Torque Android App? Still using the original fan clutch or did you switch over to an electric fan?

I'd be curious to know if the thermostat even opens up. A three core may be overkill but could work well for those who go offroad in the desert.
 
Part 3 of my four part project is almost done Pulled out the 4.10 front diff and put the 4.3 in. Pulled the 99 talls off and replaced them with Billstein 5100 and OME 881. Still have to finish up the passenger side and get it aligned. That SOB front diff did not want to come out, but after fighting it for hours I got it out. The 4.3 slid right into place no problem. WTF?
 
racks

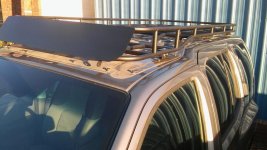
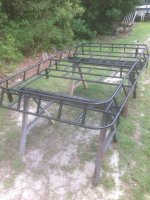
Picked up 3rd gen to build a short basket Rack.

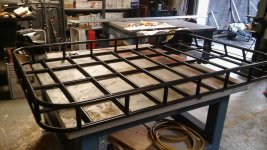
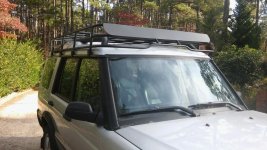
Been building some 4Runner , Land Rover and other 4x4 custom racks. Seems we need some post responses before they let us start a new thread here. Shipping out of our shop in NC.

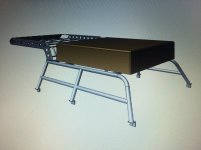
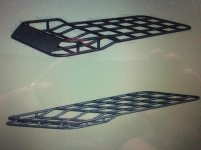
Working on U bolt bolt on racks as well as hitting the existing mounts with the stock brackets removed - custom options all designs in 3D Inventor. Get some images up soon. PhotoBucket de-railed our image posting so moving over to Flickr for now.
Ken & Alex
 
Since I just did the trans cooler and temp gauge I figured it would be a good time to do a drain and flush. 14 Quarts of ATF later it's coming out super clean.

With that done it was out of the garage to test the new cooler. I took it on the highway and stayed at 160-165 on the flats. Then I hit an 8 mile long 6% grade that's just north of my house. It never got above 182. I don't have any hard numbers prior(looking at you [MENTION=69868]LittleCaesar[/MENTION] :hello:) since my 97 didn't have a way to read them before I added the gauge. I'm very happy seeing the trans temp that low when stressed. I'll get out next week and wheel it up some steeper stuff but with the fan on I don't think it will get over 185. I should have done this a year ago. Sorry trans.

As for that Glow Shift gauge? It's going back to Amazon. You can't even read the damn thing in the sun. Add that to the fact the color switch didn't work out of the box and that's another made in China company that's off my list forever. It's getting replaced with an Auto Meter that should be here Wednesday.

EDIT: Forgot I also pulled the front sway bar off. One link was mangled and the other wasn't much better. It drives fine without it so it's staying off.
 
Last edited:
Just got my invoice from Savage. The bumper is official. Dual swingouts with tire mount, hi-lift, and rotopax mount. I can't wait to get my spare out of the cargo area. lol

did you call to place your order? cause the website still says out of stock and i've been on the waiting list.
 
Picked up 3rd gen to build a short basket Rack.

Been building some 4Runner , Land Rover and other 4x4 custom racks. Seems we need some post responses before they let us start a new thread here. Shipping out of our shop in NC.

Working on U bolt bolt on racks as well as hitting the existing mounts with the stock brackets removed - custom options all designs in 3D Inventor. Get some images up soon. PhotoBucket de-railed our image posting so moving over to Flickr for now.
Ken & Alex


Where in NC?


Sent from my iPhone using Tapatalk
 
2000 driver window

I tried to diagnose why the driver window doesn't work! Ive even bought a replacement motor but that din't fix the issue either.
All other windows work except the most important one.
Anyone have any ideas
 
Racks

Where in NC?

Hi Keith , we are in Southern Pines South of Raleigh near Pinehurst.
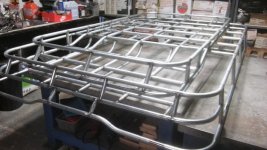
I will be getting some of our photos moved overt to Flickr. just to get some interest. Right now we are getting busy two Xterra racks one flat with small ft basket the other a short basket , two 4Runner racks, Defender 90 rack shipping this week.

1st image below is a Land Rover Disco 2 rack with an Xrterra rack nested on top gives some Idea of differences in sizes.
Also have done a Defender 110 rack they run just under 10 Ft long...
Ken
 

Attachments

  • 20161117_202704_zpsfcwpdyvo.jpg
    20161117_202704_zpsfcwpdyvo.jpg
    84.9 KB · Views: 349
  • ADB47C60-9FE7-4E66-B83F-689C6D2E6D8E_zpsc3l75edj.jpg
    ADB47C60-9FE7-4E66-B83F-689C6D2E6D8E_zpsc3l75edj.jpg
    133.5 KB · Views: 349
  • 20161201_161754_zpsw0j79tta.jpg
    20161201_161754_zpsw0j79tta.jpg
    86.9 KB · Views: 354
  • 20150710_201208_zps6mzl2rpr.jpg
    20150710_201208_zps6mzl2rpr.jpg
    107.5 KB · Views: 352
  • 20161122_093726_zpse4nlzyrn.jpg
    20161122_093726_zpse4nlzyrn.jpg
    115.1 KB · Views: 357
  • 20A5A540-7FBF-41DB-BABE-FEDA84AD2F20_zpsvoumuz4b.jpg
    20A5A540-7FBF-41DB-BABE-FEDA84AD2F20_zpsvoumuz4b.jpg
    92.9 KB · Views: 355
  • download_20150721_204447_zpslkmhgdks.jpg
    download_20150721_204447_zpslkmhgdks.jpg
    129 KB · Views: 340
Last edited:
Since I just did the trans cooler and temp gauge I figured it would be a good time to do a drain and flush. 14 Quarts of ATF later it's coming out super clean.

With that done it was out of the garage to test the new cooler. I took it on the highway and stayed at 160-165 on the flats. Then I hit an 8 mile long 6% grade that's just north of my house. It never got above 182. I don't have any hard numbers prior(looking at you [MENTION=69868]LittleCaesar[/MENTION] :hello:) since my 97 didn't have a way to read them before I added the gauge. I'm very happy seeing the trans temp that low when stressed. I'll get out next week and wheel it up some steeper stuff but with the fan on I don't think it will get over 185. I should have done this a year ago. Sorry trans.
As for that Glow Shift gauge? It's going back to Amazon. You can't even read the damn thing in the sun. Add that to the fact the color switch didn't work out of the box and that's another made in China company that's off my list forever. It's getting replaced with an Auto Meter that should be here Wednesday.

EDIT: Forgot I also pulled the front sway bar off. One link was mangled and the other wasn't much better. It drives fine without it so it's staying off.

I am an internal auditor for a company so I live for hard data and numbers. Coworkers aren't thrilled with me except for the top brass. Most others run away or chose to be sick when I am scheduled to meet with them....:wow:

Low trans temps equal a long living happy A340F. Those are good numbers. Post a pic of the set up.
 
I am an internal auditor for a company so I live for hard data and numbers. Coworkers aren't thrilled with me except for the top brass. Most others run away or chose to be sick when I am scheduled to meet with them....:wow:

Low trans temps equal a long living happy A340F. Those are good numbers. Post a pic of the set up.

I was just busting you balls man. I'm all about hard numbers as well. I tried so many PID combos on Torque Pro to get trans temp. From using others numbers to working out my own. Literally hours of attempts. Nothing worked for the old 97. So I figured the next best thing was an aftermarket gauge. I wanted to add the trans cooler anyway so now was the time.

There's some pics in this post and I'll put up some more once I get rid of the POS Glow Shift and get the Auto Meter gauge and pillar mount in.

http://www.toyota-4runner.org/2749514-post21929.html
 
Wow. I looked for one of those for a while and couldn't find much. How much effort was it to install? Did you have to change anything?

Installation was really easy and straight forward. First, credit this guy on youtube with a detailed video for removal.
https://www.youtube.com/watch?v=Iz1X8hunRrQ

Start drain coolant and remove upper/lower hose.
Remove AFT feed/return lines. Clamp if needed.
Remove fan shroud 4-10mm bolts in rear and about 3 clips.
Remove radiator bracket mount 4-12mm bolts inside grill area.
Pull radiator with bracket 1" back towards fan and then straight up and out.
Clean AC condenser coil

Put back new radiator back same way. It has hook hangers on each side.
Use existing 12mm bolts. For me, holes lined up almost perfect.
Trick is to screw on bolt and keep them all loose before torquing down.
If not some had to enlarge the through hole with die grinder bit.
For the shroud, on the top I had to use 3/8 spacers and longer 10mm bolts.
Connect everything back and you're done.
Need about 2.5 gallons of coolant
All done less than 3 hours.

Tools for easy install
3/8 extention 3", 6" and swivel
 

Attachments

  • IMG_0248.jpg
    IMG_0248.jpg
    119.1 KB · Views: 478
Last edited:
Know anyone with a Scangauge or Ultragauge or Torque Android App? Still using the original fan clutch or did you switch over to an electric fan?

I'd be curious to know if the thermostat even opens up. A three core may be overkill but could work well for those who go offroad in the desert.

I do not have one, but I think I might order that Ultragauge and use it on my iphone.
 
Currently fighting the upper bolts on the rear body mounts. WTF Toyota?

[MENTION=119532]Road Bull[/MENTION]

Did you drill them out? These are the only bolts on my rig that I've ever had trouble with. There's no rust, I sprayed them down with Liquid Wrench last night and today. I've got a 14mm open end on there and they won't budge. There stripping. 14MM seems a bit loose. 1/2/13mm won't fit. I'm getting pissed. lol

EDIT: Screw it. It'll be way easier to get in there with the bumper off. So it'll wait till I get my bumper from Savage. lol

I didn't have to drill them out. I had the advantage on my mechanic friend helping me, but even so, that felt sketchy as hell. And, I had the bumper and trailer hitch off.

Are you having an issue with the center bolt, or the the two flange bolts in the side? My friend hit those bolts as I struggled with the flange bolts.
 
I didn't have to drill them out. I had the advantage on my mechanic friend helping me, but even so, that felt sketchy as hell. And, I had the bumper and trailer hitch off.

Are you having an issue with the center bolt, or the the two flange bolts in the side? My friend hit those bolts as I struggled with the flange bolts.

The flange bolts. My impact took care of the center bolt nut off in 2 seconds.

There's not enough room to get the box end of my 14mm wrench on there so I had to use the open end. That started to round out the one bolt so I called it a day. I'll give them a bunch more liquid wrench in the meantime. If they still won't come off I'll drill the centers out. With the bumper off though I should be able to get them out.
 
The flange bolts. My impact took care of the center bolt nut off in 2 seconds.

There's not enough room to get the box end of my 14mm wrench on there so I had to use the open end. That started to round out the one bolt so I called it a day. I'll give them a bunch more liquid wrench in the meantime. If they still won't come off I'll drill the centers out. With the bumper off though I should be able to get them out.

Ah, OK. So, we jacked the body up with enough room to get the closed end 14mm over the top. He showed me a way to connect two wrench ends together to get more torque to break them free. This pretty much exactly>> https://www.youtube.com/watch?v=SDI4j1LgqV4 This worked for me.

I would say it would be almost impossible to get in there with the bumper in the way. I would wait till you get it off. In the meantime, hit it with some PB blaster or other such penetrating lubricant to assist. It had a very small arc of stroke to work with, but once you have it broken free, then, with the body jacked up you can spin with fingers. This part sketched me out. What I would highly suggest, is this, Jack the body up in the safest way possible. Then, have something to wedge in that work space around where you are working, but not IN the way that would keep the body from coming down on your fingers / hand should something like the jack fail. We had to build a tower of wooden blocks to have enough height to lift a "lifted" 4runner body enough to get at those damned body mounts. I hope this helps.
 
Status
Not open for further replies.

Members online

Forum statistics

Threads
278,316
Messages
3,554,120
Members
248,016
Latest member
Advally Service

Trending content

Back
Top