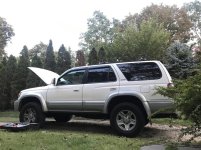
What Did You Do To Your 3rd Gen Today?

Status
Not open for further replies.
Rear Diff Fluid Change

A few weeks later than the transmission, front diff, and transfer case, but I finally did fluid change on the rear end of my 2000 limited....should have done it 8 months ago...

Had a lot of the gray goop on it...but also a couple shavings that were the size of clipped finger nails. No noise or issue that I can detect, and I bet that the fluid has only be changed maybe one other time on it with 165k....so I am not freaking out yet until you guys tell me it is a serious problem.

First pulled the plug:
<a data-flickr-embed="true" href="https://www.flickr.com/photos/150426074@N06/36342527754/in/dateposted-public/" title="2000 T4R rear diff fluid change"><img src="https://farm5.staticflickr.com/4344/36342527754_9cbf738fea.jpg" width="500" height="500" alt="2000 T4R rear diff fluid change"></a><script async src="//embedr.flickr.com/assets/client-code.js" charset="utf-8"></script>

Shavings on the end of my glove and then on paper towel:
<a data-flickr-embed="true" href="https://www.flickr.com/photos/150426074@N06/36342526504/in/dateposted-public/" title="2000 T4R rear diff fluid change"><img src="https://farm5.staticflickr.com/4354/36342526504_548b48c764.jpg" width="500" height="500" alt="2000 T4R rear diff fluid change"></a><script async src="//embedr.flickr.com/assets/client-code.js" charset="utf-8"></script>
<a data-flickr-embed="true" href="https://www.flickr.com/photos/150426074@N06/36989564646/in/dateposted-public/" title="2000 T4R rear diff fluid change"><img src="https://farm5.staticflickr.com/4337/36989564646_b7112e2895.jpg" width="500" height="500" alt="2000 T4R rear diff fluid change"></a><script async src="//embedr.flickr.com/assets/client-code.js" charset="utf-8"></script>
 
How hard and with what did you hit those? My Tacoma rims are really oxidized...I hand sanded one and haven't painted it yet...debating on whether it will be worth it to do the other 3 by hand or just find 4 used rims at an auto yard... Just not sure if I should use a sandpaper wheel on my grinder or wire wheel or anything other than hand sanding to finish.

I used a wirewheel on an angle grinder as well as a wirecup on a corded drill.

Safety eyewear, dust mask and gloves are heavily recommended. I had a lot of debris flying around with the angle grinder, but it got the job done rather quickly. Then I just went over a few spots with 120 grit sandpaper and a wire brush.

After that was done, I cleaned the wheel with degreaser and parts cleaner and a final wash with dish soap.

I put the center caps in the dishwasher.

And now everything is ready for paint.

I used the Duplicolor self-etching primer, then paint. Now I'm waiting the recommended 5-7 days curing time before slapping on a couple of coats of Duplicolor clearcoat.

I'm using the Automotive Formula Acrylic Enamel paint.
 
Last edited:
Trying to sell your spacers? :tongue::cool:

Nah, I'll hold on to them for now, unless I find out that they are a contributing factor to the front end shimmy/vibration that I have.

I'll try the new wheels with spacers on.

I also just wanted to downsize the tires so that I "could" run without spacers in case I ever wanted to sell my 4runner. Spacers wouldn't pass a safety certification in Ontario, so I have to be able to safety the vehicle without them on.

So yeah, bottom line is I'm not sure if I will be selling them.
 
Not what I want to hear when I've got them sitting in a box out in the garage waiting to go on.

It wasn't terrible and I spent no time researching it first. I would have saved a lot of time had I known a couple of things up front. Loosen the body mount nuts (I think 2 on each side) on the side of the car before attempting to lift the rear. Second, what worked best was a LONG pry bar wedged between the frame and body in the rear. And last, don't be afraid to MUSCLE that body up until it clears the mount and body so it can easily be removed. A second set of strong hands to do the lifting, while you work on the mounts, would make the install go much quicker. I was by myself and had to lift and work on the mounts.

LMAO. Looks easy right? When I did mine I figured about 20 minutes for both. I was wrong.


Hahaha, right? I estimated about 30 minutes per side. I think I have like 2 hours per side into it, not including clean up and coffee breaks.
 
No big issues that I can recall putting those SS rear body mounts on, but I put a 1" body lift on a year or two before, so perhaps that made it easier?

I remember the body lift went swimmingly easy, right up to the point I got to the left-front body mount. And the bolt there was rusted/frozen *tight* in the body mount bushing sleeve. It would not budge at all. I probably spent a couple of hours getting all the other mounts loose and ready, and then 2 or 3 hours fighting with that single bolt. Compounding issue was the lack of access. I eventually took the front bumper off and managed to reach in with a sawzall blade and cut between the body and the bushing to remove the head.

Then another hour to lift/insert spacers/replace bolts.
 
Not done yet, but I recently picked up a set of 265/75R16's to replace my current 9 year old 285/75R16's. I'm also wanting to ditch the wheel spacers and make this rig slightly more road friendly without sacrificing too much of the current "look" and offroad capability.

Anywho, the tires I picked up also happened to come already mounted onto 16" split spoke wheels, but they are in pretty rough shape. Spent a few hours prepping yesterday and applied Duplicolor paint to one of the wheels as a test.

I debated going with something other than silver, but the '97 desert Dune/silver combo with chrome bumpers doesn't really look that great with dark colored wheels IMO, unless you can break that up with a polished ridge or some white lettered tires or something. Anywho, I think this silver will do nicely.

Next step after these are balanced and installed will be to hunt for a single used 265/75R16 tire that I can mount to one of my spare split spoke wheels and put back into the stock spare tire mounting location.

That one rim looks great!

I have been toying with the idea of painting my 5-star rims a slightly darker grey to match my grill/scoop/rear license plate bezel but I'm concerned about longevity of just paint.

I was gonna dip them, but decided against it, and now I'm looking at Universal Metallic by Rust Oleum, paint and printer in one.

I'm not good at making life-altering decisions :sadwave:
 
Moving from the Land Cruiser game to a T4R.
<blockquote class="imgur-embed-pub" lang="en" data-id="a/nVyKs"><a href="//imgur.com/nVyKs"></a></blockquote><script async src="//s.imgur.com/min/embed.js" charset="utf-8"></script>
Picked up this 1996 Limited with factory e-locker from a guy outside of Nashville about a week or so ago. ARB came in yesterday and got it mounted up right after! Toytec lift on its way....more to come
 
Moving from the Land Cruiser game to a T4R.

Picked up this 1996 Limited with factory e-locker from a guy outside of Nashville about a week or so ago. ARB came in yesterday and got it mounted up right after! Toytec lift on its way....more to come

Welcome and nice start with your rig. Excellent first post!
 
Not done yet, but I recently picked up a set of 265/75R16's to replace my current 9 year old 285/75R16's. I'm also wanting to ditch the wheel spacers and make this rig slightly more road friendly without sacrificing too much of the current "look" and offroad capability.

Anywho, the tires I picked up also happened to come already mounted onto 16" split spoke wheels, but they are in pretty rough shape. Spent a few hours prepping yesterday and applied Duplicolor paint to one of the wheels as a test.

I debated going with something other than silver, but the '97 desert Dune/silver combo with chrome bumpers doesn't really look that great with dark colored wheels IMO, unless you can break that up with a polished ridge or some white lettered tires or something. Anywho, I think this silver will do nicely.

Next step after these are balanced and installed will be to hunt for a single used 265/75R16 tire that I can mount to one of my spare split spoke wheels and put back into the stock spare tire mounting location.

that does look nice. before ditching your spacers, If you ever do the TBU, those wheels will only fit the 199 TBU not the bigger one without spacers.
 
that does look nice. before ditching your spacers, If you ever do the TBU, those wheels will only fit the 199 TBU not the bigger one without spacers.

No plan to TBU. I just replaced my calipers and flex hoses last year without upgrading. I don't tow and don't have armor and don't live in the mountains. I don't have a dog or kids, it's usually just me in my empty 4runner, lol.

The larger OEM Limited brakes are good enough for me.
 
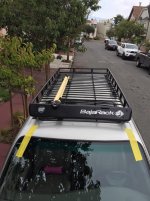
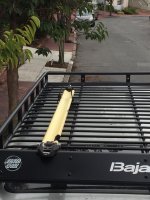
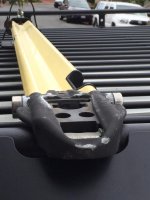
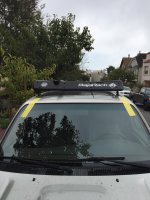
Just picked up a 2002 and have been busy making small mods. Already did some of the LED's inside the cab but not done yet. Will post pics later. Today, I managed to attach my Rocky Mounts Bike Racks to the Baja Rack on the Runner. Used some bike tubing to increase the diameter of the front crossbar to mount the rack and it worked perfect. And the Baja Rack has a cut_out on the fairing that perfectly fits the rack. Used the high-lift mount to elevate the back of the rack for now. Will come up with something better later. Regardless, it works and looks great. Enjoy!!

And a replaced the cracked windshield. $150 well spent!
 

Attachments

  • Baja Rack (1).jpg
    Baja Rack (1).jpg
    136.8 KB · Views: 395
  • Baja Rack (2).jpg
    Baja Rack (2).jpg
    132.3 KB · Views: 401
  • Baja Rack (3).jpg
    Baja Rack (3).jpg
    127.4 KB · Views: 393
  • Baja Rack (4).jpg
    Baja Rack (4).jpg
    134.8 KB · Views: 393
Just picked up a 2002 and have been busy making small mods. Already did some of the LED's inside the cab but not done yet. Will post pics later. Today, I managed to attach my Rocky Mounts Bike Racks to the Baja Rack on the Runner. Used some bike tubing to increase the diameter of the front crossbar to mount the rack and it worked perfect. And the Baja Rack has a cut_out on the fairing that perfectly fits the rack. Used the high-lift mount to elevate the back of the rack for now. Will come up with something better later. Regardless, it works and looks great. Enjoy!!

And a replaced the cracked windshield. $150 well spent!

Nice! Who'd you use for your windshield replacement?
 
Installed some 5100 in the rear to replace my Firm OME, I think they are to soft with the sport OME's up front, oops. Now it bounces a little to much. Much smoother though!
 
Removed running boards, removed rain guards, reset EFI. Really happy with all of it, although getting the adhesive off of the doors from the rain guards is a biiiitch.

Edit:fixed photo.
 

Attachments

  • IMG_6652.jpg
    IMG_6652.jpg
    138.2 KB · Views: 404
Last edited:
What did you do to your 3rd gen today?

Not done yet, but I recently picked up a set of 265/75R16's to replace my current 9 year old 285/75R16's. I'm also wanting to ditch the wheel spacers and make this rig slightly more road friendly without sacrificing too much of the current "look" and offroad capability.

Anywho, the tires I picked up also happened to come already mounted onto 16" split spoke wheels, but they are in pretty rough shape. Spent a few hours prepping yesterday and applied Duplicolor paint to one of the wheels as a test.

I debated going with something other than silver, but the '97 desert Dune/silver combo with chrome bumpers doesn't really look that great with dark colored wheels IMO, unless you can break that up with a polished ridge or some white lettered tires or something. Anywho, I think this silver will do nicely.

Next step after these are balanced and installed will be to hunt for a single used 265/75R16 tire that I can mount to one of my spare split spoke wheels and put back into the stock spare tire mounting location.

Two more done.

f8ab5c2cb21347e8fd3903c2a0754704.jpg
 
Status
Not open for further replies.

Members online

No members online now.

Forum statistics

Threads
278,316
Messages
3,554,120
Members
248,016
Latest member
Advally Service

Trending content

Back
Top