What Did You Do To Your 3rd Gen Today?

Status
Not open for further replies.
Installed SwitchDoctor master window switch in my 1997

Wednesday evening, my window master switch in the driver's door decided to give up after 22 years of service with my window down several inches. Since I bought it in 2014, the driver's window would only go down in the AUTO mode and you had to really tug on it to get the up to work. Not entirely unexpected for it to die, but unfortunately the rain forecast was questionable for the rest of the week. I immediately ordered this SwitchDoctor replacement that fits 1989-1997 4Runners:

https://smile.amazon.com/gp/product/B001MP12OK/ref=ppx_yo_dt_b_asin_title_o00_s00?ie=UTF8&psc=1

Luckily the rain held off during the day so I didn't get drenched at work and I took the garage for those nights. The switch got here Friday and works perfectly. Not only could I finally roll up the window, but I got back manual down functionality which is nice. It even has the AUTO backlit in the factory green which is another thing out on my original.

The main quality difference versus the OEM switch is less tactile response. Engagement is smooth, but it just doesn't have that nice click. For $25 shipped instead of $350 for OEM, I'm not mad.
 
Nothing today but over the weekend I replace all the wipers and threw in a new air filter, looks like a mouse or something had been living in the airbox for a bit before I bought the truck.

I also pulled off the rusty old runningboards, drivers side was just about falling off, and cleaned up the chrome bumpers while I was waiting for some WD40 to soak into the running board mounting bolts(only snapped one!)

If anyone wants the front mudflaps that integrate with the runningboards let me know, those are in good shape and I have the passenger side rear plastic piece, drivers was missing when I got the truck.
 
You could always do a hitch mounted stinger too, like the new Jeep JL folks are doing to protect the tail gate. Wouldn't be tough to fab something up.

WAYALIFE Store - Hitch STINGER, PARTS

Or, just mount the plate using the bottom holes instead of the top ones.

Yeah, the plate is mounted using the bottom holes and uses the top holes for lighting. I will probably figure out a way to move the whole thing up a bit. People that don't order the jerry can holder have it mounted on the main lower portion of the swing out bar more towards the middle and sucked in more than how I have it hanging off the end of the jerry can holder. It's not too bad, but I think if I end up breaking it, it will motivate me more to figure out a solution.

I will probably go with what habanero has going on. I like the simplicity of that design better.
 
[MENTION=5345]habanero[/MENTION]

The license plate position, and lights, are one thing that I'd change on my 4X Innovations rear swing out. It is the first thing to drag back there during transitions. Granted, mine sticks out a bit further with it being mounted off my jerry can holder. I really like your fix, and will probably do the same when the time comes for sure. I might see about raising the plate location altogether. I was thinking about picking up a light fixture assembly from a 2nd Gen 4Runner swing out. It's pretty much the same idea.

How much did that cost? are you liking it?
 
Over the weekend my friend and I installed a 5100, 881 and 890 kit on a 2000 SR5 I picked up about a month ago. Excited to do a couple more things to it and take it out on some adventures.

Next up are fixing an axle seal, extended breather hose for rear diff, removing side steps, fishing pole holder and a makeshift RR for potential RTT. Not sure yet.
 
fixed my airlift ( to prepare for a heavily loaded move ), burned hose, hit exhaust. then tore into it for knock sensors, vc gaskets,install a block heater, do the oil cooler hoses and seals while im right there etc. have main intake ready to pull but gonna wait for tomorrow morning, so I finished the evening cleaning the MAF and the idle control valve as well as the throttle body..and other cleaning.....mindless stuff.

Kind of bummed. Im the 3rd owner, the first 2 owners had it at the same Toyota dealership and the dealer doing all the work, including vc gaskets at 120k. missing bolts, missing injector harness protector under manifold on driver side bare wires just sitting on engine, still there on pass side.
 
Kind of bummed. Im the 3rd owner, the first 2 owners had it at the same Toyota dealership and the dealer doing all the work, including vc gaskets at 120k. missing bolts, missing injector harness protector under manifold on driver side bare wires just sitting on engine, still there on pass side.

My harness protector crumbled when I did valve cover gaskets so I wrapped that side in rescue tape. 2 years later when I did the head gasket it looked very good so I just left it taped up. Those durned protectors don't last well on the left where they're more closed in.
As for wires just laying there and the missing bolts, yikes Toyota dealership!
 
My harness protector crumbled when I did valve cover gaskets so I wrapped that side in rescue tape. 2 years later when I did the head gasket it looked very good so I just left it taped up. Those durned protectors don't last well on the left where they're more closed in.
As for wires just laying there and the missing bolts, yikes Toyota dealership!


I was thinking of using that plastic flexible loom stuff and tape it with electrical tape, open to better suggestions, maybe that rescue tape would be better, think I will go grab some tomorrow.
 
Last edited:
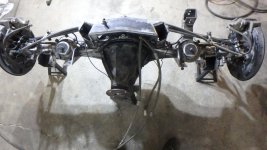
axle assembly upgrade
 

Attachments

  • P5070503.jpg
    P5070503.jpg
    135 KB · Views: 458
I was thinking of using that plastic flexible loom stuff and tape it with electrical tape, open to better suggestions, maybe that rescue tape would be better, think I will go grab some tomorrow.
I did what [MENTION=5345]habanero[/MENTION] did but used wire harness tape, rated for engine bay heat, etc, that I got off Amazon. Kinda pricy but I sleep better at night knowing it's there to protect me. Eventually the wiring (insulation) on these trucks will go bye bye too

If you use split loom, make sure it's rated for at least 300° F and then wrap it with wire harness tape :D

Sent from my Pixel XL using Tapatalk
 
DYI Disaster help

Got a 2000 3.4l and 2 days ago I changed the spark plugs as well as cleaned out the TB + replaced IAC.

Now it won't start but makes a horrible noise when cranking, sounds like the timing is way off but mechanic says its fine after inspecting it.

Got spark and fuel, lots of fuel.

Any ideas what the heck Ive done? Retraced my steps twice and shop mechanic has aswell.

Thanks for the help
 
Last edited:
I did what [MENTION=5345]habanero[/MENTION] did but used wire harness tape, rated for engine bay heat....

[MENTION=124615]3bears[/MENTION] Ah, octanejunkie makes an excellent point about the temp that I neglected. I used
https://www.homedepot.com/p/Nashua-...sing-Silicone-Tape-in-Clear-1210364/203534911
with a -60 to 500 degree claim. Only chemical resistant, not proof, though so far so good.

I replaced all the coolant and vacuum hoses that are normally hard to get to, and the fuel lines. The low pressure side fell apart when I removed it for replacement. The big guy seemed to be fine but with 23 years/300,000 miles it seemed like a decent idea.
 
[MENTION=124615]3bears[/MENTION] Ah, octanejunkie makes an excellent point about the temp that I neglected. I used
https://www.homedepot.com/p/Nashua-...sing-Silicone-Tape-in-Clear-1210364/203534911
with a -60 to 500 degree claim. Only chemical resistant, not proof, though so far so good.

I replaced all the coolant and vacuum hoses that are normally hard to get to, and the fuel lines. The low pressure side fell apart when I removed it for replacement. The big guy seemed to be fine but with 23 years/300,000 miles it seemed like a decent idea.

If I had had the time I would have replaced a bunch of hoses, I could not get clear answers on part #s on the hoses so I passed this time. They all looked pretty good....crossing my fingers

I use the rescue tape, looks like the Home Depot stuff would have been cheaper
 
If I had had the time I would have replaced a bunch of hoses, I could not get clear answers on part #s on the hoses so I passed this time. They all looked pretty good....crossing my fingers

None of the hoses I pulled were leaking, the one pictured below was still intact and working fine, it was only when I twisted it to break it free of the nipple that it....broke. If I hadn't touched it the falling apart wouldn't have happened. It was the original stuff on my '96. The big fuel supply line was still bendy.
OhjhWdw.jpg


Too late for you I pulled this from a post in the ol' build thread....but I'll stick it here anyhow:
Some part numbers for the various hoses and lines on the intake manifold
nqICvP6.png

Not pictured- the forward IAC coolant hose to pipe (not attached to intake manifold but to the pipe behind it)- part# 16261-62060

And I stumbled across this site this morning. It is awesome for part numbers and schematics.
Engine, fuel system and tools for Toyota 4Runner VZN180L-GKPGKA - Genuine parts
 
Last night this showed up at the shop! Alec from TrueNorthFabrications (truenorthfabricationsllc.com) did a great job with the welds and design. i can't wait to paint match and install this bad boy. ill be test fitting this weekend.

IMO, best plated design.

How it was shipped - 93 lbs with grill guard tubing.
i-6XGvqFh.png


i-G4QR5qF.png


welds
i-Mv97pK9.png


What it looks like -
a76b48_42c78b78559940d29a0ed1e4edc3a8e0~mv2.jpg
 
Last edited:
Status
Not open for further replies.

Members online

Forum statistics

Threads
278,316
Messages
3,554,120
Members
248,016
Latest member
Advally Service

Trending content

Back
Top