What Did You Do To Your 3rd Gen Today?

Status
Not open for further replies.
I re-torqued them after some driving but I get a ticking at high RPM, not sure if I have exhaust leak or its just a difference from cast iron to steel tube.


XafmZmj.jpg


tCvpwus.jpg


iJEgSjw.jpg
I couldn't find your original post so I'll just ask- did you install new gaskets with the new headers?

Sent from my SM-G950U using Tapatalk
 
I couldn't find your original post so I'll just ask- did you install new gaskets with the new headers?

Sent from my SM-G950U using Tapatalk

I reused the manifold to head gasket (MLS) and the EGR gasket. I used 2 new OEM manifold to down pipe/cat gaskets, the new manifold came with flimsy metal crush washers, I didn't use them because I thought they were to be used in place of the oem gaskets, but maybe I needed to use them along with the OEMs. The OEM gaskets seemed to fill the gap between the manifold and down pipe but its kinda hard to tell.

rY7tWoi.jpg

cTcm72d.jpg

NIh1HgG.jpg

DoNQHGj.jpg

rEEls8r.jpg

eLhGkah.jpg

0do2UMk.jpg

k1qBjLf.jpg

tDMU0bl.jpg

sOgNaCt.jpg
 
I reused the manifold to head gasket (MLS) and the EGR gasket. I used 2 new OEM manifold to down pipe/cat gaskets, the new manifold came with flimsy metal crush washers, I didn't use them because I thought they were to be used in place of the oem gaskets, but maybe I needed to use them along with the OEMs. The OEM gaskets seemed to fill the gap between the manifold and down pipe but its kinda hard to tell.


rY7tWoi.jpg


cTcm72d.jpg


NIh1HgG.jpg


DoNQHGj.jpg


rEEls8r.jpg


eLhGkah.jpg


0do2UMk.jpg


k1qBjLf.jpg


tDMU0bl.jpg


sOgNaCt.jpg
Gotcha. How does it sound after the upgrade??

Sent from my SM-G950U using Tapatalk
 
Gotcha. How does it sound after the upgrade??

Sent from my SM-G950U using Tapatalk

Sounds better, a little deeper and growly, I just get ticking when I floor it, usually only hear it briefly at high RPM right before shifting up. I took another look at the manifold to cat pipe flanges and they look like they are flush together with no spacing so its possible they are bottomed out and not fully sealed so I think I do need those crush washers. The instructions said to just reuse the manifold and egr gaskets and just install the supplied crush washers, no mention of reusing the old gaskets or replace them, my old ones were black toast and crumbly.

IAQ6O2x.jpg
 
FWIW: I remember them being a lot cheaper from the dealer. I know dealers vary a lot, but I thought I'd toss that out there.

Thanks Jeff, and you're right - I've seen them for less than $1 each from a dealer or mail order. But when I added in shipping, it was inevitably no less than $16 for four. And in these Covid times, I didn't feel like schlepping into a dealership just to save a few bucks. I did find an Ebay source that had them for $12 delivered, so I grabbed those :) - GENUINE Automatic Shift Linkage Bushing Set of 4 x 9038511003 OEM | eBay.
 
Thanks Jeff, and you're right - I've seen them for less than $1 each from a dealer or mail order. But when I added in shipping, it was inevitably no less than $16 for four. And in these Covid times, I didn't feel like schlepping into a dealership just to save a few bucks. I did find an Ebay source that had them for $12 delivered, so I grabbed those :) - GENUINE Automatic Shift Linkage Bushing Set of 4 x 9038511003 OEM | eBay.

One thing I have noticed Leon is that my transfer case stick vibrates more now than before I replaced the shifter bushings. Curious if you see the same thing. Or maybe it always did such and didn’t notice:sadwave:
 
One thing I have noticed Leon is that my transfer case stick vibrates more now than before I replaced the shifter bushings. Curious if you see the same thing. Or maybe it always did such and didn’t notice:sadwave:

I'll let you know! I just watched Timmy's video on this, and now I'm pondering if I should go whole hog like he did, and replace gaskets and transfer case shifter oil deflector and seat? Can we say can of worms?
 
I'll let you know! I just watched Timmy's video on this, and now I'm pondering if I should go whole hog like he did, and replace gaskets and transfer case shifter oil deflector and seat? Can we say can of worms?

In looking back I should have done it. Maybe next time I will replace such when I have to take off that fragile bezel again.:thumb:
 
In looking back I should have done it. Maybe next time I will replace such when I have to take off that fragile bezel again.:thumb:

I went whole hog and replaced them all last week including the shifter seat and oil deflector. It seemed well worth the effort while in there, and for the peace of mind it was. Not to mention I found that the shifter seat was completely disintegrated once I dug deeper.
 
RockAuto order showed up today. Got new steering rack and mounting hardware, outer tie rods, lower ball joints, new upper and lower control arm bushings, and front hubs. Still waiting for sway bar bushings and links. These are a few items I decided to replace as I do the 4wd conversion.
3r8oHdp.jpg

tXGcorZ.jpg

otdgUiM.jpg

If Imgur links from my phone don’t work I’ll try and edit them from my computer.
 
Last edited:
Picked up some 3/16" plate steel for the gas tank diy skid for the f150 swap, paranoidfabrication switch panel showed up today, and the correct rear brake line showed up, this weekend is going to be busy lol. Good times.
 
I'll let you know! I just watched Timmy's video on this, and now I'm pondering if I should go whole hog like he did, and replace gaskets and transfer case shifter oil deflector and seat? Can we say can of worms?


yep...debating if I should do mine later this summer as I have to take the bezel off....but like you said....can of worms
 
New OEM air filter and added a pre-foam filter from UNI. Much thanks to Jziggy for the idea. Cut it down to the size of the air filter, and sprayed it liberally in the filter oil. In the pic, the foam looks spaced on one end, but with the air filter lid down, the foam sits flush against the filter. Will check it in a few months to see how well it is working.


foLawgZ.jpg


Xyfp8GW.jpg
 
New OEM air filter and added a pre-foam filter from UNI. Much thanks to Jziggy for the idea. Cut it down to the size of the air filter, and sprayed it liberally in the filter oil. In the pic, the foam looks spaced on one end, but with the air filter lid down, the foam sits flush against the filter. Will check it in a few months to see how well it is working.


foLawgZ.jpg


Xyfp8GW.jpg


Good idea. So no extra crap can get through. Might look into that idea. Thanks


Sent from my iPhone using Tapatalk
 
New OEM air filter and added a pre-foam filter from UNI. Much thanks to Jziggy for the idea. Cut it down to the size of the air filter, and sprayed it liberally in the filter oil. In the pic, the foam looks spaced on one end, but with the air filter lid down, the foam sits flush against the filter. Will check it in a few months to see how well it is working.

It works well. If you keep the oil on the side of the unifoam away from the air filter it’ll stay there and your air filter doesn’t end up oily. I used Belray oil and it stays stuck where you spray it.

Great idea JZiggy came up with.
 
It works well. If you keep the oil on the side of the unifoam away from the air filter it’ll stay there and your air filter doesn’t end up oily. I used Belray oil and it stays stuck where you spray it.

Great idea JZiggy came up with.


I’ll look into the belray spray as well


Sent from my iPhone using Tapatalk
 
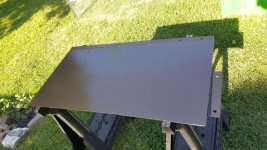
Fabbed up the f150 tank skid plate. Was fun building it, lots of cutting and welding. Ran out of gas and had to switch to flux core lol. Tomorrow it goes in, watching paint dry is boring. Rear stainless brake line goes in too. Phew, beverage time.
 

Attachments

  • 20200627_173248_compress29.jpg
    20200627_173248_compress29.jpg
    140.3 KB · Views: 462
Status
Not open for further replies.

Members online

Forum statistics

Threads
278,316
Messages
3,554,120
Members
248,016
Latest member
Advally Service

Trending content

Back
Top