What Did You Do To Your 3rd Gen Today?

Status
Not open for further replies.
New OME 2891 coils and some other stuff

The list is long, and distinguished like my.....old line that never gets old. Put my new OME Heavy Duty (2891) coils on after riding on salvaged landcruiser coils for six months. So Nice!! Also went back to the wrecking yard where I bought my 2002 rear hatch that fits and looks nice on my 1996 Limited...whoops. Should have checked the forum. ECUs and wiring are all different. Anyone have a .pdf of the 1996 rear window wiring? I found one for the '02....

I could post something almost everyday on this thread.

-Justin
 
I'm a little deep in it now to document all the things but I'll share my notes when I'm done. I've mostly followed along with Timmy's videos (THANKS TIMMY!!) and lots of skipping around to the parts I need.

And now that I have enough posts, I'll likely start a build thread of my own. :)

Definitely do the build thread! Aside from and engine replacement, tranny swap or dif swaps, you've probably embarked on one of the PTA jobs on the 4R. Front steering issues are probably one of the biggest "things" with the 3rd gen. I think these front ends are not as "sturdy" as they should have been. In the end, they require a little more attention...
 
Just put a deposit down to have my front two seats rebuilt by an upholstery shop.

Hes gonna solder some damage to the driver seat frame, refoam, and stitch us 2 new custom covers to replace the old worn out stock ones using long life fabric.

$850 total.
 
Did these all within this week so hopefully this still counts, but the new headlight bulbs are going in tomorrow too! All were done on my 2002 4wd and the courtesy lights were done on my moms 2003 2wd. [emoji173][emoji1690]
1945df82f1033eedeff5db3d4327dd27.jpg


Sent from my SM-G981V using Tapatalk
 
Today, my 16 year old Son & I flushed Roscoe's power steering and cleaned the reservoir screen. I do all my own Auto work and get wrenches in my Sons' hands every chance I can. KUDOS to Timmy The Tool Man for making a great video! I've read a lot of good comments. I learned a few things before we started the job. THANKS!!!
 
I evicted the bushings from the LCA's. I figure more people will see it here than in my build thread. :nod:

This was with no heat and no soaking for days. It's a lifeline PNW truck so minimal rust or corrosion. I did drill through each sleeve before I started using the existing hole in the control arms. Both base side bushings popped first and could be finished by hand.

<iframe width="560" height="315" src="https://www.youtube.com/embed/yFPrf0uM1ZE" frameborder="0" allowfullscreen></iframe>


.
 
Thursday I mostly installed my rear shocks, which have been sitting for ~3 months uninstalled. But I used a wrong washer between the upper mount and bushing and realized that only when I had a spare of the right one... So this morning took it apart and redid it. I can do a left rear shock now in 30 minutes from in the air to on the ground.

Also ordered LEDs for dash. Left gauge light burnt out. Considered going green or blue but ultimately went white for nearly all. Got 1 blue to try to have the ignition surround blue.
Also ordered LED interior kit 4Runner - Interior kit (3rd Gen.) - PFran LEDs

Also trying to order the right washers for stock front suspension so I can do that next week maybe.
 
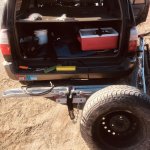
Nothing exiting, but after a bike ride this afternoon I did the rear breather extension mod in the side of the road where the other MTB riders park their brodozers. To make more room I dropped the spare. This entailed confirming that my rig came with all the original jack and gear under the seat and it turned out to have an old, worn, Made in the USA Dunlop spare. Embarrassed to say that I've now owned this 4Runner for almost a year and never dropped the spare. I used the same union and breather that Timmy did in his video but I left the breather end of the 5/16" fuel hose tucked under the protective cover over the filler in the wheel well rather than poking it through the rubber collar at the cap. With my luck I would have found a way to foul it with gasoline. I am doing at least 1 upgrade, update, refresh, or at least cleaning of some area of mine every weekend.
 

Attachments

  • spare.jpg
    spare.jpg
    133.2 KB · Views: 347
Drove a couple hundred miles over Saturday and Sunday and found the time to do some light off-roading on Sunday. Location was downstream from Keystone Dam in Sand Springs, Oklahoma.

<blockquote class="imgur-embed-pub" lang="en" data-id="ugMLzN2"><a href="https://imgur.com/ugMLzN2">View post on imgur.com</a></blockquote><script async src="//s.imgur.com/min/embed.js" charset="utf-8"></script>

<blockquote class="imgur-embed-pub" lang="en" data-id="PWsSHUx"><a href="https://imgur.com/PWsSHUx">View post on imgur.com</a></blockquote><script async src="//s.imgur.com/min/embed.js" charset="utf-8"></script>
 
Last edited:
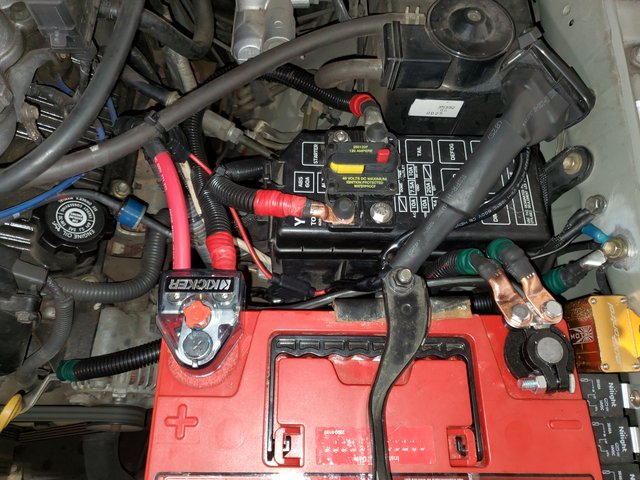
Did the "Big 3" yesterday and, of course, it wasn't easy.

20201206-220522-1.jpg


The wiring itself wasn't the problem, it was all of the local parts stores that seem to have been cleaned out of 4 AWG wire and lugs (and most 2 AWG stuff). I had to go to 2 AWG and it was too big to work around the narrow battery area. I wanted to keep the lines as short as possible, which when combined with the Kicker terminals turned out to be a nightmare scenario. FYI: not sure if I got a dud, but the negative clamp (which is the same as the positive but with a shim) would not hold onto the post. Half of my time at the shop was spent fighting it and then required me to make a run to get a normal terminal (and more lugs) to get me back home!

Needless to say, I'll be putting in a order for 4 AWG stuff on Amazon today, including new terminals, because I want this to be cleaner than what I ended up with last night.

Not sure if this is any gauge, but my OBDII bluetooth scanner picked up a consistent 13.1-13.2v (measured at the connection) the whole trip home. It usually is bouncing between 12.3-13.0v, so I'm pretty sure I did something right, lol.
 
LED dash update and new head unit

I did a couple of things over the past week. I set out to change all the green in the instrument cluster and dash to amber. I got amber LED bulbs using the guide found on the forum here. I got them from superbrightleds. The bulbs fit fine, but tbh... I'm disappointed with the results. The instrument cluster is certainly not brighter than what it was before with the stock bulbs - which is very surprising considering that I got LEDs, and moreover there are hot spots. The bulbs on the dash have been burnt since I got them - so it's nice to have some light in them, but you can see hot spots there too. It's such a shame, because I was really looking forward to better lighting in my dark dash.

In better news, I replaced the stock stereo with a Sony XAV-AX1000. No complaints there at all. I had looked into several models and I'm glad I got the Sony. It's very simple and does basic things fairly well and a huge improvement over stock. I also got a good deal on eBay, so that was a win too!
 
Just installed Depo clear corners and front signal lights. The clears look pretty good on Desert dune. Can't wait until I find a parts car on Craigslist and I can grab a replace front bumper valance since mine has gorilla tape on it from the previous owner.

<a href="https://ibb.co/CQJ2mTY"><img src="https://i.ibb.co/tDZXQWv/20201207-122114.jpg" alt="20201207-122114" border="0"></a>

<a href="https://ibb.co/QjFt3cS"><img src="https://i.ibb.co/5xWwg9p/20201207-122122.jpg" alt="20201207-122122" border="0"></a>

<a href="https://ibb.co/XzfrYHS"><img src="https://i.ibb.co/fCVzDJ4/20201207-122129.jpg" alt="20201207-122129" border="0"></a>
 
Last edited:
Differential drop kit

I'm a bit disappointed by Revtek as their Amazon listing showed that this was an aluminum spacer but I received a rubber spacer instead. I've complained about this and it's too much of a hassle to go through a replacement at the time but I'll eventually find a place that was aluminum spacers that work.

Differential drop kit:
<a href="https://ibb.co/2NBQwsP"><img src="https://i.ibb.co/M6L4bGp/20201205-091704.jpg" alt="20201205-091704" border="0"></a>

Removing the OEM bushing bolts: The kit from Revtek did NOT come with new washers. It stated to use the OEM washers but those are stuck on the original bolt and bolt thread prevent them from being removed. - No way am I going to wreck the OEM bolt since I'll hold onto those for the future.
<a href="https://ibb.co/42wBZzr"><img src="https://i.ibb.co/68c6RzC/20201205-101353.jpg" alt="20201205-101353" border="0"></a>

I visited a local hardware store and found washers that fit over the new bolt.
<a href="https://ibb.co/Ns75yvT"><img src="https://i.ibb.co/hyCbm6Y/20201205-104419.jpg" alt="20201205-104419" border="0"></a>

The new washers cover much more width. It turns out to be a problem later as I noticed the washers surface was stripping from the nut due to it being wider than the nut surface. It worked for the moment but shame on you Revtek for asking people to re-use washers that are not meant to be removed from the OEM bolt:
<a href="https://ibb.co/BK1gwZM"><img src="https://i.ibb.co/1JS9bqW/20201205-104454.jpg" alt="20201205-104454" border="0"></a>

I had to stack two washers together to match the OEM height.
<a href="https://ibb.co/hBLr88w"><img src="https://i.ibb.co/LxYBppH/20201205-104439.jpg" alt="20201205-104439" border="0"></a>

Installed one side, loosely bolted before starting on the other side. The differential is being supported by a floor jack.
<a href="https://ibb.co/jgnNHqk"><img src="https://i.ibb.co/4PhqJCR/20201205-105011.jpg" alt="20201205-105011" border="0"></a>

The differential drop it is now fully installed.
<a href="https://ibb.co/3fxgCxQ"><img src="https://i.ibb.co/yhzHQz7/20201205-112503.jpg" alt="20201205-112503" border="0"></a>

The CV axles are now sitting a better angle: :becky::becky::becky:
<a href="https://ibb.co/vJ306DZ"><img src="https://i.ibb.co/qRNT3xk/20201205-112456.jpg" alt="20201205-112456" border="0"></a>

Just two weeks after the install, I had to remove the spacers while I was replacing the rack and pinion bushings and I noticed how deformed the bushings already are. These are definitely NOT going to hold up like aluminum spacers which Revtek falsely advertised on their Amazon listing. I would not recommend them unless you can be for certain that you'll receive aluminum spacers.
<a href="https://ibb.co/Fxy92TH"><img src="https://i.ibb.co/PmPRKHD/20201210-152439.jpg" alt="20201210-152439" border="0"></a>
 
Last edited:
I was going to put the steering rack back in... then remembered the control arms gotta go in first. Dammit! So I went through and cleaned up a bit then marked all the eccentrics with a better paint pen so I can get it close when it all goes back together. I also got the UCA bolts back in and the relays and clips I had to move. That's a "fun" design.

Need to pick up the ball joint tools again so I can press the bushings in. Should get that done and those in tonight and then maybe the steering rack. It's nice when things start going back together. Kinda wish I hadn't drug my feet for so long, lol. I'd rather be driving this in the rain than the Mustang.

Also ordered LED's for the dash. I have so many burnt out lights. And my brights indicator comes on when I'm in reverse so I'm hoping that fixes itself throughout the process.

I'll document how things go a little better in my build thread.
 
Status
Not open for further replies.

Members online

No members online now.

Forum statistics

Threads
278,316
Messages
3,554,120
Members
248,016
Latest member
Advally Service

Trending content

Back
Top