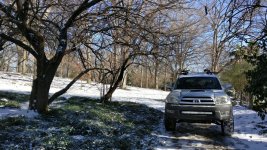
What did you do with your 4runner today?

dont know if i posted it but i got a set of amber covers and a strip of leds from my brother for Christmas. just have to wire up some under hood lights now

20161225_211115_zpstwvvrgbp.jpg~original


20161225_211052_zpsqrnreu04.jpg~original

Ohh nice
 
A little bit late on this update, but..

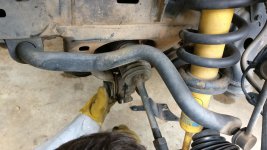
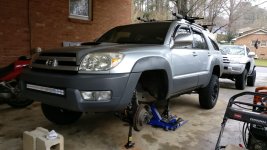
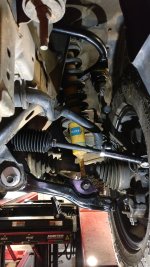
With the help of [MENTION=104973]BusinessHippieRH[/MENTION] (okay he definitely did all the hard stuff... well pretty much everything actually.. but I at least learned a lot! haha) I now have new upper and lower control arms, inner and outer tie rods, and sway bar links. This was a much longer process than we thought it would be. Took a few days with waiting on parts (had to cut out the old arms due to the typical seized cam bolts, and order new Toyota cam bolts)

Parts installed:
SPC UCA's - $480
Ebay Front end kit, $217. link: GX470,4Runner,FJ Cruiser,Control Arms Sway Bar Links,Tie Rods $5 YEARS WARRANTY$ | eBay
OEM cam bolts - ~$200
Sawzall + many blades... ~$100
Alignment from nearby shop - $150
Torque wrench and pickle fork - rented from Autozone

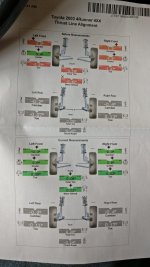
Truck rides great now, alignment specs attached. Got it back together just in time to drive it in its first snow storm. Lots of drifting was done! I also coated the underside in Fluid Film to try to prevent more rusting with this salt.

I am hoping that the cheap parts last well... $800 for OEM Toyota lower control arms (NOT including cam bolts, sway bar links, tie rods, etc) was just not a possibility. Tie rods are my biggest worry.

Same kit [MENTION=101553]t-man[/MENTION] has, so hoping for the best since I think his truck sees more abuse than mine at the moment haha
 

Attachments

  • IMG_20161231_140229.jpg
    IMG_20161231_140229.jpg
    136 KB · Views: 240
  • IMG_20170102_150558.jpg
    IMG_20170102_150558.jpg
    139.3 KB · Views: 258
  • IMG_20170105_102026.jpg
    IMG_20170105_102026.jpg
    142.6 KB · Views: 302
  • IMG_20170105_120712.jpg
    IMG_20170105_120712.jpg
    134.2 KB · Views: 258
  • IMG_20170108_140040.jpg
    IMG_20170108_140040.jpg
    142.7 KB · Views: 235
So some "cool" things are happening... picked up a cheap ebay snorkel for an LC 80. I started by trimming the template and then mocking up the location.


Lol...looked at that 1st pic and said ..WTF kind of front bumper is that???

Good deal brother..nice looking 4th Gen...wish I would have kept mine and went crazy on it!
 
Haha- I did the same thing.

Sent from the Far Side

Don't see many SD dudes on 5th gen threads so i'm expanded..rock on! lived in Rapid for a few years and loved that area...actually went thru last summer a 4k trip and got nailed in Sage Creek in the Badlands...Hurricane force winds, hail, rain, thru me to the ground in the annex under my RTT....I thought my whole rig was moving and come to find out we are on the tail end of a tornado...
Good Times!
 
Holy crap! Did you get a happy ending with that?

Sent from the Far Side

Charged me an hour of labor on top of typical $70 alignment fee since everything was terribly out of whack with the new parts and the adjustable upper ball joints. Took him over two hours to do everything. (I stood and talked with him the whole time since the mechanic was cool.) Seems to be the going rate when aftermarket parts are involved.
 
Started on the 4x4Labs rear bumper. Got it all tacked up.

IMAG0507.jpg~original


Been taking a few pictures along the way, will try and get them into the build thread once I'm done. Figure I can try to help by adding another reference on the forums to add to the couple already on here (which have been a huge help so far).
 
New grille

The chrome on my stock Sport Edition was rippling and peeling so I decided to try something new. I got my mitts on a grill from a limited, busted out the Plasti-Dip and . . .

On3HJr.jpg


Not sure why the picture is at an angle, but y'all get the idea. :D

Pretty stoked with how it turned out. Matches the black wheels well too.
 
Replaced 4 tire sensors. The blinking TPMS light on my dash finally got to me.


Sent from my iPhone using Tapatalk
Ouch. You know there is a five minute, fifty cent fix to kill that light so you never have to see it again. That means you actually have to check your tire pressure like a big boy though.

Sent from the Far Side
 
Ran all new wiring to all of my auxiliary lights, cleaned a lot of it up too with terminal connectors from Blue Sea Systems. Highly recommend them. I mean honestly what I used could be easily made from home Depot, but at the time I wasn't thinking of it.

I used one of their terminals for the (-) side and disassembled the other for the (+) since I had no where to cleanly mount it. Got all the wire harnesses bundled up in 1 spot, and hid most of the wiring. Very satisfied now. (It's a lot cleaner I promise)
6c134277801c8b5ae3de275da55cf40e.jpg


Added ditch brackets from CBI to mount my new pods, and created my own little system of keeping everything clean
08320a4283c79841fbd59b291c53015b.jpg
71b8a2d029f5446d6da9ae1aed170d44.jpg


Installed new brackets to the light bar, which was by far the hardest part because the screws come down right near the pinch welds so getting a nut on was near IMPOSSIBLE. I ended up drilling a 1/2" hole to tighten one of them because I was getting way too irritated.

Cleaned her up and started playing with the new lights [emoji16]
5b20e847806174ca7a18398e42645ae0.jpg
https://vimeo.com/199761630

Should I drive like this? LOL. Overall all a pretty solid weekend considering I did all of the work myself.
 
Ouch. You know there is a five minute, fifty cent fix to kill that light so you never have to see it again. That means you actually have to check your tire pressure like a big boy though.

Sent from the Far Side
Bwahahahaha!

Sent from the drivers seat of my 05 4runner.
 
PSA to all to clean your front brake hardware/calipers and check LCA torque after alignments!

Spent the evening checking suspension torques after hearing a pop that I could recreate only with hitting the curb into my driveway then backing up and hitting the brakes hard, pop pop back and forth. I found the LCA bolts were about a full turn away from 135nm factory spec. Tightening them up fixed the issue. OEM hardware and 15-20k miles mevotech supreme complete arms. Bushings and ball joints still look good, bolts were loose from recent alignment.

Then I pulled my brake pads to clean hardware off, the pads barely slid out with how much crap there was caked in there! Salt and cinders from NY trips and mud left over from the summer. 2 year old 30k mile OEM Toyota calipers and NO stuck pistons! Cleaned and lubed up and brakes like new, hopefully that gets me some mpg back?!?

I also rotated tires, tweaked toe (steering wheel off slightly from alignment due to play in the wheel, bothers the OCD), and started spraying PB blaster on my headers studs, AIP studs, and y pipe connection bolts to aide in getting those off when I'm ready to put the Doug Thorleys on.
 
2218567eb38feb16338d79708468768a.jpg

Installed my new box this past weekend


Sent from my iPhone using Tapatalk

Did you make that yourself? I've been wanting to make a cargo drawer system that rests over the wheel wells like that to maximize sleeping space on top with a fold out sleeping platform that lays over the folded back seats.
 
Ran all new wiring to all of my auxiliary lights, cleaned a lot of it up too with terminal connectors from Blue Sea Systems. Highly recommend them. I mean honestly what I used could be easily made from home Depot, but at the time I wasn't thinking of it.

I used one of their terminals for the (-) side and disassembled the other for the (+) since I had no where to cleanly mount it. Got all the wire harnesses bundled up in 1 spot, and hid most of the wiring. Very satisfied now. (It's a lot cleaner I promise)
6c134277801c8b5ae3de275da55cf40e.jpg

Curious where you got the positive terminal piece from?
 

Members online

Forum statistics

Threads
278,316
Messages
3,554,120
Members
248,016
Latest member
Advally Service

Trending content

Back
Top