What did you do with your 4runner today?

Replaced blown oem sub with aftermarket sub:

- Ordered me a new sub from crutchfield for $210 (pandemic pricing) that fits right into the oem enclosure.
- No cutting was required to the enclosure.
- Modification required: drill new holes for new sub (or use self drilling screws) & splicing wires (super easy).

Used the following two videos for instructions:
-First video is great for overall instructions to get to the sub.
-Second video is good for wiring part.

2003 - 2009 Toyota 4Runner OEM Subwoofer Install / Replacement - YouTube

4th Gen Toyota 4Runner JBL subwoofer replacement- the easy way. - YouTube

I need to replace my sub too. I see for that Rockford sub it says "Dual Voice Coils: This woofer features dual 2-ohm voice coils for wiring flexibility. When the voice coils are wired in parallel, the woofer presents a 1-ohm load. When the voice coils are wired in series, the woofer presents a 4-ohm load."

How did you wire it? Did you add an amp? I have a 500W Alpine mono channel amp sitting around but I'd rather stay stock and just do an easy plug and play with the replacement sub. And did you look at any other subs? The Pioneer TS-SW2002D2 that everyone recommends has been discontinued. $210 isn't bad but may still be more sub than I need.
 
Was looking at this on Crutchfield the other night also. Curious what you think of the results/sound? Is it a pretty noticeable change?

It could be from the result of having a blown sub for two weeks, but this thing sounds great to me. For me its slightly better than the oem sub. I am not having to raise the volume as high as I used to with the oem sub. One change I may do in the near future is get a separate amp for the sub and leave the jbl one for just the speakers.

I need to replace my sub too. I see for that Rockford sub it says "Dual Voice Coils: This woofer features dual 2-ohm voice coils for wiring flexibility. When the voice coils are wired in parallel, the woofer presents a 1-ohm load. When the voice coils are wired in series, the woofer presents a 4-ohm load."

How did you wire it? Did you add an amp? I have a 500W Alpine mono channel amp sitting around but I'd rather stay stock and just do an easy plug and play with the replacement sub. And did you look at any other subs? The Pioneer TS-SW2002D2 that everyone recommends has been discontinued. $210 isn't bad but may still be more sub than I need.

Just like you, i looked for the pioneer one first. Since that was discontinued, this came up as an alternative. What sold me on it was that it didn't require me to modify the sub enclosure since this is the shallow version. I spoke with Crutchfield customer service as well and they said it was a great oem replacement. Wiring was pretty straight forward. On the second youtube video, skip to where he goes over the wiring (basically a positive and negative wire on each side of the sub). If i can wire it with my lackluster mechanical abilities, then anyone can. FYI: The sub did come with a free wiring harness from Crutchfield which made it seem like I may not have to splice wires at all, but the adapter didn't connect with our oem adapter very well so I chose to splice the wires as most others have done with aftermarket sub replacements.

As I mentioned to the other individual, one change I may do down the line is hook up a separate amp to connect to this sub and leave the stock amp for just the speakers. But for now I am quite happy with the simple oem replacement that didn't require much in terms of modification (just the minor splicing for wiring and using self drilling screws as the holes on new sub don't match with the old ones).
 
Last edited:
Just like you, i looked for the pioneer one first. Since that was discontinued, this came up as an alternative. What sold me on it was that it didn't require me to modify the sub enclosure since this is the shallow version. I spoke with Crutchfield customer service as well and they said it was a great oem replacement. Wiring was pretty straight forward. On the second youtube video, skip to where he goes over the wiring (basically a positive and negative wire on each side of the sub). If i can wire it with my lackluster mechanical abilities, then anyone can. FYI: The sub did come with a free wiring harness from Crutchfield which made it seem like I may not have to splice wires at all, but the adapter didn't connect with our oem adapter very well so I chose to splice the wires as most others have done with aftermarket sub replacements.

As I mentioned to the other individual, one change I may do down the line is hook up a separate amp to connect to this sub and leave the stock amp for just the speakers. But for now I am quite happy with the simple oem replacement that didn't require much in terms of modification (just the minor splicing for wiring and using self drilling screws as the holes on new sub don't match with the old ones).

Awesome. Thanks for your input. Just ordered it!
 
44-D4-A8-EF-03-C7-4798-8721-C387092-F6-EA1.jpg


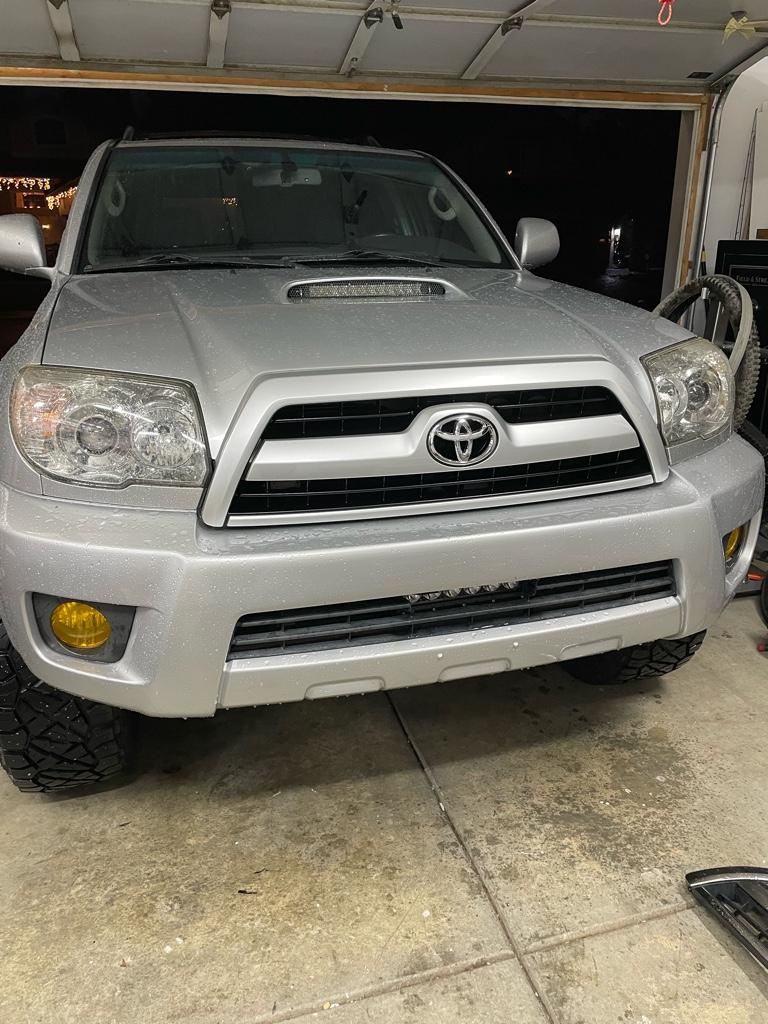
New grill Bumper, sliders and Wheels :)
 
Last edited:
That looks great!

Couple questions:
Did you go steel or aluminum on the Demello?
What sliders are those?

I went with the steel, in hindsight maybe I should have done the aluminum, but the steel was half the price, but took about 5 months or so to get completed. The sliders are from Restless Offroad, they are also local to me and were doing a black friday sale for $650 installed (welded) quality is great and the price was right.
 
I went with the steel, in hindsight maybe I should have done the aluminum, but the steel was half the price, but took about 5 months or so to get completed. The sliders are from Restless Offroad, they are also local to me and were doing a black friday sale for $650 installed (welded) quality is great and the price was right.

Did you notice a big change in the driving characteristics from the added weight? I'm debating between the steel and aluminum right now... Like you said the price jump to aluminum is pretty big.
 
Crosspiece looks right but the length & lack of u-shaped metal spacers with the bolts are a concern unless the V8 is very different underneath.

Got the crossbrace installed today--had to clearance and enlarge the bolt slot on the driver side (next to gas tank) to squeeze in the bolt. Running a bolt through that hole beforehand with some cutting fluid will definitely help with when you install with the crossbrace.

I'm just going to send the guard back to RCI and get a replacement--it seemed like it could fit okay, but not having the spacers in the hardware bag, and there was also a random nylock nut in there, makes me concerned that I don't have the right product as well.

Was the RCI replacement process painful at all?
 
Did you notice a big change in the driving characteristics from the added weight? I'm debating between the steel and aluminum right now... Like you said the price jump to aluminum is pretty big.

Not really, I also don't drive my 4runner aggressively like I do my sports car. I think it's more about the weight once I add things like more lights or a winch, that's when having that weight savings could be nice. I did have to move up to a 650lb spring up front to compensate for that bumper.
 
Got the crossbrace installed today--had to clearance and enlarge the bolt slot on the driver side (next to gas tank) to squeeze in the bolt. Running a bolt through that hole beforehand with some cutting fluid will definitely help with when you install with the crossbrace.

I'm just going to send the guard back to RCI and get a replacement--it seemed like it could fit okay, but not having the spacers in the hardware bag, and there was also a random nylock nut in there, makes me concerned that I don't have the right product as well.

Was the RCI replacement process painful at all?


Thankfully, no. Call them or email Austin at [email protected].
 
Thankfully, no. Call them or email Austin at [email protected].

Hey man, thanks for all your help so far. I looked at the picture you posted in the Armor thread and it made me try installing the skid plate again. Judging by my view compared to yours, it seems like I have the right plate:

DbIMTXT.jpg

CdKZIch.jpg

Bd2Ma5p.jpg

B7cMRVI.jpg


I just called RCI today to get the spacers and they said it should be here soon. Do the spacers go towards the front where the two bolts tie to the flattened tubes?

vhQXAJ6.jpg
 
Last edited:
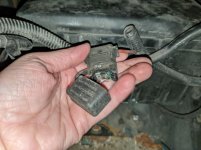
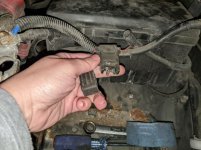
Blown Fuse- not sure what?

As its gotten colder here, I noticed my 4Runner was taking longer to start so assumed I would be replacing the battery soon. Today, the battery light came on and I eventually couldn't get it to start. I tested the battery with a multimeter and it had low voltage coming out, and without much other thought I jumped it and went to buy a new one. After a few hours driving around I started having trouble again so at that point assumed an issue with the alternator. Battery had already drained below 10V. Tried pulling the alternator to get it tested but had some bolts I couldn't get to budge. I then noticed a fuse in the middle of a cable that went from the positive terminal up to possibly the starter? I'm not sure what this is and so far haven't been successful searching for it online. Can someone please help me identify it? I'm not sure if it would be related to my issues but I assume it needs replaced either way. This is a 2007 SR5. My wife's car is having electrical issues right now as well so we are vehicle-less at the moment, fun times!
 

Attachments

  • aPXL_20211213_225439424.jpg
    aPXL_20211213_225439424.jpg
    43.8 KB · Views: 435
  • aPXL_20211213_225428555.jpg
    aPXL_20211213_225428555.jpg
    52.9 KB · Views: 428
As its gotten colder here, I noticed my 4Runner was taking longer to start so assumed I would be replacing the battery soon. Today, the battery light came on and I eventually couldn't get it to start. I tested the battery with a multimeter and it had low voltage coming out, and without much other thought I jumped it and went to buy a new one. After a few hours driving around I started having trouble again so at that point assumed an issue with the alternator. Battery had already drained below 10V. Tried pulling the alternator to get it tested but had some bolts I couldn't get to budge. I then noticed a fuse in the middle of a cable that went from the positive terminal up to possibly the starter? I'm not sure what this is and so far haven't been successful searching for it online. Can someone please help me identify it? I'm not sure if it would be related to my issues but I assume it needs replaced either way. This is a 2007 SR5. My wife's car is having electrical issues right now as well so we are vehicle-less at the moment, fun times!

That is an aftermarket item. See where it traces to.
Do you have a multimeter? Once an engine is running, voltage at the battery terminals should read ~14V to indicate a good alternator.
 
Hey man, thanks for all your help so far. I looked at the picture you posted in the Armor thread and it made me try installing the skid plate again. Judging by my view compared to yours, it seems like I have the right plate:

I just called RCI today to get the spacers and they said it should be here soon. Do the spacers go towards the front where the two bolts tie to the flattened tubes?

vhQXAJ6.jpg


You're very welcome, glad I can be of help. The spacers look like this and yes, they go at the front where the tubes attach.

D1f5elhl.jpg


You can loosen the bolts to lower the skid far enough where you can slide the spacers in from each side. They're designed to fit between the downturned edges of the flanges on the tube ends, like this, sandwiched between the tubes on the top and the skid on the bottom.

nrOVODel.jpg


And yes, looks like you have the correct skid as long as the front bolts up where the tubes connect and the 3 rear bolt holes line up with those in the crosspiece like this. I didn't realize the V8 would be such a different layout to where it takes a shorter t-case skid.

B6LxDN2l.jpg
 
That is an aftermarket item. See where it traces to.
Do you have a multimeter? Once an engine is running, voltage at the battery terminals should read ~14V to indicate a good alternator.


Thank you - I came to that realization a little bit ago also (aftermarket) after seeing where the wire goes into the cabin. Not sure what it would have been for though, nothing about the vehicle seems aftermarket. I charged battery up to 12.6V, turned the engine on and that dropped down to 12.0V. Will work more on getting the alternator out tomorrow.
 
You're very welcome, glad I can be of help. The spacers look like this and yes, they go at the front where the tubes attach.

https://i.imgur.com/D1f5elhl.jpg[/img


You can loosen the bolts to lower the skid far enough where you can slide the spacers in from each side. They're designed to fit between the downturned edges of the flanges on the tube ends, like this, sandwiched between the tubes on the top and the skid on the bottom.

[img]https://i.imgur.com/nrOVODel.jpg[/img


And yes, looks like you have the correct skid as long as the front bolts up where the tubes connect and the 3 rear bolt holes line up with those in the crosspiece like this. I didn't realize the V8 would be such a different layout to where it takes a shorter t-case skid.

[img]https://i.imgur.com/B6LxDN2l.jpg[/img[/QUOTE]

Great pictures! Thanks again.

[QUOTE="shmitty15, post: 3695334, member: 688783"]Thank you - I came to that realization a little bit ago also (aftermarket) after seeing where the wire goes into the cabin. Not sure what it would have been for though, nothing about the vehicle seems aftermarket. I charged battery up to 12.6V, turned the engine on and that dropped down to 12.0V. Will work more on getting the alternator out tomorrow.[/QUOTE]

Sounds like an alternator. You can typically rebuild with just a brush kit but that's up to you.

[url=https://forum.ih8mud.com/threads/i-replaced-the-alternator-brush-kit-before-it-wears-out.1076823/]I replaced the alternator brush kit before it wears out | IH8MUD Forum[/url]
 
While using a no-spill funnel to burp my coolant, I went under the back and inspected the rear calipers. For the past month, I've experienced a softer pedal and noticed the fluid dropping just barely each week. Sure enough, there was a slow leak right around the washer and caliper. I cleaned it and gave it a little extra with the wrench.

As for the coolant, the level rose up about 3 inches after initial start up until normal temp. Is that normal? It burped a little here and there, but it never went down. Everything was fine until a month ago when I started getting a running water sound every so often. Now that the engine has cooled, the level in the reservoir is just about down to starting level.
 
I've been slowly dumping some money in my 2003 SR5 the last few months. First I replaced the suspension, then the rear brakes and an oil change. Started getting written estimates for the timing belt as I was under the assumption the 4.7L V8 had a chain, not a belt (that's what I get for not reading into the subject in detail when I bought it in 2015), so instead of replacing it at 180k, I'm now at 245k and it hasn't been done since the initial replacement @ 90k. Oops. :embarassed:

Thus, I set out to dump a few grand into it to keep it running, even though my wife just went and picked up a 2020 RAV4 on Sunday... I was jealous enough the rest of the day of the new car smell, that I almost went back and bought a 2021 Tacoma they had on the lot for myself.

Last week:

- Picked up a set of 2022 Tacoma wheels & Goodyear Wrangler Territory A/T Kevlar tires (full set + spare matching tire on full-size steel wheel) for $800

- Estimates for timing belt and coolant replacement

- Replaced rear tail lights (one was burnt out)

This week:

- Scheduled my timing belt, water pump, thermostat, crankshaft seal, serpentine belt, coolant drain & refill, tire install, & 4-wheel drive alignment for $1160, next Monday

- Calling them tomorrow to get a price to add in the installation of a Rough Country 2" leveling kit while the aforementioned repairs are being done, since I just ordered it tonight (says it should be delivered this Friday)

- Ordered Chemical Guys carpet/upholstery cleaning kit to take care of some stains inside the truck

- Cali Raised LED switches for the new LED lights I'm expecting for Christmas (or will be ordering the next day, if nobody in the family got the bar I had on my list)

- Contacting the mobile window tint guy my buddy used to do his patrol car and truck, should be about $60-80 to have him match my windshield (AS1) and front windows to my rear windows and hatch slider

- Ordered LED interior bulb replacement kit because all of my interior lights are pretty dim and a few don't work

- Install console organizers

- Order a small amount of recovery gear (I normally go in the evenings and have never had anything with me; thankfully, the only time I've gotten stuck in this thing was in the daytime, so I was able to call a friend and get pulled out)

- Plan out whether I want to add a roof rack, rock sliders, and rear-facing LED cubes to assist in backing up at night (even with the rear window down, it's hard for me to see)

- Again, if Christmas doesn't have it show up, the bull bar will get ordered and installed in the next few weeks as well

- Once the repair work is finished, I plan on having the exterior detailed (including the engine bay), replacing the gas struts on the hood.


Buddy and I are planning on camping in mid-January somewhere in the woods in North Florida, so I'd like to be finished with all this by then

 

Members online

Forum statistics

Threads
278,316
Messages
3,554,110
Members
248,016
Latest member
Advally Service

Trending content

Back
Top