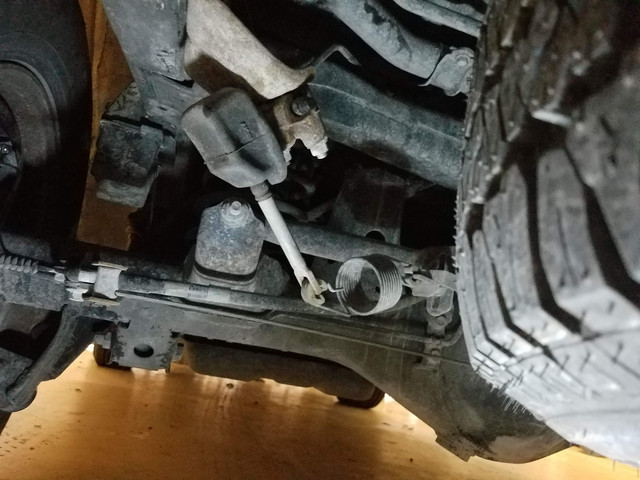
What is this thing? [SOLVED - Load Sensing Proportioning Valve]

I have only owned limited models 96 & 01 both ABS, have looked at all in the yards never seen this on a Runner.
Must be on the cheapest optioned Runners you could buy.

[MENTION=73949]quatin[/MENTION], just curious what frame code do you have?

Not sure what a frame code is, but can confirm this is the cheapest model you can buy (4cyl & 15'' rims) and was discontinued in 2000.
 
ty004runn_br-034a_svg

Adjust the fluid pressure by changing the A or B length.
1. Low pressure - Lengthen A, B
2. High pressure- Shorten A, B

HINT: Fluid pressure change for one turn of the lock nut is 100 kPa (1.0 kgf/cm2, 14 psi) and fluid pressure change for 1 mm (0.04 inch) sliding of the adjust bolt within the long hole position is 40 kPa (0.4 kgf/cm2, 6 psi).

ty004runn_br-036c_svg


Initial set length (Unladen): 222.5 mm (8.760 inch)

I can't see the pictures. I'm searching all over the net for how to adjust this thing, so it would be really helpful if you can reupload it.
 
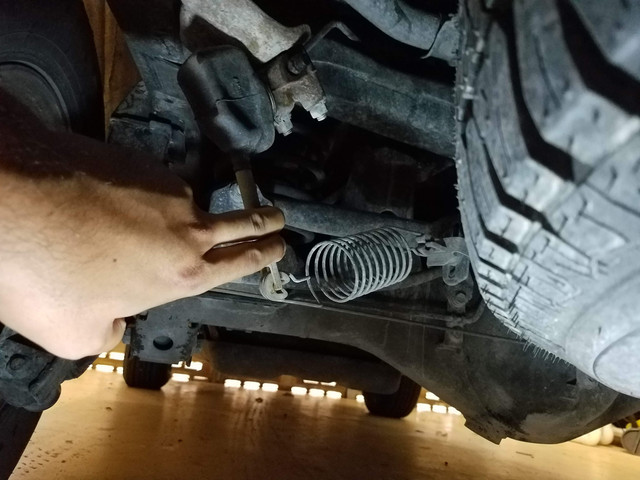
Is my valve just broken? I feel like the default state should be with the spring fully loaded and the arm down. My default state is with the spring fully relaxed and the arm up. When I pull down on the bumper (adding a load), it seems like the arm wants to go up, which can only work if the default state of the arm is down.

Default state (unladen) with spring fully relaxed and just hanging loosely. Arm all the way up.

20190407-125220-1.jpg


What I think should be the unladen state, with the arm all the way down and the spring fully loaded.
20190407-125227.jpg
 

Attachments

  • DefaultState.jpg
    DefaultState.jpg
    130.2 KB · Views: 3,842
  • WhatShouldBeDefault.jpg
    WhatShouldBeDefault.jpg
    124.7 KB · Views: 3,640
Last edited:
Thanks. What is the unladen distance you quoted earlier? I couldn't find that in the manual you posted.

That wasn't me. And I have never seen one of these; except I was looking for one on mine many years ago because of the manual. I have ABS, so I never found it.
 
This is a long saga spanning several years. It started with a "catch" in the brake pedal, as in you depress the pedal, it would get hard halfway down as if catching something. Then if I press the pedal harder, it would give and I get full brakes again. During the catch period, I would get partial brakes. Once it gives, i can hear a "clank" noise coming from the rear of the car. Everytime I use the parking brake lever, it would catch in the first 2-3 brake pedal uses. I have also had it happen randomly when driving.

My mechanic couldn't figure it out so I went brute force approach with replacing things. Here's where I'm at so far:

Things I've replaced in order:
- brake booster hose and valve. No effect
- Mechanic replaced the brake booster. No effect.
- front calipers & rotors, flushed brake fluid (brake fluid was dark). Problem improved, with less force required to get pass the catch.
- wheel cylinders in the drum, no effect
- master cylinder, no effect
- drum shoes, shoe adjuster, parking brake cable (the 8'' one inside the drum) Problem improved, now only catching lightly with parking brake lever up and me pumping the brake pedal in park.

From what I've read, this sounds like a "tripped valve" in the proportioning valve. It can be the valve being faulty itself or something tripping the valve. However, I'm not sure what else is left for me to replace.

Things I haven't replaced (let me know if there's anything I've missed)
- Brake hoses. (inspected and doesn't look cracked or leaky)
- LSPV (Just discovered it recently, bled it, problem persists)
- Drum springs & clips (autozone parts didn't fit so I reused the originals, looked fine)
- Drums (looked fine)

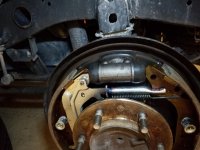
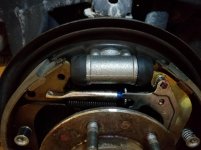
The parking brake and the hydraulic braking system are completely separate systems all the way up to the point of the actual brake shoe engagement inside the drums. So the fact that you say that parking brake use effects the situation leads me to believe that the brake shoes inside the drum are not installed correctly. There's lots of adjusters and springs and small parts that have to be in the correct place to function properly. I'd be willing to make a heavy bet that's where your problems lie. I'd start by removing your drums and comparing what your setup looks like to a known correct setup photo.

Post a photo of each side with the brake drum off and we should quickly be able to tell you if something is way off.
 
Last edited:
There is a special procedure to adjust the ebrake bell cranks which effect the brake shoe adjustment.


Sent from my iPhone using Tapatalk
 
The parking brake and the hydraulic braking system are completely separate systems all the way up to the point of the actual brake shoe engagement inside the drums. So the fact that you say that parking brake use effects the situation leads me to believe that the brake shoes inside the drum are not installed correctly. There's lots of adjusters and springs and small parts that have to be in the correct place to function properly. I'd be willing to make a heavy bet that's where your problems lie. I'd start by removing your drums and comparing what your setup looks like to a known correct setup photo.

Post a photo of each side with the brake drum off and we should quickly be able to tell you if something is way off.

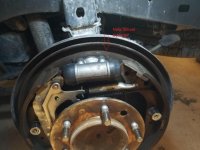
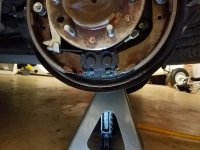
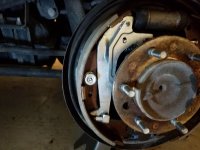
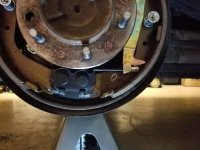
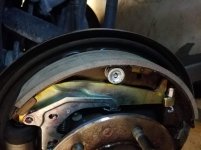
It might take me a bit to get the car jacked up to take pictures, but meanwhile I have pictures of the drivers side drum before I started disassembly. At this point, it is all original parts, except for the wheel cylinder. (had the problem before replacing wheel cylinder too) To replace the wheel cylinder, I popped off the c-clip for the adjuster arm and pulled it off the pin (but didn't remove the spring) to make it easier to turn the adjuster to max so I could slide the cylinder off. I adjusted the shoes after installation.

Some things to note. This problem isn't exclusive to the e-brake, it's just easily reproducible using the e-brake. The old shoes had plenty of meat left, but had more wear on the bottom where all the dust gathered forming a 2''x2'' sticky patch on the shoe facing the rear. Maybe the 1 shoe was getting stuck? I also never adjusted the e-brake as the shoes wore, so it would take 10-11 clicks on the e-brake handleto set. After the new shoes, it takes 5-6 clicks.
 

Attachments

  • drum1.jpg
    drum1.jpg
    127.5 KB · Views: 3,182
  • drum2.jpg
    drum2.jpg
    122.6 KB · Views: 2,944
  • drum3.jpg
    drum3.jpg
    122.8 KB · Views: 3,100
  • drum4.jpg
    drum4.jpg
    122.8 KB · Views: 2,906
Last edited:
There is a special procedure to adjust the ebrake bell cranks which effect the brake shoe adjustment.


Sent from my iPhone using Tapatalk

Do you happen to know where to find that info? I've been googling all around and can't find the specific procedure. There's a nut inside the parking brake lever, plus there's a bell crank on the outside of each drum.
 
The parking brake and the hydraulic braking system are completely separate systems all the way up to the point of the actual brake shoe engagement inside the drums. So the fact that you say that parking brake use effects the situation leads me to believe that the brake shoes inside the drum are not installed correctly. There's lots of adjusters and springs and small parts that have to be in the correct place to function properly. I'd be willing to make a heavy bet that's where your problems lie. I'd start by removing your drums and comparing what your setup looks like to a known correct setup photo.

Post a photo of each side with the brake drum off and we should quickly be able to tell you if something is way off.

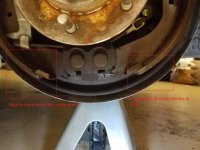
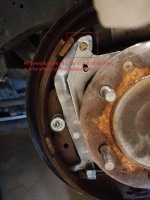
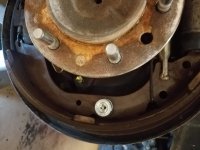
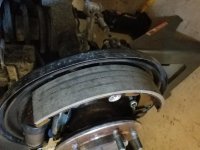
Adjusted the bellcranks tonight so I took some pictures. I didn't see anything out of place, but could use another set of eyes. I also notice my new shoes has some funny wear marks after 30 miles of driving already. I can now feel some light grooves in the drum that I'm not sure were there before. Guess I have to go get new drums or have them turned.
 

Attachments

  • DriverDrum1.jpg
    DriverDrum1.jpg
    130.6 KB · Views: 3,052
  • DriverDrum2.jpg
    DriverDrum2.jpg
    126.3 KB · Views: 2,594
  • DriverDrum3.jpg
    DriverDrum3.jpg
    126.9 KB · Views: 2,508
  • PassDrum1.jpg
    PassDrum1.jpg
    128.2 KB · Views: 2,577
  • PassDrum2.jpg
    PassDrum2.jpg
    128.4 KB · Views: 2,607
  • PassDrum3.jpg
    PassDrum3.jpg
    125.1 KB · Views: 2,514
  • ShoeMarks.jpg
    ShoeMarks.jpg
    129.2 KB · Views: 2,701
Adjusted the bellcranks tonight so I took some pictures. I didn't see anything out of place, but could use another set of eyes. I also notice my new shoes has some funny wear marks after 30 miles of driving already. I can now feel some light grooves in the drum that I'm not sure were there before. Guess I have to go get new drums or have them turned.

Are those grooves worn in the new brake shoes or just streaks? The hardware looks to be set up properly from what I can see. The way I usually adjust the rear brakes is to turn the adjuster with a flat head screwdriver through the backing plate until there is just the slightest amount of drag on the drums. Assuming the brakes are setup properly, are you getting good fluid flow through the bleeder valves while bleeding?
 
Are those grooves worn in the new brake shoes or just streaks? The hardware looks to be set up properly from what I can see. The way I usually adjust the rear brakes is to turn the adjuster with a flat head screwdriver through the backing plate until there is just the slightest amount of drag on the drums. Assuming the brakes are setup properly, are you getting good fluid flow through the bleeder valves while bleeding?

Those are streaks. I do the same thing on adjusting the drums, then I pump the hand brake until I don't hear the automatic adjuster clicking. I did get decent fluid flow eventually when I bled the drums. I have a brake bleeder hand pump, but we had to try the pump the brake pedal method a few times to get things going. (again a sign of a tripped valve?) I did notice the LSPV bled much easier than the wheels. I feel like the calipers bled easier than the drums too.
 
Update:

Replaced drums: No effect

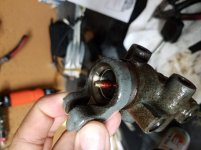
I pulled the LSPV valve off and it appears the piston (red rod thing) is seized. I would assume some type of spring like response from it, since it is connected to a lever with the load spring. There's about 1/8''-1/4'' of play on the piston, but you need to press/pull hard. Once it's in, it stays in, once it's out it stays out. There's also a bypass valve that somehow rides ontop of this piston, so perhaps that part is seized too? Seems like I need to replace it regardless, so hopefully this is my problem.
 

Attachments

  • 20190414_123039.jpg
    20190414_123039.jpg
    122.2 KB · Views: 2,945
Final update. Replaced LSPV and problem resolved. I'm still unsure how the system works, because even with a new valve, the lever is in a permanent up state, so I don't understand how it's supposed to adjust load, when a loaded chassis will make the lever go up even more?

Anyhow, for anyone replace theirs, remove the spare tire first or you can't see the brake line coming from the MC. I cross threaded the fitting for that brake line working blind. I had to chase it down with a die cutter. Turned a 20 minute job into a 2 day job.
 
Final update. Replaced LSPV and problem resolved. I'm still unsure how the system works, because even with a new valve, the lever is in a permanent up state, so I don't understand how it's supposed to adjust load, when a loaded chassis will make the lever go up even more?

Anyhow, for anyone replace theirs, remove the spare tire first or you can't see the brake line coming from the MC. I cross threaded the fitting for that brake line working blind. I had to chase it down with a die cutter. Turned a 20 minute job into a 2 day job.

Quatin,

I know this thread is a few months old. I was wondering if you could provide the part number for the LSPV you replaced. My 2000 4Runner is having the same problem. But looking online, my LSPV looks different than the others I see out there. Yours is the only one that looks like the one I need. Hope you remember. Thanks in advance!!
 
Rear Brake Proportioning Valve

reviving an older thread. I have a 1999 Toyota 4runner 2wd base model with the Rear Brake Proportioning Valve . my 4runner is lifted 2.5 inches and ive read that lifting a base model will cose the brake light to turn on and off. is there a way to fix this besides from pulling the light fuse? just kinda of annoying to see the light pop on and off lol.

also anyone tried the Revtek Rear Brake Proportioning Valve Relocate Kit for 1996-2004 Toyota Tacoma to fix this problem?
 
Quatin,

I know this thread is a few months old. I was wondering if you could provide the part number for the LSPV you replaced. My 2000 4Runner is having the same problem. But looking online, my LSPV looks different than the others I see out there. Yours is the only one that looks like the one I need. Hope you remember. Thanks in advance!!

Sorry for such a late response. For future reference:

47900-35493 Pressure Metering Valve

$260 part and no aftermarket that I could find since it's rarely installed. I was able to revive the old valve by playing with the piston, so I kept it as a back up just in case.
 

Members online

Forum statistics

Threads
278,312
Messages
3,554,089
Members
248,016
Latest member
Advally Service

Trending content

Back
Top