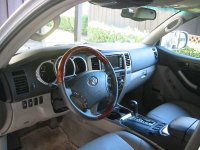
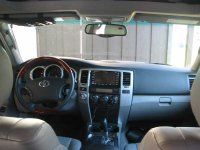
woodgrain steering wheel

Luxury said:
Is it actually "black" or just very dark brown or red? I too am surprised by your choice if there is actually a black option. How does the color of the leather match the stock (which actually varies too)?

it's not black, it's pretty dark brown. it looked nice but it just didn't make me think of wood when i saw it. i really like the look of this color in the lexus and i guess i'm hoping one day someone will come out with a wood trim kit that'll match this color exactly.

the color of the leather matches pretty well. the stock leather steering wheel is almost black and much darker than the horn cover and button. this leather is a little lighter than the horn cover but i think it will darken a little bit with age and leather conditioner. the leather on the new wheel looks a little rougher , which matches the horn cover texture better and it is much thicker and durable. the leather on the stock wheel comes from a single layer of leather split in half so it is thinner, and then they paint or dye the surface of the leather. i don't know if you notice but older leather steering wheels have this look of the paint being rubbed off and looks spotty. i always worried about putting too much friction against the leather when i had the old wheel on. the leather on the new wheel is the whole layer of the leather, not split into two thus much thicker and feels very solid. it just feels like nothing can wear through it.

so to answer your original question, there's a difference in color in that it's a little lighter which i think will get darker with oil from the skin, leather conditioner and natural aging, but imo less than the difference between the old leather which was almost black.

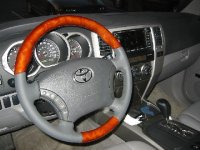
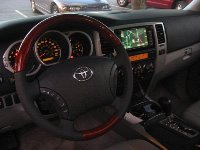
i think this picture presents a fairly true representation of the color difference, maybe makes it look worse too since the flash is not exactly natural, just look at how neon like the wood looks in this pic! :D if anyone is really picky about the difference, i can try to capture the true look in full natural daylight.. (notice how much beefier it looks compared to the old one?)
 

Attachments

  • 02.jpg
    02.jpg
    58 KB · Views: 3,980
Last edited:
Br1ck , sammy's personal email is :

[email protected]

i guess they don't use the yahoo accounts anymore. i believe he has these steering wheels for highlanders, siennas, etc. too in case you guys are a toyota family like mine.

i also just emailed him about getting a hold of the voice command button that comes on the gx470 where the button cover is on the right hand side of our steering wheel controls.

i will post my installation pictures in another thread with the appropriate title..
 
Last edited:
does the wodd wrap around?

Sweet. Does the wood wrap completely around the wheel, or just halfway?

Was it a basic plug and play procedure. What torque do you spec to? The wood kinda looks like a light Rosewood color. The thicker wheel is an added bonus.
 
Last edited:
Re: does the wodd wrap around?

Sac State said:
Sweet. Does the wood wrap completely around the wheel, or just halfway?

Was it a basic plug and play procedure. What torque to you spec to? The wood kinda looks like a light Rosewood color. The thicker wheel is an added bonus.

the wood is all the way around with no seam, it's kinda hard to see but i got the version with the thumb rests too.

it is plug n' play in that the new core is exactly the same as the old core (they came from the same factory). it took me about 10 minutes to swap it out. the torque spec for the center nut is 49N-m (36lb-ft), although if you don't have a torque wrench giving it a good crank by feel worked just fine as well in all the steering wheels i've replaced. you can feel how much pressure it takes to loosen it, just tighten it with around the same force. i can give full step by step with pictures if anyone needs it for the install. There's two torx screws, one hex center nut, and six phillips screws to the whole steering wheel to remove, pretty simple.

i'm about to buy two more, one for my aunt's lexus is300 and one for my dad's highlander.
 
Last edited:
someone asked my for some pictures and instructions of the install so i thought i'd post it here in case anyone else needs it..

oh, and since everyone who posts instructions on here does this, i should include my own little disclaimer just in case.

Do this at your own risk! These instructions are purely educational in purpose. I'm not a mechanic and cannot guarantee the results of your work performed by you! thank you... :D


1. Pop open your hood and disconnect the negative terminal of your battery. (Note: You may be able to do this without disconnecting the airbag, thus no need to disconnect the battery. I installed my 4runner's old leather steering wheel into a Highlander without disconnecting the battery. You can try and wiggle it out first and then disconnect everything if it's not possible. Looking at my pictures, it should work just like the Highlander.)

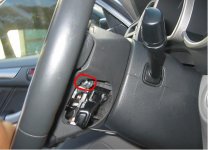
2. Now pry off the caps on each side of the steering wheel with a small flat-head screwdriver covered in cloth to expose the torx screw inside. Work your way around the cap with the screwdriver until you find a good, loose spot to insert and pry open. Use a size T-30 torx bit and loosen the screws.
 

Attachments

  • step1.jpg
    step1.jpg
    38 KB · Views: 3,755
Last edited:
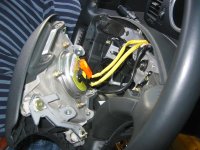
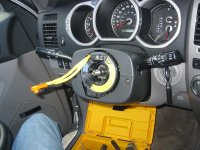
3. Now the airbag/horn cover is off you'll see two fancy looking wires attached on the back for the airbag. If you disconnected the battery, you can now remove these wires. See those yellow caps on the back of each cable connectors?You'll need something sharp to stick under them and lift them up to disconnect the wires from the airbag module. Also disconnect the black wire bundle seen in the picture at the steering column.
 

Attachments

  • 10.jpg
    10.jpg
    69.6 KB · Views: 3,677
Last edited:
or if you don't want to disconnect the battery and airbag, just set the module, still connected to the wires, on top of your steering column, like this:

(note, the wood steering wheel is already installed in this picture, i am actually putting everything back at this point, but just pretend we're still removing the old one!)
 

Attachments

  • 11.jpg
    11.jpg
    29.2 KB · Views: 3,584
Last edited:
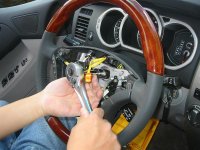
4. Now use a socket wrench (you'll need the extension piece) and loosen the center nut holding the steering wheel onto the steering column. Before loosening it, wiggle the steering wheel left and right until it feels like the wheel is aligned straight, look at the top of the shroud on the steering wheel, it should be level with the shroud on the steering column. This will make putting the new wheel back on straight easier.

If you're not disconnecting battery/airbag, you'll need to remove the shroud from the steering wheel and leave it dangling, as the airbag module will not fit through the shroud opening for the shroud to be taken off while still on the steering wheel.
 

Attachments

  • 06.jpg
    06.jpg
    80.1 KB · Views: 4,184
Last edited:
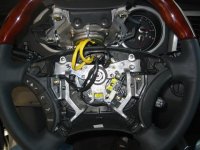
5. With the socket off, grasp the steering wheel at 9 o'clock and 3 o'clock and wiggle it around until it loosens and slides off. The steering column looks a bit naked now!
 

Attachments

  • 08.jpg
    08.jpg
    80.8 KB · Views: 3,651
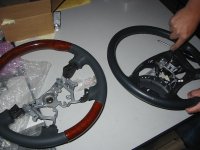
6. Lay the two steering wheels side by side and transfer everything. The steering wheel controls, cruise controls, etc. The screws holding each part on should be obvious.

You can also take everything off right there in the truck. Becareful to store the screws in a safe place and remember where they came from! Having a screw fall into the cracks of the center console is no fun...
 

Attachments

  • 07.jpg
    07.jpg
    57.8 KB · Views: 3,805
Last edited:
7. Reverse the steps for installing the new steering wheel back on the steering column. the torque spec for the center nut is 49N-m (36lb-ft), however i just tightened this by hand and gave it a good tug. This is not a high stress point, the gears mating on the wheel and column takes the brunt of the force.

Note: If your steering wheel appear to be misaligned after installing, you can remove the airbag and the center nut to try to align the teeth more precisely but in my case i just couldn't find the perfect notch so that my steering wheel looked straight even though the alignment of the wheels were okay and the truck rolled straight. This is just a matter of the manufacturing variation between the teeths on the two steering wheels.If the steering wheel tiliting a little to the right or left bothers you like it did me for pure esthetic reasons, have a front wheel alignment done after you install the steering wheel. I took mine to BigO and had them redo it a second time because I'm very anal about the steering looking perfectly straight when driving straight.
 
Last edited:
8. After everything's done, make sure to check all the functions like steering wheel controls, cruise control, (don't try to check the airbag!) and make sure they function properly.

Everything detailed in these steps took me only about 20 minutes.

and VOILA! You're now rolling Lexus style!! :cool:
 

Attachments

  • 04.jpg
    04.jpg
    68.4 KB · Views: 2,515
That color of woodgrain steering wheel was a sweet looking install to your rig my friend. I'd like to gander that look in my Grey 4runner. Unfortunately, I would want to add the steering wheel controls for the radio....as I don't have them now. I was wondering how much that would set me back. Also, while you had the steering apart; did it appear that I could add tilt/adjust forward slide to my steering. The SR5 only comes with tilt as the adjustable in/out only comes with the sport/limited models. That really bites on long drives!
 
slowginjoe, that looks great :) very classy... have you thought about painting the silver trim on the interior black, then putting on matching woodgrain?? (wood on the silver wouldnt look too good in my opinion)...but spray the pieces black, then put on the niiiice wood..i think it would look great!
 
24runners said:
slowginjoe, that looks great :) very classy... have you thought about painting the silver trim on the interior black, then putting on matching woodgrain?? (wood on the silver wouldnt look too good in my opinion)...but spray the pieces black, then put on the niiiice wood..i think it would look great!

thanks everyone. yeah, i thought about the wood trim thing but haven't found a kit worthy enough yet. i really don't like the way the stick-ons look from what i've seen. perhaps toyota might offer a wood trim on the 4th gens. sometime in the future and i could then steal the parts and plug and play it..
 
fo'runner said:
That color of woodgrain steering wheel was a sweet looking install to your rig my friend. I'd like to gander that look in my Grey 4runner. Unfortunately, I would want to add the steering wheel controls for the radio....as I don't have them now. I was wondering how much that would set me back. Also, while you had the steering apart; did it appear that I could add tilt/adjust forward slide to my steering. The SR5 only comes with tilt as the adjustable in/out only comes with the sport/limited models. That really bites on long drives!

the steering wheel controls don't cost too much but the airbag module is in the hundreds of dollars to replace since it's not the same. there's a thread somewhere of someone who tried pricing this total upgrade and i think it was over $1k. :eek:

the telescopic feature is built into the steering column and although i wasn't paying attention to it, i don't think i got any better glimpse into that mechanism with the steering wheel off.
 

Members online

Forum statistics

Threads
278,312
Messages
3,554,088
Members
248,016
Latest member
Advally Service

Trending content

Back
Top