ZachAttack's Build Thread - 2004 Sport Edition

From the AMSOIL site:
APPLICATIONS
AMSOIL Synthetic Fuel Efficient Automatic Transmission Fluid is recommended for automatic transmissions and other applications requiring DEXRON® VI, MERCON® LV, SP or Toyota WS.

Given the repeated positive feedback of many members here who have had great results, I think I'm going to try it...
 
First self-oil change.

Well, I got the oil changed last night and put in the new AMSOIL Synthetic 5W-30.

Nothing different than all the other posts about how to change the oil in the V8 4Runner, with the following small clarifications.

1) Although you can get to the oil drain plug (through an oval cutout) without removing the aft skid plate, it's easier if you do (four 12mm bolts).
2) The forward skid plate (four 12mm bolts) is the one you need to remove to get to the oil filter. (Don't do the "let it hinge down from the front" thing. My hinges, (which are really just metal tabs that slide into a hole on the frame), started bending and I ended up having a really hard time getting the front skid plate all lined up at the end.
3) Remember to put a piece of cardboard underneath the vehicle or you'll get some oil on the driveway. (Ask me how I know.)

Took me two hours last night, mostly because my oil filter wrench didn't fit. Next time it will take 30 minutes.

No pictures since it's so standard. I'll try to take pictures of the rear and foward differential oil changes, as well as the transfer case changes.
 
Urban Runner Roof Rack.

Found the urban runner roof rack I've been looking for.

Seems every dealer sells them for $300 and some change, and all the online parts suppliers sell them for $163. Toyotapartszone.com will ship it from CA for $16, so they've got my order. Will update with pics when it arrives.
 
Looks Great!!!!

i cant wait to get my full mod on, hopefully ill close on a house in May, so let the games begin!!!

i have tons of bookmarks from this site to get things started...:D
 
DIY Black Headlights

Well, based on a lot of other threads here, I did the DIY black headlight mod.

I ended up using Krylon's Fusion for plastic, satin-black. (Looked at flat and gloss, and decided to split the difference.)

Anyway, I don't want to reinvent the mod write-ups, so let's get to the pictures...

Before.
zachattack-albums-diy+black+headlights-picture3265-20110409-005.jpg

Before closeup.
zachattack-albums-diy+black+headlights-picture3266-20110409-006.jpg

Looks sad with no headlights.
zachattack-albums-diy+black+headlights-picture3267-20110409-010.jpg

After baking for 10 minutes at 200 deg F. (Tried it at 8, needed another 2.)
zachattack-albums-diy+black+headlights-picture3268-20110409-011-medium.jpg

I taped off the parking light reflector area, and then laid on about 4 coats.
zachattack-albums-diy+black+headlights-picture3269-20110409-020-medium.jpg

Installed.
zachattack-albums-diy+black+headlights-picture3270-20110409-025-medium.jpg

Closeup lights off.
zachattack-albums-diy+black+headlights-picture3271-20110409-026-medium.jpg

Closeup lights on with brights.
zachattack-albums-diy+black+headlights-picture3272-20110409-035-medium.jpg

Finally, an after shot.
zachattack-albums-diy+black+headlights-picture3273-20110409-036-medium.jpg


I don't know what else to say. It took about 3 hours total, but most of that time is just waiting for the coats of paint to dry.
 
Last edited:
I like. Might do it to mine some weekend coming up. Have some residue inside the lens. Kill two birds with one stone.
 
Spidertrax

There are a tone of writeups (see J.A.'s, for example) for the Spidertrax, so I won't repeat anything here.

I'll just get straight to the before and after pictures.
Before:
zachattack-albums-spidertrax-picture3294-20110410-006-medium.jpg

After:
zachattack-albums-spidertrax-picture3297-20110410-009-medium.jpg


I like them, but I'm a little worried that the rear tires are sticking out too far. Here's a better angle.

zachattack-albums-my+4runner-picture3298-20110410-011-medium.jpg


I took them for a test drive, and I'm getting a little rubbing while going in reverse at about 3/4 steering deflection. I got out and looked, and it's actually the front mud flaps (behind the front wheel). Those are easy to take off, so I might do that.

I'm tired, and I need a beer.
 
Last edited:
The headlights look good, have you thought about doing the turns & fogs to match?

They come apart the same way, I was worried about brightness when I did mine, but they look just as bright as the turn signal with chrome reflector in the '06 housings I have.
 
Love the headlights, I've been debating on doing this to my 03 for years. I love the krylon fusion satin black, I did half my interior of my acura with that stuff :driving:
 
Hella Supertones

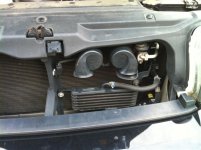
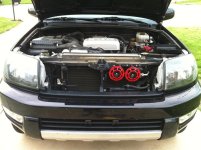
Well, last night my Hella Supertones came in ($50 from Amazon).

I got them installed (see pictures) and I think they look awesome.

While they are a little louder than the stock horns, they are far to high-pitched for my taste. Somebody described them as Civic-sounding.

Yup. (And we own a Civic!)

I think I'm going to return them.
 

Attachments

  • photo (11) (Medium).JPG
    photo (11) (Medium).JPG
    64.5 KB · Views: 1,913
  • photo (12) (Medium).JPG
    photo (12) (Medium).JPG
    71.9 KB · Views: 1,899
I think I'm going to return them.

I did return them. I spent some time on youtube and have settled on trying to get the Fiamm El Grande horns. When those come in, I'll report back.

Now where the heck is my Urban Runner roof rack. (It's somewhere between CA and NC on a UPS truck...)

Maybe I'll do my differentials today...
 
Nice, what made you decide to switch? stock horn isn't loud enough?

Autbond used to have a train horn on his and it was LOOUUD..

I've thought about getting an "Ooga" horn but can't find one that sounds how I want it to sound.
 
This weekend, I finally decided to upgrade my head unit. I chose, based on much research (and help from here), the Pioneer AVIC-Z130BT.

You can find more information here: Pioneer AVIC-Z130BT Navigation receiver at Crutchfield.com

Also purchased:
PAC Toyota Factory Integration Adapter ($75)
Toyota In-dash Receiver Kit ($15)
iPod Cable (Pioneer CD-IU51V) ($50)
PAC Steering Wheel Controls Adaptor ($70)

I followed the instructions to a "t" and got everything working (I haven't finished the steering wheel controls yet).

Notes:
1) I took out the box for the dual-diversity antennae.
2) I removed my old iPad adapter I had installed.
3) Did the bypass successfully.
4) Still need to install backup camera.
5) Still need to install steering controls.
6) Still need to connect reverse and speed sense wires.

zachattack-albums-pioneer+avic-z130bt-picture3089-pioneer-avic-z130bt-installed.jpg
hey, i have just about the same head unit, my buttons are on the left side...but anyways, have you had any issues with your head unit? i love my head unit but when i turn on my high beams, my music and subwoofer will cut out. I can get the msuic to turn back on, but for the subwoofer, i would have to turn off the 4runner and turn it back on.
 
Nice, what made you decide to switch? stock horn isn't loud enough?

Autbond used to have a train horn on his and it was LOOUUD..

I've thought about getting an "Ooga" horn but can't find one that sounds how I want it to sound.

I've always liked LOUD horns, and the T4R horn is pretty good, just hoping for something a little louder. I want to scare the crap out of someone when they are about to do something stupid.

I like the ooga horns, but more for the trail. I don't know if anyone would take me seriously on the highway with an ooga horn.

...but anyways, have you had any issues with your head unit? i love my head unit but when i turn on my high beams, my music and subwoofer will cut out. I can get the msuic to turn back on, but for the subwoofer, i would have to turn off the 4runner and turn it back on.

Hmm. I haven't had any of those same issues (I think the side-button one is the AVIC-920/930 instead of the AVIC 120/130).

I wonder if with all your music stuff going, when you turn on your high beams, the alternator can't keep up and the buss voltage is dropping below what your amp needs to put out music. But I'm not sure, and by no means an expert.
 
Changed Differential and Transfer Case Oil

Well, yesterday, I finally got around to changing my differential oil.

I ended up buying 7 quarts of Amsoil Sever Gear SAE 75W-90.

6.6 pints (or 3.3 quarts) for the rear differential.
3 pints (or 1.5 quarts) for the front differential.
3 pints (or 1.5 quarts) for the transfer case.

I ended up having a whole quart left over, so I must have left about a tenth of a quart in each area, which makes sense.

I also bought a "gallon jug" pump and four 8,000 ramps from Autozone. (The pump is labelled as a gallon jug, but it comes with different sized extensions, the one shown in the picture perfectly fits a quart bottle.)

Later edit: THIS THING SUCKS. It takes forever. I bought a "fluid transfer pump" from somewhere else (I forgot where) and it pumps the whole quart in about 4 slow pumps. Way faster.

zachattack-albums-differential-transfer+case+oil+change-picture3418-photo-5-medium.jpg


Anyway, there are plenty of writeups around for this, but I figure I'd document it as well as I could.

Here's the rear differential:

Top bolt is fill port: 24mm socket, 36ft-lb, uses 12157-10010 crush washer.
Bottom bolt is fill port: 24mm socket, 36ft-lb, uses 12157-10010 crush washer.

zachattack-albums-differential-transfer+case+oil+change-picture3419-photo-6-medium.jpg


Here's the transfer case:

Top bolt is fill port: 24mm socket, 27ft-lb, uses 90430-18008 crush washer.
Bottom bolt is fill port: 24mm socket, 27ft-lb, uses 90430-18008 crush washer.

zachattack-albums-differential-transfer+case+oil+change-picture3420-photo-7-medium.jpg


Here's the front differential:

Top bolt is fill port: 10mm hex, (didn't have torque wrench for hex), uses 12157-10010 crush washer.
Bottom bolt is fill port: 10mm hex, (didn't have torque wrench for hex), uses 90430-24003 crush washer.

zachattack-albums-differential-transfer+case+oil+change-picture3421-photo-8-medium.jpg


Also, I used a LOT of paper towels (I'm still new to the fluids thing) and was smart enough to lay a couple of cardboard pieces under the truck. I still need to go get a creeper.

All of the old fluids were pretty black and smelled horrible (the transfer case was the least offensive), but I'm glad I changed these (at 87,000 miles).

Oh, and went for a test drive, and the vehicle definitely shifts in and out of center diff lock and 4Hi and 4Lo a lot easier and smoother.

Hope this helps.

 
Last edited:
Amsoil Product listings.

Also, I've been using this from AMSOIL to help me find my products.

LUBRICANTS & FLUIDS:
Engine Oil
Grade 1......SL, All TEMPS......5W-30

Automatic Transmission,A750E/F......WS
Differential, Front......GL-5, All TEMPS......75W-85
Differential, Rear......GL-5, All TEMPS......75W-85
Transfer Case,......GL-5
Fluids
Power Steering Fluid......AF3
Brake Fluid......HB
Clutch Fluid......
None listed.
FILTERS:

NGK PLUGS AND WIRESETS:
  • GPSERIES PLUG BKR6EGP NGK7092
  • IXIRIDIUM PLUG BKR6EIX-11 NGK3764
  • PREMIUMIRIDIUM PLUG IFR6T11 ^ NGK4589
  • STANDARD PLUG BKR6ES-11 NGK5553
  • VPOWER PLUG BKR6E-11 NGK2756
  • WIRESET WIRESET Direct Fire Ignition

WIPER BLADES:

Driver
ExactFit T221
NeoForm T16220
Winter T37225
Passenger
ExactFit T201
NeoForm T16200
Winter T37205
Rear
ExactFit T12F

CHASSIS LUBRICATION:
4WD

CAPACITIES:
Engine, with filter..........6.6 quarts
Cooling System, Initial Fill..........13 quarts
Automatic Transmission, A750E/F Initial Fill..........3.2 quarts
Automatic Transmission, A750E/F Total Fill..........11.6 quarts
Differential, Front..........1.5 quarts
Differential, Rear..........3.3 quarts
Transfer Case, ..........1.5 quarts

TORQUES:
  • Oil Drain Plug.....29 ft/lbs
  • Transfer Case Fill and Drain Plugs.....27 ft/lbs
  • Rear Differential Fill and Drain Plugs.....36 ft/lbs
  • Front Differential Fill and Drain Plugs.....?? ft/lbs
 
Last edited:

Members online

Forum statistics

Threads
278,310
Messages
3,554,079
Members
248,016
Latest member
Advally Service

Trending content

Back
Top