Papabeach's Mod Thread

Pandemic projects...

More pandemic projects complete.

-added interior hatch release (Luke Hixson kit); pairs nice with my interior rear window control. Yes I could just roll the window down and open the hatch that way but l kinda felt like I needed a little project and its nice to have options. Tbh…I have no idea when I would need either right now….I don’t sleep in my 4Runner and I have a dual swing rear bumper that has to be opened before the hatch can go up...but whatever...this scratched an itch I had!
m8zf5usm.jpg


-North Bound Expedition G.A.R.B (Spare tire bag), the mounting is nicer than Trasharoo and it has some additional pockets…nothing super technical here….it holds trash! Just wanted to try something new….my trasharoo went with the sale of my 80 series some time back and haven’t needed another bag until now. Kinda wishing I went with a different color but not that big of a deal.
PktUfEFm.jpg


-Front Runner under rack table/mount setup-not crazy about this as it touches the roof a little big…have some 3M tape under it currently but probably need to order taller legs but not sure how much I care...the roof doesn't look great and is covered by a rack. I am not sure that a little big of pressure matters much...any opinions/thoughts?
h2s2Gxkm.jpg
Jh1lBOym.jpg


-Front Runner fishing rod holder….none of the interior options have worked great for longer poles and I wanted a secure option that didn't require them to stick out of a a window.
zNYypZIm.jpg
 
More pandemic projects complete.


Tbh…I have no idea when I would need either right now….I don’t sleep in my 4Runner and I have a dual swing rear bumper that has to be opened before the hatch can go up...but whatever...this scratched an itch I had!
m8zf5usm.jpg


-North Bound Expedition G.A.R.B (Spare tire bag), the mounting is nicer than Trasharoo and it has some additional pockets…nothing super technical here….it holds trash! Just wanted to try something new….my trasharoo went with the sale of my 80 series some time back and haven’t needed another bag until now. Kinda wishing I went with a different color but not that big of a deal.
PktUfEFm.jpg


-Front Runner under rack table/mount setup-not crazy about this as it touches the roof a little big…have some 3M tape under it currently but probably need to order taller legs but not sure how much I care...the roof doesn't look great and is covered by a rack. I am not sure that a little big of pressure matters much...any opinions/thoughts?
h2s2Gxkm.jpg
Jh1lBOym.jpg


rack looks great. I like scratching itches.
 
Rainy day projects….first tropical storm of the year raining on my weekend

Shout out to [MENTION=148218]JZiggy[/MENTION] and [MENTION=120071]mtbtim[/MENTION] for showing me how to mod a panavise mount for more usability. I previously had a ram mount on an extended shaft from the transmission tunnel but the length of the arm led to some vibrations in the mount I didn’t like. This is a great solution…and this freed up a nice easy place to mount a Ham Radio. Thanks fellas…short and sweet!

SbYwsokl.jpg

q2eGh8il.jpg
 
Front Runner Roof Rack updates

More rainy day projects….

I swapped out the back two sets of mounting feet on my Front Runner Roof Rack for taller ones as the Pro Table Bracket was touching the roof. Problem solved now! I couldn’t be happier with this setup. It took a little effort to get it the way I like it but if anyone is looking to adapt a Front Runner Roof rack for their 3rd gen this is great.

qJ6xdqYl.jpg

RIww6t0l.jpg


Front Runner Roof Rack and accessories specs
-Slimline II tray 1165mm x 2166mm
-Foot Set 60-70mm x 3
-Between Slat Foot Adapter x 1 (between front two slats)
-Universal Track 1400mm x 2
-Universal Track 200mm x2
-Pro Ski, Snowboard & Fishing Rod Carrier
-Pro Stainless Steel Camp Table/Bracket
-Rack Mounted Bottle Opener
-Black Tie Down Rings x 6
 
TC mod for dual cases

Dual cases/Triple Stick Progress

I purchased a used TC from [MENTION=254416]JROTN[/MENTION] to work on as to minimize downtime for my truck. I got it cleaned up, modified the drivers side shifting fork (Dremel with cut off wheel and grinder) then split the case, removed the shifting fork interlocking pin (required to be able to have independent control over H/L and 2WD/4WD. Sealed everything back up with the Toyota Red FIPG and now waiting on the seals/nut below to finish this step. Will hopefully get this paired up with the Tacobox by the end of the week. [MENTION=143526]theesotericone[/MENTION] thanks for your prompt response asking for a little bit more help...I bet I will be pinging you again in the not to distant future!

Here are the threads I found useful and some pics. I thought I took a pic with the TC split open but it appears not…bummer because that was cool to see. The TW thread has pics if anyone is interested.

As always thanks [MENTION=120071]mtbtim[/MENTION] for the excellent videos. I am glad I didn’t have to try to do the seal work under the truck. My output shaft steal was stuck…had to press it out and use some emory cloth to clean up the surface.

Clint's 1997 Reg Cab Build | Page 13 | Tacoma World
Transfer Case Output Shaft Seal Replacement - YouTube
http://nebula.wsimg.com/ee317827726...BA896CE942FEBA752&disposition=0&alloworigin=1

*Rear Output Shaft Seal #90311-41007 Amazon.com: Genuine Toyota 90311-41007 Type-T Transfer Case Oil Seal: Automotive
*Companion Flange Seal #90312-23001 https://amzn.to/392oPEf
*Companion Flange Nut #90179-22016 http://rover.ebay.com/rover/1/711-532...


Dual cases are coming along…TC has been modified, just waiting on a couple seals to finish up the rebuild. Decided to dry fit the cases together and found out the dowel pins are still in the TC and they don’t want to come out….sitting in PB blaster currently…nothing with vice grips and heat and I don’t have a puller (at least not yet). One step at a time I suppose…. Would love to hear if anyone has any solutions….

 
Finally got these out! I ground down a bolt to fit inside the pin and then clamped the $!#@$ out of it and then it twisted right out!


Getting closer! Everything works :-)

 
Last edited:
While waiting on some parts for the dual case install it was time to fix my A/C. As it turns out I had a leak in the evaporator...see pics below and this thread:

AC Refrigerant Leak

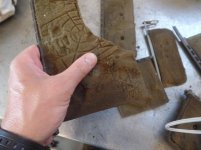
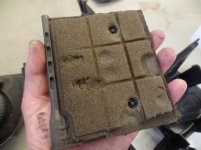
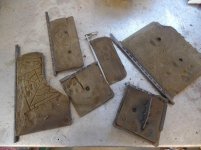
I couldn't find the leak with the dye and black light in the engine bay and the Schraeder valves weren't leaking. I picked up a cheap refrigerant sniffer and as soon as I put it near the central vents the alarm went off. I was shocked to see how bad the evaporator actually looked...wow, I am surprised the system lasted for 2 weeks on a recharge/dye injection. It was a pretty easy repair, installed a Denso evaporator/dryer, aftermarket expansion valve, all new O-rings and used appropriate oil. Had to have a shop drain the system and recharge but happy I did it myself....not hard...just took some time.

 
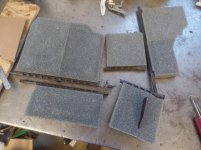
Hey, how was the foam on the blend doors when you had it apart?
I just put a heater core in my 96' Tacoma and they were shot. I fixed them and am in the process of a write up on how I did it for the Tacoma forum I may post on here also.
 
Hey, how was the foam on the blend doors when you had it apart?
I just put a heater core in my 96' Tacoma and they were shot. I fixed them and am in the process of a write up on how I did it for the Tacoma forum I may post on here also.


Tbh, I was so involved with the project I didn't even think to look at anything else when it was all apart...I was racing the clock to get back to the shop to get it recharged. Out of curiosity, had did you find out your blend doors were shot?
 
Blend doors

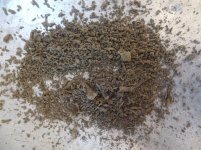
When I touched them the foam was really mushy and when I pushed my finger into it, it just left an indentation and didn't return. Then I started rubbing them with my fingers and the foam was just balling up and falling off the doors.
Last pic is some of the doors with the new foam.
 

Attachments

  • SAM_4804.jpg
    SAM_4804.jpg
    55 KB · Views: 655
  • SAM_4840.jpg
    SAM_4840.jpg
    60.8 KB · Views: 652
  • SAM_4802.jpg
    SAM_4802.jpg
    68.2 KB · Views: 676
  • SAM_4814.jpg
    SAM_4814.jpg
    107.3 KB · Views: 656
  • SAM_4842.jpg
    SAM_4842.jpg
    74.6 KB · Views: 640
First complaint with MC crawlbox/Inchworm adapters. When I paired the cases last week I put FIPG on (Right Stuff), tightened all the bolts finger tight...waited an hour or so then came back to tighten them down. Some of the bolts sink into the aluminum adapter while a few go into the case itself. In the process of tightening them down (slowly), three of the bolts that sink from the case into the adapter started to slip before they were snug. The first time it happened I tried to tell myself I just over torqued it and I'm an idiot. After the 2nd I was thinking WTF and after the 3rd I almost lost it. As it turns out the bolts that came with the kit only engaged about half of the threads so I bought longer bolts and things tightened right up and felt much tighter. No idea if this was a me problem, bolt problem or poor job of tapping the holes but glad things are tight now. The new bolts engaged much better from the get go so who knows.

So this made me a bit paranoid. Tne box came preassembled with adapters in place and I hadn't looked at any of those bolts closely. One of the bolts had two or three threads sticking up above the lock washer/flat washer!!! Glad I checked. I tightened it down and checked the rest...they were fine.
 
When I touched them the foam was really mushy and when I pushed my finger into it, it just left an indentation and didn't return. Then I started rubbing them with my fingers and the foam was just balling up and falling off the doors.
Last pic is some of the doors with the new foam.

Thats great work, I am interested in seeing your write-up!
 
Dual case install 1 of 2

“Minchworm” Dual Case Install


The first question people ask is why and the second question is how much did this cost.

Why? I am not big into rock crawling with my 4Runner but I do get into them from time to time and anyone who has tried to do technical work with a 5spd understands that trying to manage the clutch, gas pedal and brake pedal simultaneously is difficult. A reduction box “Tacobox” offers a significant increase in control by increasing your traction, torque, control and allows you to go very very slow! This results in less bouncing and less risk of breaking stuff. My final crawl ratio went from 48:1 (3.83*2.57*4.88) to 226:1 (3.83*2.57*4.7* 4.88). Torque (ft-lb) at idle is estimated to have increased from 439 to >2000. So the actual numbers are probably a little different but you get the idea….tons of low end torque and an improved crawl ratio. All of this to keep me safer in technical situations and less likely to break stuff. And yes…I can now tackle things that would have never before been possible. With this mod I don’t think you can stall the 4Runner in double low and 1st gear!


Cost? Well like most things I have done with my 4Runner I didn’t do it the low cost way…mainly because I didn’t know what I was doing and didn’t think it through but whatever….I have no complaints.

All said and done I spent a little over $4,200 on this modification.

I have heard people say it can be done for $2K but I would assume that means you are building your box from scratch and have all the extra parts/tools you need to get the job done. I tried to breakdown my costs below for a more practical understanding of what I got myself into.

Must have Parts/Cost
Marlin Crawler Tacobox w/Inchworm adapters w 4.7-- $2200
Drive shaft mod--$309
Transfer case mount for crawlbox (OEM)--$177
Crossmember/shifter mod-$100
The Right Stuff FIPG--$22
Redline 75W90 1 ga--$60
TOTAL: $2874

Extra Parts/Cost
Rad Design Triple Sticks--$300
HD detent springs--$8
Trail Gear TC shifter (better clearance than Marlin TC stick)--$110
Matching shifter knobs (Advanced Adapters)--$125
Spare TC to rebuild and use to minimize truck downtime--$200
New TC flange seals F/R, pinion nut--$45 (can’t remember…and can’t find all the receipts)
Big Red Torin Transmission Jack--$240
Custom shift boot--$200 (has not arrived yet)
90 degree hose barb for breather port on rear case--$9
OEM style Axle Vent-$7
TOTAL: $1244

GRAND TOTAL: A little over $4,200…I know I purchased some extra sockets (pinion nut), ratchet extensions, numerous cans of brake cleaner, wire wheels, acetone, shop towels, hose clamps, fuel line (breather hose) and some other odds and ends but whatever…I lost track.

Here is the watered down version of the step by step install. I am sure I have forgotten some details but hopefully this helps someone in the future. I had a lot of help from members on here. Big shout out to [MENTION=143526]theesotericone[/MENTION], [MENTION=135317]rkntoy[/MENTION], [MENTION=118207]midcoma[/MENTION]. Much appreciate the help.

Step 1: spare TC cleaning/rebuild
I replaced the F/R output shaft seals and companion flange seals and one of the pinion nuts…the other was in pretty good shape so I reused it. Timmy the Toolman was quite helpful for this part:
Transfer Case Output Shaft Seal Replacement - YouTube
Thanks [MENTION=120071]mtbtim[/MENTION] [MENTION=102606]infamousRNR[/MENTION]

Step 2: prep TC for Rad Design Triple sticks.
This required me to split the case open, remove the pin that locks the shift rails together and also cut/grind the foot off the driver side (L-N-H) shift rail. I did this without removing the shift rails and just stuffed a shop rag under the rails to catch the debris.


Step 3: Connect Minchworm to TC
The Inchworm adapters already had the alignment pins in place so rather than remove those I figured I should remove the 20 year old pins in the spare TC. Well…those things were in there good. I ended up using a torch, vice trip and filed down a bolt to the ID of the pin so I could clamp it easier. Also…I had to tighten some of the nuts on the adapters….though I bought a built unit…not everything was fully put together. The dry fit went well then I pulled everything apart added the FIPG and snugged down the bolts. This was my first horrifying experience. I wasn’t anywhere close to snug and 3 of the bolts starting spinning. On the first one I figured I was an idiot and just over torqued it…then the 2nd then the 3rd and I was being very careful. I am not sure what the problem was suffice to say the bolts were pretty short. Maybe the bolt holes were tapped sloppy…I don’t know. I ended up buying some longer bolts and they tightened down to what I would call a more normal feel and that was the end of that. I did a dry fit with the triple sticks and everything shifted as expected.


I had some extra parts including a set screw and a metal tab. Marlin assured me the set screw was not needed (more on that later) and neither was the metal tab as they already welded one on the shift rail in the Tacobox.


What I didn’t realize about the Inchworm adapters is that while the clockable aspect is great (if you need that…I did not)…it creates waaay more opportunity for leaks. And let me tell you…Marlin didn’t use near enough FIPG when they assembled it! Not only does it need sealed at the clockable ring…almost every single one of these holes needs sealed. This pic was after I just got done cleaning off all the FIPG I had placed and got the chance to do it again.


This next pic shows a leak at the clockable ring after install. I got lucky…I didn’t know that gear oil was fluorescent…and my UV light was super helpful to find the leaks.

I did my best to goober up a bunch of FIPG from the outside to almost stop it but it should really be taken apart and just resealed but that was NOT HAPPENING!

Step 4: Factory TC removal
…pretty straight forward…no pics of this. Only comment, the top two bolts are a #!@#$!@# to remove. In the end I was able to reach them easiest from the inside of the cab with a tiny ratchet. I have heard others could reach them with ratchet extensions but all of my extensions were for ½” and that was waaay to big and wouldn’t fit.

Step 5: Extend 2 wires on TC…no pics again…just cut them in the middle and added 12” of 18ga wire with soder/heat shrink and high temp loom.

Step 6: Install Transmission output shaft seal extension, spline coupler, oil seal
I used red Loctite on the back of the extension and RTV on the transmission side of the spline coupler. This was all pretty straight forward but I really had to beat both of them in place…they both seemed like “press-fit” parts. The oil seal was refreshingly easy to tap in.


Step 7: Install combined Crawlbox/TC
First issue…I’m an idiot. The combined unit on top of the transmission jack was about ½” too tall to clear the bottom of my sliders. I would have used my jack to just lift the truck up a little bit but I was using it to support the transmission as I had removed the crossmember. Thinking now I am pretty sure it would have been fine to let the transmission hang for just a little bit but I was frustrated and stopped thinking. I could have simply used my high lift but again I wasn’t thinking.

Rather in the most awkward fashion I pulled the combined unit on top of the transmission jack and secured it in place with two ratchet straps. Once this problem was solved I drank a beer! Everything seem to go together very smooth and I was almost there but the jack wouldn’t go up any higher.

I was so close…Looking around I found the bolt that you are supposed to hook the chain on that comes with the lift was catching on the exhaust pipe.

30 seconds with a cut off wheel and that problem was solved and the unit was in!

I pulled it back apart, sealed it up and bolted it to the transmission.


TO BE CONT in post 2 of 2

 
Last edited:
Dual Case install 2 of 2

Step 8 : Run the breather line to the engine bay
Ok so you don’t have to do this but I had already extended the front diff breather to the engine bay, the rear diff to the gas cap opening so this was getting extended too.


Step 9: Measurements for driveshaft modifications
Rear flange to flange got shortened to 41.5” and front lengthened to 35.” I dropped the driveshafts off that afternoon and they were ready the next day. They used a little bit thicker walled tubing albeit a bit more narrow in diameter and machined the yolks down to fit. The company I used is Driveshaft Specialists in Tampa FL if anyone is down here doing this. $309…and one day turn around…I thought this was more than fair.

I bolted them up the next day and was happy to see the front drive shaft cleared the crossmember (barely). Since the front driveshafts on our IFS trucks don’t move (much if at all) clear is clear! However, if I SAS in the future this setup won’t work.


Step 10: Clearance the transmission tunnel for the shifters and test drive!


I cut this much out and later trimmed up the corner with a pair of tin snips and a file.

This was enough for the shifters to clear! I filled up the TC/Tacobox with oil and went for my first drive!

Everything worked, amazing! The new sound of the gear driven TC was music to my ears. After that I needed to modify the mounting bracket for the triple stick rubber boot. I copied what [MENTION=135317]rkntoy[/MENTION] did and it worked out well. I don’t have a pic of it mounted because you can’t really see much but it slipped right on.


I went on a couple more test drives and the rear case shifter seemed like it wasn’t engaging as strongly as it should. This seems to be a common complaint and was solved by adding a reinforcing spring inside the OEM detent spring…these are available through Marlin Crawler.


Step 11: Fab new crossmember to support the TC and raise it enough so the TC is above the bottom of the rear crossmember so I can use my Shrockwork skids. The TC didn’t have to go up much but it did need to go up as you can see in the pic below.

I can’t say enough good things about Timbo’s Customs fab shop in Auburndale, FL. We talked options and in the end he shimmed the transmission mount high enough to raise the bottom of the TC just enough to clear the bottom of the rear crossmember and welded a new support bracket to back of the transmission cross member to support the Tacobox. I ditched the HD (red) mount and went will all OEM rubber mounts.


I don’t have a pic of the TC clearance above the skid plate but in this pic you can see the skid just under the new crossmember mount.

I have to say I am very happy with this setup. After driving around for a couple weeks I have no increase in driveline vibrations.

Step 12: Fine tune shifter clearance/adjust linkage
After I reinstalled the surrounding trim pieces I needed to adjust the shifters/linkages a bit more. Timbo’s Customs had cut/welded my transmission shifter to move it a litte more forward and also adjusted my rear case L-N-H shifter in a “S” like bend to prevent interference with the transmission shifter. In the end my buddy at TaterFab straightened it out a bit and just cut some threads off the linkage to shorten it up. Problem solved. Tbh…I am not sure how many times I have taken the shifters apart and put them back together but it is a process. There isn’t much space at all. One of the things I ended up doing was swapping out the shifter that came with the crawlbox with a TG shifter d/t the location of the bend in the stick. The marlin stick is much thicker than the TG shifter and also bent in a different direction. This may sound confusing but the bottom line is that the TG shifter went right in and didn’t require any modifications for clearance.

Step 13: Shift knobs/shift boot
Ok so this is totally a personal choice here but I wanted matching shift knobs for all 4 shifters. There aren’t many options out there and I was done with the white pool ball look. After looking around and even asking for some custom work I found that Advanced Adapters had what I liked. The transmission shifter was a direct fit but the other three knobs required adapters I picked up from McMaster-Carr M12x1.25-1/2” 13. In my opinion this is a pretty sharp look.

For now I just cut two extra holes in the rear part of the shift boot to cover everything up. I am in the process of ordering a custom boot from Redline Goods. They required some pretty specific measurements (See below) that I hope I obtained in an accurate enough fashion…their fab shop is in Poland and it is $200 for a boot but at this point that doesn’t seem like much and I don’t know a local shop that will do this for me.

I will post up the final product when complete….

Step 14: Sign up for Southern Expedition Overland Challenge
Done! https://www.southernxpeditions.com/overland-challenge Still waiting for confirmation but my buddy already has our team signed up…just waiting on my confirmation. Between work, family and rain I haven’t had a chance to really use the new setup. Rather…its summer in Florida and I have been fishing!


Hopefully I will get out in the dirt and rocks soon! I didn’t spend $4K to to listen to the gear driven TC sing!
 
Last edited:
Just quickly read through these last posts. Glad you got everything installed without too much trouble. I think it was a good choice to build off of the factory crossmember for the transfer case mount. I was wondering if you had seen that before and I was happy when I saw the picture in the dual case thread.

Two other things:

1. Does the Inchworm case have set screws in the extra holes?
The one that I bought back in 2011 had set screws to plug the extra holes. The plate is made to fit the manual or auto transmission and has multiple clocking options, so all the holes are necessary. The instructions said to put FIPG on the set screws and use them to plug the holes that aren't being used.

2. If you don't have a short shifter for the transmission, get one. You'll definitely be glad you did. It helps a lot with making enough room for all the sticks and has a nicer feel. I run one on my W59 with dual cases in the Tacoma.
 
Just quickly read through these last posts. Glad you got everything installed without too much trouble. I think it was a good choice to build off of the factory crossmember for the transfer case mount. I was wondering if you had seen that before and I was happy when I saw the picture in the dual case thread.

Two other things:

1. Does the Inchworm case have set screws in the extra holes?
The one that I bought back in 2011 had set screws to plug the extra holes. The plate is made to fit the manual or auto transmission and has multiple clocking options, so all the holes are necessary. The instructions said to put FIPG on the set screws and use them to plug the holes that aren't being used.

2. If you don't have a short shifter for the transmission, get one. You'll definitely be glad you did. It helps a lot with making enough room for all the sticks and has a nicer feel. I run one on my W59 with dual cases in the Tacoma.

The pic I posted was as the unit was sent from Mariln Crawler. I don't think they are used to using the Inchworm adapters in place of theirs. I think some set screws were missing, there were loose bolts, not enough FIPG and the stripped thread thing...well I don't know. The case only came with one extra set screw in the bag. I just filled everything up with The Right Stuff FIPG nice and thick. It looks a bit silly but no leaks! I do have a short throw shifter for the transmission and you are totally right, the feel is great! I think I would like to bend the transmission shifter down a little bit but I may get used to it...my fist isn't hitting the dash and I can reach all the gears without too much difficulty. Will see what happens next...I have a manual throttle setup I am debating to install but not sure how useful it will be...
 

Members online

Forum statistics

Threads
278,305
Messages
3,554,043
Members
248,016
Latest member
Advally Service

Trending content

Back
Top