What did you do with your 4runner today?

<a href="https://ibb.co/tPgMCDg"><img src="https://i.ibb.co/yBtnsqt/AB486-F92-D88-D-463-D-AB1-A-CADFE2030294.jpg" alt="AB486-F92-D88-D-463-D-AB1-A-CADFE2030294" border="0"></a>

Got a new windshield today. Finally crack and chip free…. for now!
 
<a href="https://ibb.co/tPgMCDg"><img src="https://i.ibb.co/yBtnsqt/AB486-F92-D88-D-463-D-AB1-A-CADFE2030294.jpg" alt="AB486-F92-D88-D-463-D-AB1-A-CADFE2030294" border="0"></a>

Got a new windshield today. Finally crack and chip free…. for now!

Same here!! Amazing what a new windshield will do for the driving experience.
 
Cleared a CEL, hopefully because my daughter didn't put the gas cap all the way on after filling it up. Codes were P0441, P0446, P0455. Hopefully that was it.

Also performed a Zero-point calibration. It seems like this is the 3rd time I've had to do it in the last 6 months. What would cause it to keep losing that setting?
Thanks.
 
Cleared a CEL, hopefully because my daughter didn't put the gas cap all the way on after filling it up. Codes were P0441, P0446, P0455. Hopefully that was it.

Also performed a Zero-point calibration. It seems like this is the 3rd time I've had to do it in the last 6 months. What would cause it to keep losing that setting?
Thanks.

I had the same issue in a 2003 sequoia. Ended up being a bad wheel speed sensor.
 
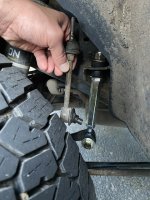
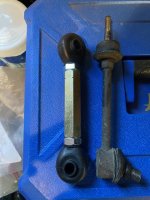
I installed extended rear sway bar links from OCD. Anyone have any experience with these? Noisy after a while or with regular maintenance are they ok? Seems to ride much better than stock which were way out of wack.
 
Had my fuel sending unit replaced and did the fuel pump for good measure while the tank was out. The video at the end of this post by someone named Rick S. provides an impressively detailed analysis of the issue. The short version of my story being that I recognized a number of the symptoms he described have been going on with my truck for years. Recently it started reading 1/4 tank low all the time. I'm keeping this truck forever so I fixed it and wanted to provide some pics and info.

For reference, my 4R is an '07 V6 with ~228K miles.

Cost: Parts ~$283 | Labor $393 with 10% veteran discount makes the total ~$676. Yeah, a lot of money, but probably about a month's car payment on a new vehicle so there's that. Someone comfortable doing the job themselves could do it for about $250 worth of parts (fuel pump kit, fuel sending unit, and the housing with the filter media and even that's kind of optional).

Chokes me to pay the labor but after consideration of the job itself and other things going on, it was worth it.

OEM items are from Toyota's online store. Shop around by clicking the dealer names if there are multiple dealers in your area as some offer significant discounts. Parts:

8332060440 $ 95.70 GAGE ASSEMBLY, FUEL SENDER
2330050120 $ 37.97 Fuel Filter << This is the housing w/filter media in it
7714435010 $ 33.59 Fuel Tank Lock Ring << Didn't necessarily need
7716904050 $ 6.34 Fuel Pump Tank Seal << Gasket
Denso fuel pump & mounting kit - ~$109 from Amazon

Here's a comparison of the fuel sending units and the problem is obvious - the "track" of contacts where the pin or whatever it is moves up and down gets worn away over time.

What it's supposed to look like:
5d2V9wum.jpg


What it actually looked like after removal:
2ERjr3qm.jpg


Interestingly, the 4th Gen fuel filter has two components. There's the strainer, which I have to say looked pretty clean for the age and mileage.

Old:
jO7AkBhm.jpg


New:
VceB6xIm.jpg


Then the housing itself has filter media inside, visible through the hose connections in this pic of the new one. I unfortunately couldn't get a pic of the old one but it was nearly black.

x4WUs2Hm.jpg


Here's the video by Rick S. Worth watching if you're having these issues or just want a very thorough understanding of the fuel sending unit and how it works.

<iframe width="560" height="315" src="https://www.youtube.com/embed/yzfGmA-T9TI" title="YouTube video player" frameborder="0" allow="accelerometer; autoplay; clipboard-write; encrypted-media; gyroscope; picture-in-picture" allowfullscreen></iframe>
 
Last edited:
<a href="https://ibb.co/tPgMCDg"><img src="https://i.ibb.co/yBtnsqt/AB486-F92-D88-D-463-D-AB1-A-CADFE2030294.jpg" alt="AB486-F92-D88-D-463-D-AB1-A-CADFE2030294" border="0"></a>

Got a new windshield today. Finally crack and chip free…. for now!

Same here!! Amazing what a new windshield will do for the driving experience.


How much did ya'll pay for a new windshield? I'm hoping to get a brand new one installed for under $200
 
Installed front CV axle on both sides today. Found a place that did it for $377 per side with lifetime warranty on the axle... I don't do much off-roading so I wasn't really worried about future breaks.

On that note, I just had my truck aligned about a month ago after doing 1" leveling kit up front. It was then that I noticed the CV axle boots were torn and had lost a lot of grease, but the alignment had gotten so bad from the leveling kit that I wanted to pay for the alignment asap and not wait on CV axle repair.

Anyway, the truck feels fine and the alignment seems alright -- how necessary is an alignment job after new CV axles?
 
How much did ya'll pay for a new windshield? I'm hoping to get a brand new one installed for under $200

That's in the ballpark IIRC. I didn't pay for mine since I had dashcam video of a company's truck throwing a huge rock but I did call around just in case and it was in the $200-300. Having a new one is a gamechanger for sure.
 
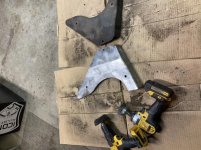
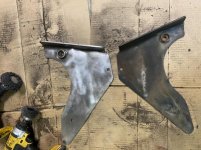
I bought a set of total chaos LCA skids used and stripped them down of rust and paint. I also handled the bolts that had a little surface rust as well. Will get around to painting and installing them tomorrow.
 
Photos of work in progress
 

Attachments

  • 7BB528BC-37C6-44EC-98EE-F693A596A1E7.jpg
    7BB528BC-37C6-44EC-98EE-F693A596A1E7.jpg
    55.6 KB · Views: 443
  • 67BFA1F7-4B00-42A8-8020-632B92F29C48.jpg
    67BFA1F7-4B00-42A8-8020-632B92F29C48.jpg
    57.4 KB · Views: 427
Also here are a few photos of the OCD rear sway bar links from the other day. The side by side are the fronts vs the rear but same girth. I will get around to installing the fronts in the next few days.
 

Attachments

  • 4F48EDB9-F73E-437F-AD11-728DC91D8734.jpeg
    4F48EDB9-F73E-437F-AD11-728DC91D8734.jpeg
    122.8 KB · Views: 429
  • 0454934C-247D-4310-A8C3-958C6EB9F34E.jpeg
    0454934C-247D-4310-A8C3-958C6EB9F34E.jpeg
    122.3 KB · Views: 418
That's in the ballpark IIRC. I didn't pay for mine since I had dashcam video of a company's truck throwing a huge rock but I did call around just in case and it was in the $200-300. Having a new one is a gamechanger for sure.


I was mostly getting quotes over $400 and the dealership wanted $675 to replace the boot and repack the grease, or $750~ for the axle. That's for only one side. Annoyingly, the dealership was the ONLY place I could find who would do the boot repair.

Swapping out the axles got rid of the clunk/thunk over bumps that had developed about a month ago, so I'm definitely glad to have it driving as it should again!
 
It's amazing how damn near any issue you may have with a 4R has a solution on this board. And thanks to [MENTION=82412]DrWinkler[/MENTION] for figuring out the answer to this one (in this thread). I dropped an LED bulb into the front passenger turn signal opening, searched the forum, saw his thread, put some wire through a piece of flexible tubing and inserted it into the DRL housing, fished for about 10 minutes, and...

oBgP2zcl.jpg


I'm installing LED DRLs with resistors. More to come on that soon.
 
Last edited:
Decided to try the resistor route and while the install is complete, the jury is still out. I'm concerned about the heat generated by the resistors given that the DRLs are on all the time. But the resistors mention DRLs in the description so I'll see how it goes.

The Alla bulbs are $17.99 on Amazon. For the resistors, also from Alla, I first ordered some that you tap into the existing wiring, then returned those and got this plug and play type ($15.99 on Amazon) after running across them online. The bulb goes in one end and the other end plugs into the existing socket. Aside from being much easier, the longer wires give you a bit more flexibility in mounting the resistors.

4WfTmi7m.jpg


I'm trying this metal dryer duct tape (super useful stuff) to secure the resistors for now. I don't want to drill screw holes yet in case this doesn't work out. The passenger side placement isn't hard; this spot is away from anything that could be affected by the heat.

2MnS9FNl.jpg


There's unfortunately nowhere to put it except here on the driver's side.

jq8WURkl.jpg


Looks great and both turn signals work without hyperflashing. Updates to follow.
 
Decided to try the resistor route and while the install is complete, the jury is still out. I'm concerned about the heat generated by the resistors given that the DRLs are on all the time. But the resistors mention DRLs in the description so I'll see how it goes.
.

Do you have the stock headlight housings?

I'm curious to see how this looks. Headlights are one of the best mods to modernize our trucks IMO but I'm always super leery of the ones with DRL's, too many stories of water/condensation after a year or two
 
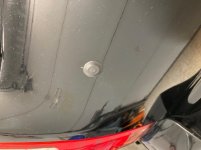
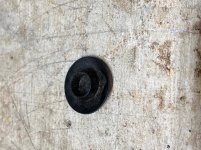
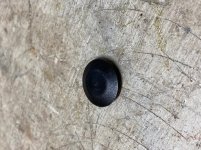
Redneck repaired a rust spot on my back hatch yesterday. Left of the license plate i had pencil sized spot of rust. Last year i ground it down with a dremmel and removed the rust. The spot reappeared under the repair with more rust so I ground it back some more. I was well below the sheet metal thickness and still had solid steel. Im going to have look inside the interior cove and see it is a spot weld in that location. Anyway, last week I see the rust return a second time. Pulled out my 1/2” rotobroach bit and cut a hole in the rear door and punched out the rust spot. Painted the exposed edges with primer, black paint and after it cured, plugged it with a panel plug with some clear silicone. Considering its black on black, I guess it looks okay. I just cant justify sinking bunch of money into a truck with 230,000 miles on it. So it’ll have to do until I need a whole new used back door
 

Attachments

  • 3EA7A016-47BF-4D7D-AC86-D5196CF119A6.jpg
    3EA7A016-47BF-4D7D-AC86-D5196CF119A6.jpg
    119.8 KB · Views: 391
  • 8E264BE1-B032-4634-939B-E943168705F7.jpg
    8E264BE1-B032-4634-939B-E943168705F7.jpg
    140.1 KB · Views: 384
  • E01BE1E1-2D02-4D44-ADA1-6B0F952964A1.jpg
    E01BE1E1-2D02-4D44-ADA1-6B0F952964A1.jpg
    139.8 KB · Views: 392
Last edited:
Removed shocks, springs, top hats and 1" spacer installed new top hats, 1/2" spacer and shocks/springs. Got a 1" drop in ground to fender height, looks a little better IMO.
 

Members online

Forum statistics

Threads
278,304
Messages
3,554,041
Members
248,016
Latest member
Advally Service

Trending content

Back
Top