Pyral
Member
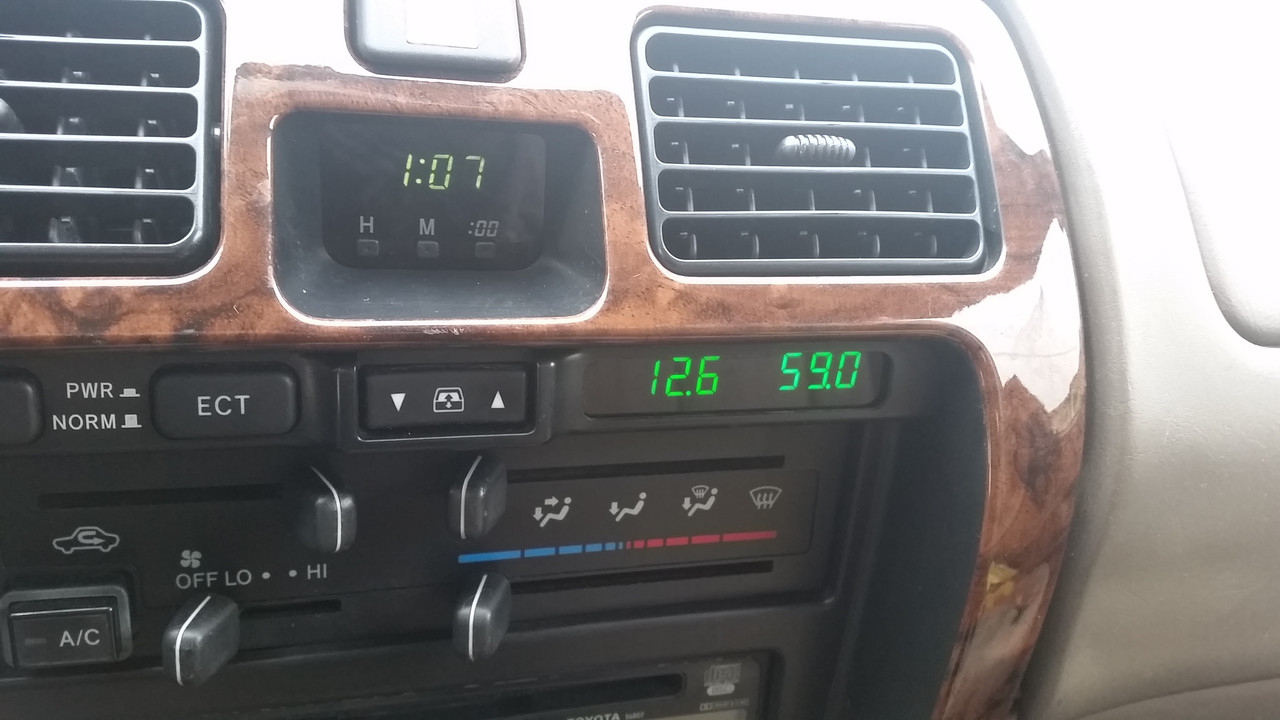
We all know that many (but not all) 3rd gens came from factory without a way to view the outside temperature. This mod will allow you to add a digital thermometer that won't look out of place in the interior.

The result
Choosing the Thermometer
One of the hardest parts was finding the correct thermometer. Because the display has to be small in order to work, most digital thermometers sold online were too big, those that were the right size either didn't use green LED or had a poor temperature range (only went down to freezing).
I ended up buying my thermometer from someone in Germany, I ordered 2 with a 5m long cable (if anyone wants to buy the extra off me PM me). You can buy it from ebay here, but the shipping is a little pricey. I'll link an alternative in the end. Also it displays in Celsius only if that matters, very few small digital thermometers output in Fahrenheit.
I chose this one because it had green LED, it has a sufficiently wide range of temperatures, had a 5m cable, and it fit within the dimensions. If your going to mount it in the blank panel, the thermometer must be under 40x30mm or else it wont fit within the blank. I also strongly recommend buying a thermometer with a 5m long cord.
Mounting the Thermometer
To mount this thermometer you will have to cut out a hole in the plastic blank. If you use the thermometer I linked you will want a hole that is 20 mm tall and 38 mm wide, expect some minor filing to get it to snap in perfectly.

Some of the tools that were used, plus the piece of plastic that was cut out
To cut out the window I used basic hand tools, the most useful was the pocket knife, the xacto pointed blade, and a hack saw blade I cut down. I tried using heat to help cut through the plastic, but it didn't help all that much. Power tools can be used, but I didn't have any.
The thermometer should fit into the window very snugly, you don't want to risk removing too much plastic. If the window is slightly too small, use a jeweler file to remove small amounts of material. This part of the job took the longest, probably 2 hours with the sparse tools I had.
Installing and Electrical
Before you start soldering, crimping, and cutting, test that your thermometers works. Hook it up across a power source and check that the all the LED in the display work and that its reading is accurate. One of mine was defective (bad LED), the seller is decent and they shipped me a replacement one.
The digital thermometers need power to work (duh), most thermometers have 2 TINY gauge wires coming out the back to provide power. These wires are small, delicate, and short. You'll need to solder on some thicker gauge wire to the end for mounting in the vehicle. I recommend using wire no larger than 16 gauge.
I originally intended to power this by filling a blank spot in my oem fuse box, the problem with this was the thermometer would not turn off when the vehicle was off.
I grudgingly ended up using fuse taps, this method is the easiest to do. It isn't pretty though, and your relying that Toyota's safety margins will allow for the additional load from the fuse tap.

Messy fuse box, ignore the right fuse tap, that is for something else
The other wire that isn't in the fuse tap, is the negative wire that is normally black. This is easier, crimp a ring terminal to the end of the wire and screw it into a ground point. I used a ground point that was in the upper left part of the footwell.
I think the result is worth the messy fuse box:

Thermometer Sensor Mounting
This is the last only step that I haven't done. My plan is to run the cable along the driver side through a vent that is in the cargo area. Toyota sells a version of this vent (PN 62940-35020) with a built in grommet, currently it's on backorder which is why I haven't finished with this step.
If you want to mount it in the same place, it's essential that you have 5 meters of cable. The pressure vent that is our 4runner's also doesn't have the built in grommet, you have to buy the part I listed. And you have to buy the grommet for it separately.
However, there are a variety of places that are suitable for the sensor, just make sure it isn't affected by engine or exhaust heat, and is in a sheltered place.
(Edit 6/17)

Section of cable run at the rear door
Here are some more photos of the cable run. I ran it under the door sills to the back, from there I poked the cable under the plastic panel that is by the wheel well.

Dust that greeted me once I removed the vent
I had to remove the driver bumper cap (simple really) and the plastic bumper top to get access to the vent. It's a good thing I'm replacing this, the rubber flap fell off when I removed the bumper. It was brittle like uncooked pasta and it had let a bunch of dust inside.

Temporary setup, the silver cylinder is the thermometer probe
Because my part still isn't in, the photos above are of my temporary setup. I used a washer to keep the probe from going back through the air vent, there isn't a flap there anymore
I'll update this section when I finish mounting the sensor.
(Update 1/9/2023):
I ended up not sticking with the location I chose initially. I had to move it to the complete opposite end of the vehicle.
I didn't think the engine heat would register if the probe was located on the side of the vehicle far away from the engine. But the engine heat would raise the temperature significantly and make the thermometer give higher than ambient temperature readings.
Read about it here and heed this warning. If you mount it where I ended up relocating the sensor (behind the front grille) to, you'll be alright and it will work perfectly.
(end of update)
Relevant Links and Extras
Link to project photo album (Broken/Replaced)
Link to project photo album part 2
(Broken/Replaced)
Link to stable photo album (part 1 and 2). I had to replace all photos made on my posts because Imgur removed all content made without an account. Every description is painstakingly preserved from the original post.
Link to thermometer I used. I bought the "grun" color display with 5 meters of cable and (PM me if you want to buy my extra one)
Suitable alternative if you don't care about having a narrow temp range
Air vent with grommet part number- 62940-35020
The result
Choosing the Thermometer
One of the hardest parts was finding the correct thermometer. Because the display has to be small in order to work, most digital thermometers sold online were too big, those that were the right size either didn't use green LED or had a poor temperature range (only went down to freezing).
I ended up buying my thermometer from someone in Germany, I ordered 2 with a 5m long cable (if anyone wants to buy the extra off me PM me). You can buy it from ebay here, but the shipping is a little pricey. I'll link an alternative in the end. Also it displays in Celsius only if that matters, very few small digital thermometers output in Fahrenheit.
I chose this one because it had green LED, it has a sufficiently wide range of temperatures, had a 5m cable, and it fit within the dimensions. If your going to mount it in the blank panel, the thermometer must be under 40x30mm or else it wont fit within the blank. I also strongly recommend buying a thermometer with a 5m long cord.
Mounting the Thermometer
To mount this thermometer you will have to cut out a hole in the plastic blank. If you use the thermometer I linked you will want a hole that is 20 mm tall and 38 mm wide, expect some minor filing to get it to snap in perfectly.
Some of the tools that were used, plus the piece of plastic that was cut out
To cut out the window I used basic hand tools, the most useful was the pocket knife, the xacto pointed blade, and a hack saw blade I cut down. I tried using heat to help cut through the plastic, but it didn't help all that much. Power tools can be used, but I didn't have any.
The thermometer should fit into the window very snugly, you don't want to risk removing too much plastic. If the window is slightly too small, use a jeweler file to remove small amounts of material. This part of the job took the longest, probably 2 hours with the sparse tools I had.
Installing and Electrical
Before you start soldering, crimping, and cutting, test that your thermometers works. Hook it up across a power source and check that the all the LED in the display work and that its reading is accurate. One of mine was defective (bad LED), the seller is decent and they shipped me a replacement one.
The digital thermometers need power to work (duh), most thermometers have 2 TINY gauge wires coming out the back to provide power. These wires are small, delicate, and short. You'll need to solder on some thicker gauge wire to the end for mounting in the vehicle. I recommend using wire no larger than 16 gauge.
I originally intended to power this by filling a blank spot in my oem fuse box, the problem with this was the thermometer would not turn off when the vehicle was off.
I grudgingly ended up using fuse taps, this method is the easiest to do. It isn't pretty though, and your relying that Toyota's safety margins will allow for the additional load from the fuse tap.
Messy fuse box, ignore the right fuse tap, that is for something else
The other wire that isn't in the fuse tap, is the negative wire that is normally black. This is easier, crimp a ring terminal to the end of the wire and screw it into a ground point. I used a ground point that was in the upper left part of the footwell.
I think the result is worth the messy fuse box:
Thermometer Sensor Mounting
This is the last only step that I haven't done. My plan is to run the cable along the driver side through a vent that is in the cargo area. Toyota sells a version of this vent (PN 62940-35020) with a built in grommet, currently it's on backorder which is why I haven't finished with this step.
If you want to mount it in the same place, it's essential that you have 5 meters of cable. The pressure vent that is our 4runner's also doesn't have the built in grommet, you have to buy the part I listed. And you have to buy the grommet for it separately.
However, there are a variety of places that are suitable for the sensor, just make sure it isn't affected by engine or exhaust heat, and is in a sheltered place.
(Edit 6/17)
Section of cable run at the rear door
Here are some more photos of the cable run. I ran it under the door sills to the back, from there I poked the cable under the plastic panel that is by the wheel well.
Dust that greeted me once I removed the vent
I had to remove the driver bumper cap (simple really) and the plastic bumper top to get access to the vent. It's a good thing I'm replacing this, the rubber flap fell off when I removed the bumper. It was brittle like uncooked pasta and it had let a bunch of dust inside.
Temporary setup, the silver cylinder is the thermometer probe
Because my part still isn't in, the photos above are of my temporary setup. I used a washer to keep the probe from going back through the air vent, there isn't a flap there anymore
I'll update this section when I finish mounting the sensor.
(Update 1/9/2023):
I ended up not sticking with the location I chose initially. I had to move it to the complete opposite end of the vehicle.
I didn't think the engine heat would register if the probe was located on the side of the vehicle far away from the engine. But the engine heat would raise the temperature significantly and make the thermometer give higher than ambient temperature readings.
Read about it here and heed this warning. If you mount it where I ended up relocating the sensor (behind the front grille) to, you'll be alright and it will work perfectly.
(end of update)
Relevant Links and Extras
Link to project photo album (Broken/Replaced)
Link to project photo album part 2
(Broken/Replaced)
Link to stable photo album (part 1 and 2). I had to replace all photos made on my posts because Imgur removed all content made without an account. Every description is painstakingly preserved from the original post.
Link to thermometer I used. I bought the "grun" color display with 5 meters of cable and (PM me if you want to buy my extra one)
Suitable alternative if you don't care about having a narrow temp range
Air vent with grommet part number- 62940-35020
Last edited: