140A main fuse issue: a practical solution

rigtec

New member
There are a few more but a lil' hard to point out. The point is I believe that Toyota assembled the outerbox first, built the Busway grid, THEN pulled the wiring harness (conn. first) through the basin and snapped it; locking it in. Okay, that's one theory. Here's what can be done about a blown alternator main fuse. Since you can't really access this fuse we'll need to approach it another way. First here's Toyota's wiring scheme...
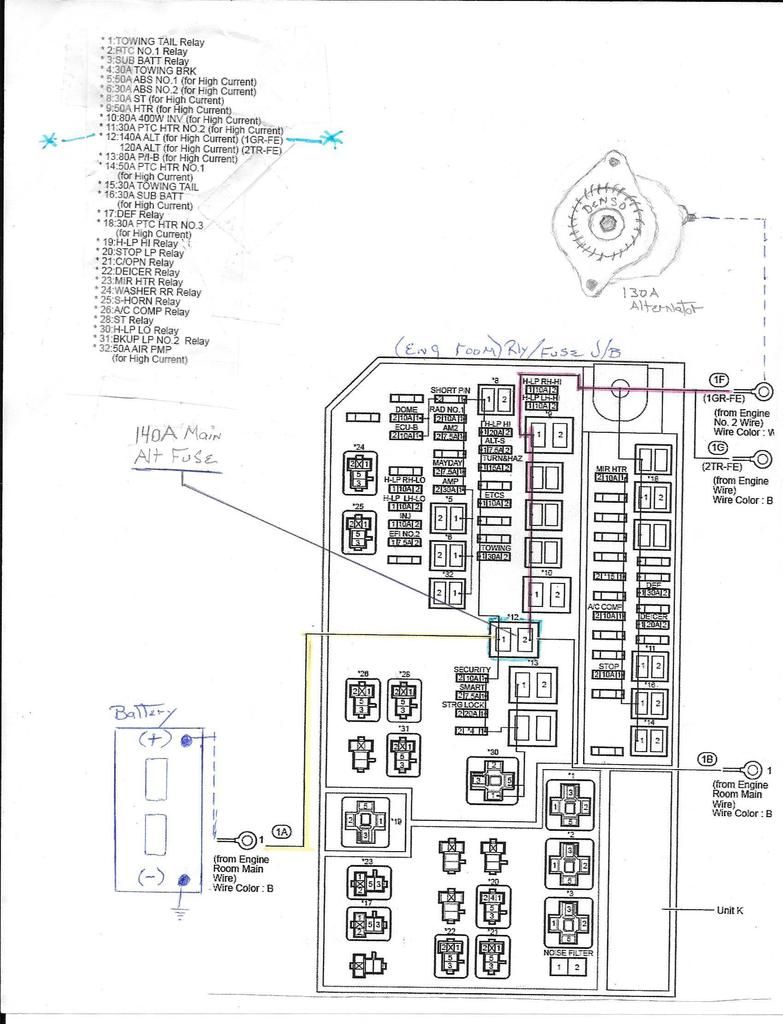


If you look at the alternator (Top) and follow the pink trace to the main engine wire lug at the upper right-hand side, you'll see the Line side supply bus just to the left; still in Pink as it travels down twds the 140A main fuse (which I have traced in Blue)! This fuse is referenced, number 12:140A Alt (For high current) "See Item list in the upper left corner"! Once this fuse is blown, you'll lose a few accessories e.g., courtesy lights, ECU, mayday, Radio, Amp... But the main thing that will be lost is the alternator's ability to charge the battery because that fuse's primary function is to disconnect the battery cable in the event of a major front-end collision to prevent an explosion; if you follow that line you'll see that the fuse is too large to protect anything else... all of those circuits that tap that fuse (through the Load-side supply bus) have their own, appropriately sized fuses. Here's a different schematic to give another P.O.V. :
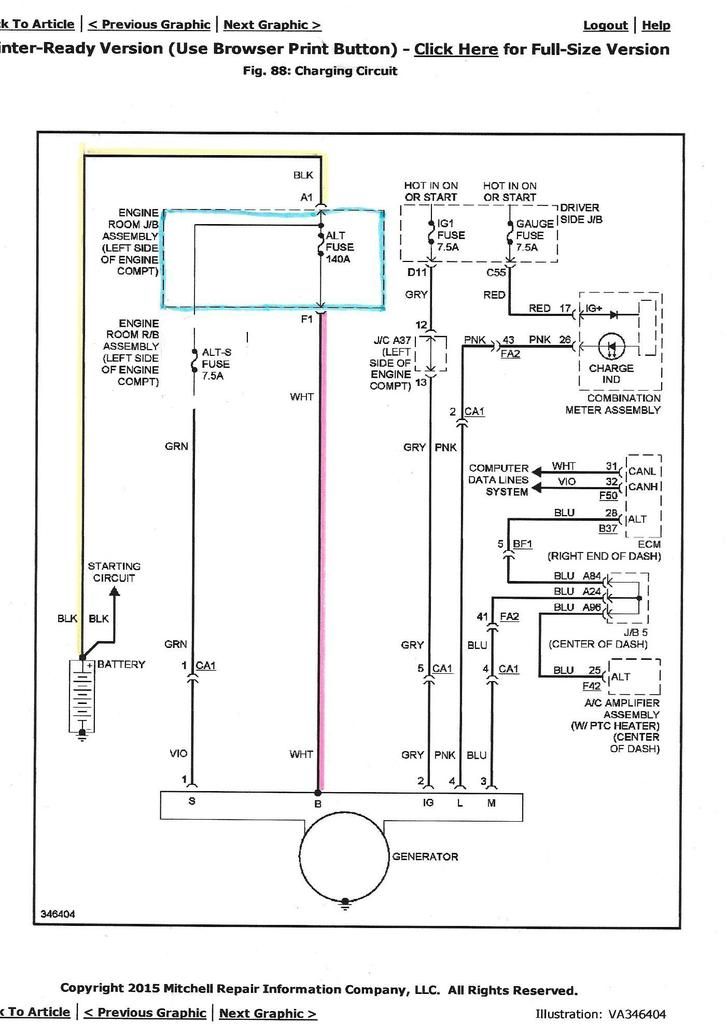


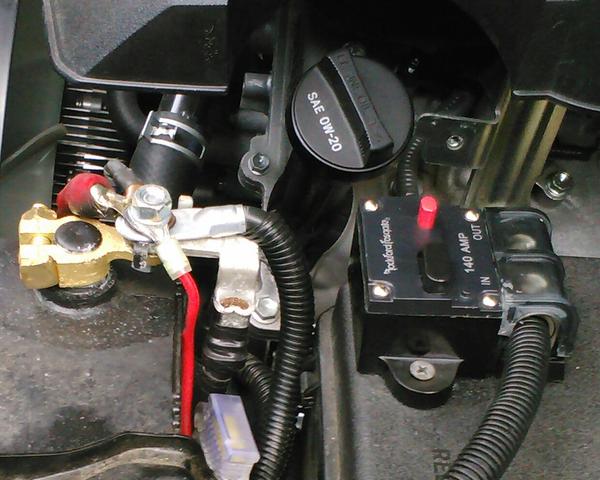
This one gives the Charging circuit vantage point. And again I have the alternator's B-Term and supply cable traced in Pink, the 140A Alt fuse traced in Blue, and the Battery cable in Yellow so the risk of a mistake is minimized! The most practical way to restore power to those circuits lost due to a blown main fuse is to by-pass it using the exact same thing... a 140A in-line fuse. The connection points are very simple. Just make your own wire harness with a 140 amp inline fuse built-in like this one:


You can use any kind of fuse that you feel comfortable using e.g., wafer, cartridge, CB (Circuit Breaker 'pictured above')... Actually, I'm already using this method... NOT to resolve a blown fuse, but a parallel (partner) supply line for quicker battery feeding when using Over-sized alternator, High current accessories; know as "THE BIG THREE", if you've already implemented this wiring configuration then you've already by-passed (Jumped) your 140A Main Alt fuse! To jump a blown line fuse, you can terminate between the POS (+) battery post and alternator "B output" terminal. Or, you can grab the alternator output lug right in the engine room fusebox, "see red arrow":
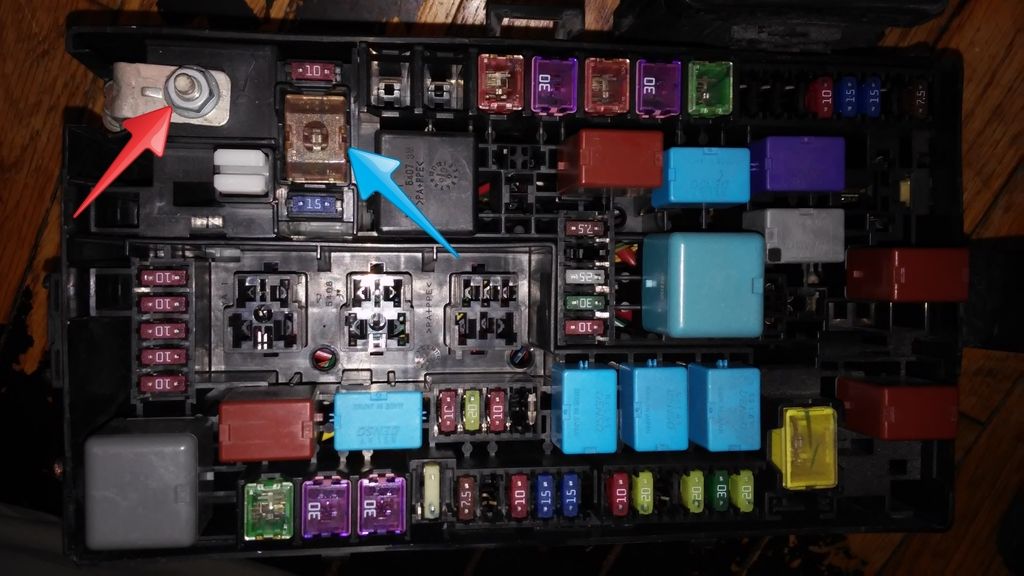


The blue arrow is the 140A fuse... this may be positioned a little differently than your truck; 4'th gen, but everything else relevant is much the same! I meant to show you how the fusebox "Busway template" is configured internally...
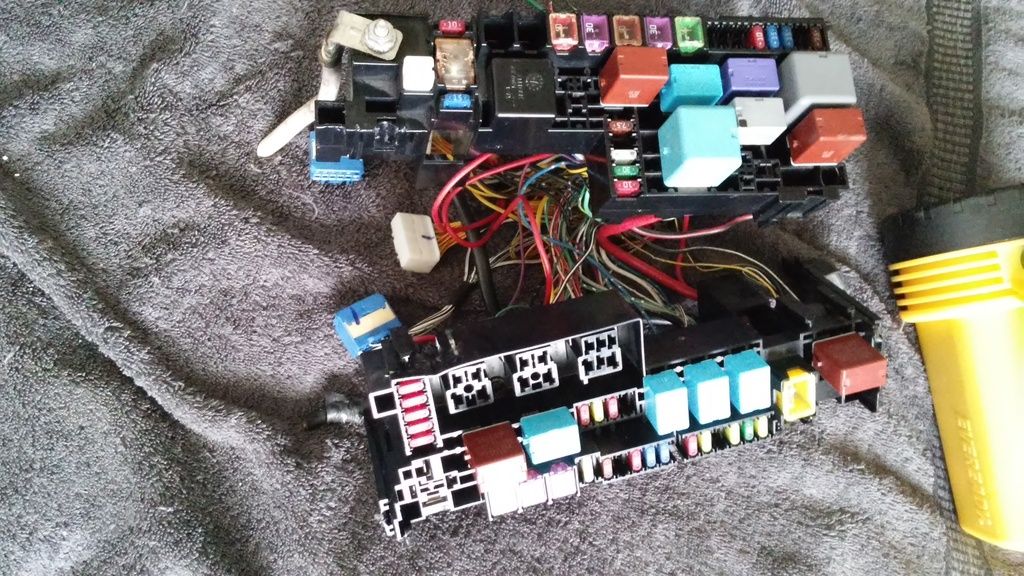


Not much to see here but it is interesting how they fit it all in there :ohwell:
Anyway, if you ever blow this fuse at anytime for any reason you'll have to decide how you'll go about getting it repaired... a Fused jumper-line may be a viable alternative to the dealership, hope you'll find some portion of this thread helpful!

Best to you!
 
Last edited:
Register to hide this ad
Wow. Amazing contribution. Hopefully few of us will have to use this information, but I can imagine those that do need it will find this invaluable.
 
Wow . Nice job rigtec. Hope I never have that problem. I see you're close to me. I'm right over the border in Rockland county.
 
Hmm, I remember getting into my 4th Gen Fuse Block without breaking the box to change my fog lamp wires to a thicker gauge...

Still helpful awesome post.
 
Hmm, I remember getting into my 4th Gen Fuse Block without breaking the box to change my fog lamp wires to a thicker gauge...

Still helpful awesome post.

Hi BW,

...In that case I sure could've used your assistance with this one! I believe my spare box is an '07 but I'm not sure that matters... what a ^itch! :(
 
If I remember right the trick is getting a very thin screw driver/flat tool and a flashlight to see where the tabs are and push them back enough while pulling up on the fuse panel itself. Still very tricky to do with the block in the vehicle as the harness provides resistance.
 
I think it would be great if someone could provide a 'STEP-BY-STEP' tutorial guide with the correct procedure for opening the box. However, the information needed for the proper dismantling of this 'Busway' has apparently been 'Unavailable' regarding the '4Runner' for more than a decade; reaching back to Gen 4. But my objective in posting this thread wasn't really to get the box opened at this point. My objective here is to provide a viable, alternative method of repairing the problem (or feeding the Load-side supply bus 'after the main fuse is blown') that wouldn't involve taking it to a dealership. The repair would also need to be cost effective... "see below":

41gqfG%2B5hdL._AA160_.jpg
41Zae0alZIL._SY90_.jpg~original

Cable set $7, Rockford*Fosgate brkr $28 (Total cost = $35)

https://www.amazon.com/gp/product/B009VTDUKI/ref=oh_aui_detailpage_o05_s01?ie=UTF8&psc=1
https://www.amazon.com/gp/product/B003RCJB62/ref=oh_aui_detailpage_o06_s00?ie=UTF8&psc=1

And... the solution to the problem would need NOT to be time consuming or involve taking a day off! The simple fix: if you blew that 140A line fuse you'd reach into your truck's cargo area, take out a pre-built 'fused' jumper-line, bolt one end of it to the existing POS battery cable, and the other end to your alternator's main output terminal, see RED arrow below:


Best to you!
 
2 questions...

41gqfG%2B5hdL._AA160_.jpg
41Zae0alZIL._SY90_.jpg~original

Cable set $7, Rockford*Fosgate brkr $28 (Total cost = $35)

https://www.amazon.com/gp/product/B009VTDUKI/ref=oh_aui_detailpage_o05_s01?ie=UTF8&psc=1
https://www.amazon.com/gp/product/B003RCJB62/ref=oh_aui_detailpage_o06_s00?ie=UTF8&psc=1

And... the solution to the problem would need NOT to be time consuming or involve taking a day off! The simple fix: if you blew that 140A line fuse you'd reach into your truck's cargo area, take out a pre-built 'fused' jumper-line, bolt one end of it to the existing POS battery cable, and the other end to your alternator's main output terminal, see RED arrow below:


Best to you!

Hey Rig,
Have you ever had issues with the circuit breakers on rough roads/off roading? A couple of the comments on Amazon and a post on pirate suggested they can get tripped in rough conditions but wasn't sure this was true of all of them or just cheap ones.

ALso where you show the alternator hookup it's really tight in my box once you shot the cover. I'm not sure I could fit a large gauge wire through there, Have you attached a wire and shut the cover in your current setup? I know you did all that alternator work.
 
Hey Rig,
Have you ever had issues with the circuit breakers on rough roads/off roading? A couple of the comments on Amazon and a post on pirate suggested they can get tripped in rough conditions but wasn't sure this was true of all of them or just cheap ones.

Hi Swarty,

The one that I was using (Rockfort*Fosgate 140A) has never tripped once since I've had it (about a yr). It was first mounted atop the relay/fuse-panel because the lines weren't quite long enough to reach the fender/wheel-well. I relocated it because it made it difficult to remove the lid for servicing:

rigtec-albums-%26quot%3Bgentilmen+prefer+redheads%26quot%3B-picture26891-img417.jpg
rigtec-albums-%26quot%3Bgentilmen+prefer+redheads%26quot%3B-picture26896-img418-1.jpg~original


ALso where you show the alternator hookup it's really tight in my box once you shot the cover. I'm not sure I could fit a large gauge wire through there, Have you attached a wire and shut the cover in your current setup? I know you did all that alternator work.

You don't have to terminate the new cable-end in there; I mainly did that for illustration purposes and clarity, for the benefit of those who are new to electrical systems and may be confused by my choice to move the cable to a different spot. The other reason that I did it that way was because I thought it may be easier to get at that lug than the one on top of the alternator... "but you raise a very good point about the lack of space through that portal"! And... bolting the cable to the top of the alternator (B-output term) will accomplish the very same thing, "See below":


PS: If you do decide to tap from your alternator's 'B term', just remember to place the new cable's "eyelet term" Underneath the stock cable end; if you don't, you won't be able to close the alternator's plastic terminal cover!

Best!
 
This worked!

Just to let you know this work around worked for me today! I had blown my 140 amp fuse about a month ago and I could not get to the fuse bolts. I tried this work around and BAM! Car started up like a champ! Thank you for posting!


Hi Swarty,

The one that I was using (Rockfort*Fosgate 140A) has never tripped once since I've had it (about a yr). It was first mounted atop the relay/fuse-panel because the lines weren't quite long enough to reach the fender/wheel-well. I relocated it because it made it difficult to remove the lid for servicing:

rigtec-albums-%26quot%3Bgentilmen+prefer+redheads%26quot%3B-picture26891-img417.jpg
rigtec-albums-%26quot%3Bgentilmen+prefer+redheads%26quot%3B-picture26896-img418-1.jpg~original


You don't have to terminate the new cable-end in there; I mainly did that for illustration purposes and clarity, for the benefit of those who are new to electrical systems and may be confused by my choice to move the cable to a different spot. The other reason that I did it that way was because I thought it may be easier to get at that lug than the one on top of the alternator... "but you raise a very good point about the lack of space through that portal"! And... bolting the cable to the top of the alternator (B-output term) will accomplish the very same thing, "See below":


PS: If you do decide to tap from your alternator's 'B term', just remember to place the new cable's "eyelet term" Underneath the stock cable end; if you don't, you won't be able to close the alternator's plastic terminal cover!

Best!
 
holy hell what a dumb design

Don't think for a minute it wasn't done on purpose. When I blew mine I bought a 140a replaceable fuse , cut out the fused link and soldered the new link across my blown contacts. I tried for hours to get the fuse box apart- crazy.
 
Please forgive my ignorance, but is there no way to get into this box? What happens when you go to the dealer with this? What voodoo do they do? And really dumb: why in the f would Toyota make this such a secret?

A very good practical solution that appears to be able to be done (if needed) in BFE with parts from NAPA!
 
wider applicability

Love your solution.
I have a 2005 LEXUS RX330 with a blown 140a alternator fuse. The t4r wiring diagram you provide looks pretty general for the battery/alternator connection. Do you know if your solution is applicable in for the 330 application?
 
Love your solution.
I have a 2005 LEXUS RX330 with a blown 140a alternator fuse. The t4r wiring diagram you provide looks pretty general for the battery/alternator connection. Do you know if your solution is applicable in for the 330 application?

Someone should correct me if I'm wrong, but I believe this solution would work on essentially any vehicle.
 
Can anyone tell me where this 12v LIVE white cable runs to in the fuse box?
Its mounted to the top corner near the 140 amp fuse and runs down into the harness.

Im trying to reconnect my harness after a big wire upgrade and I cant remember where this white cable goes.

It goes to alternator i think along with the alternator cable. Or maybe it was 2 in 1 connection. I cant remember.
 

Members online

Forum statistics

Threads
278,307
Messages
3,554,056
Members
248,016
Latest member
Advally Service

Trending content

Back
Top