1989 4Runner 1uzfe swap

Travolous

New member
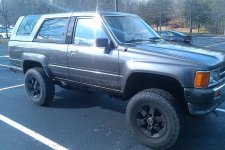
1987 4Runner 1uz-fe build

So, this build thread is an attempt to provide facts and advice for others who may do this swap in the future. Lots of research, time, and money are required for a swap. Below is my contribution.

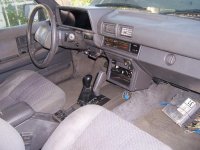
1987 4runner sr5 5spd
1" body lift
R150F transmission

Donor Car:
1991 Lexus LS400 98k miles. The 1UZ came in multiple cars, with 3 different types of oil pan sumps. The LS400 has a front sump pan which is needed to for an IFS truck. The SC400 has a rear sump which is needed for a Solid Axle Truck. The 1uz changed in 98 to include toyota's VVTI technology. That technology produces more HP but has security called an immobilizer built into the vehicle that makes swapping it very very difficult. I opted for a pre 98. The early 1uz such as mine has the beefy rods capable of handling plenty of power so I was ok with the possibilities.
 

Attachments
  • 89 4runner 2.JPG
    89 4runner 2.JPG
    89.8 KB · Views: 17,697
Last edited:
Register to hide this ad
Parts List:

-Engine pre 1995 1uz for strongest rods
-AEM Infinity EMS
-Timing change Kit
-COP conversion to eliminate dissys, coils, etc.
-1uz Fuel Pump (I believe 225lph capacity. Can't use 4runner, too small)
-Tundra 2uz headers (Best headers for 4runner clearance. Minor Modification)
Wiring Harness Conversion (The nitty gritty. I had yotatech member 'RMA' do mine. After doing 3 already, he was well equiped and was able to include the proper connectors for the adaptation of the sc400 harness. Since I had an ls400
wiring harness, I needed the sc400 connectors to the cluster, as the ls400 connectors are not the same.)
-Motor Mounts (pre fabbed available from Gloverman on Lextreme.com. He also sells them on trademe.co.nz I had mine
made.)
-315cc Injectors (may run higher since I'm running aftermarket ECU now)
-Denso IK24 Spark Plugs
-SC400 Cluster (using in lieu of factory cluster)
-Oil Filter relocation Kit (sc400 filter setup will work, LS400 will not. I chose
remote relocation)
-Adapters (R Series bellhousing to engine adapter)
-Flywheel (There are no factory made 1uz flywheels. Must either modify the 4runner flywheel with new boltpattern, or
buy one custom made which is what I did)
-Clutch (uses the actual clutch for your transmission. I went with a competition clutch stage 2 non ceramic)
-Alternator (145amp upgrade is a good thing to do and is what I did)
-Power Steering Pump
-Electric Fans (depending on your clearance which depends on how far back you get the motor, 2 or 3 electric fans
will -work. I will run 3, 10" 900cfm fans. These fans should be pullers and not pushers for proper cooling.)
-Heads ported
-Kelford 207-SC Supercharger profile Cams (higher exhaust lift and less intake lift to get the gases out)
-Lextreme Valve Springs
-Labor (I paid someobody with the experience, talent, and uncanny ability to do swaps.)

Supercharger
-Lower Manifold fabrication with waterbridge and fuel rails
-Eaton M112 Supercharger Ported
-Ford Cobra Throttle Body (since I'm running the aftermarket ecu I can do this)
-AEM Water Methanol Kit
-3" pulley
-TRD Boost Gauge
-Labor (fabricationg the supercharger, porting it, and installing it)

Interior
-New Carpet Replacement
-FatMat Sound Deadning entire cab
-New Gray Shift Boot
-New Center Console Lid
-Grant Steering Wheel
-Tacoma Gray Shift Knobs
-Lexus LX400 Rearview mirror with autodimming, temp, compass, homelink
-4th Gen 4Runner Sun Shades

Exterior
-Door Seals Replaced
-Body Restoration and trim out for new color
-ARB front bumper
-Marlin Crawler Rear bumper
-Non sealed headlight upgrade

Suspension
-ProComp Wheels
-MT 33" tires
-Sky offroad SAS Kit (Spring under for less lift)
-Man-A-Fre U-Bolt flip kit (for spring under kit)
-Man-A-Fre Tie Rods
-Marlin Crawler Billet Steering Arms
-Bilstein 5150 rear shocks
-Rear Wheel Bearing Replacements
-Front Axle rebuild and wheel bearing replacement
-Redline MT-90 75W90 Fluid for everywhere
 
Last edited:
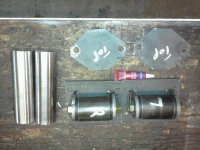
Here are the pieces for the motor mounts. Once you determine the exact resting place of the engine, the mounts will be completed.
 

Attachments

  • 1uz motormounts.JPG
    1uz motormounts.JPG
    50.1 KB · Views: 15,933
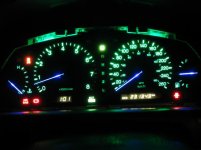
The Cluster modification requires fabrication. I had yotatech member 'RMA' do mine, as he is the only person that I know of to have actually done this to others. He made a backplate to accept the new SC400 board, and attached connectors to bolt it down in the back. It really is amazing and clean. he even used a pre 84 truck with no tripometer hole to cover it. Tinted just like the factory sc400, this is what it looks like when finished. (Picture of a vehicle RMA did, not mine)
 

Attachments

  • sc400 dash integrated.jpg
    sc400 dash integrated.jpg
    39.3 KB · Views: 22,273
  • green sc400 cluster.jpg
    green sc400 cluster.jpg
    34.2 KB · Views: 15,099
Last edited:
What is the limiting factor that makes a minimum of a 1" body lift mandatory?

You can't mount the engine low enough in the engine bay without a body lift. RMA has completed 3 so far. He made a custom 'frankenpan' specifically to get the engine low enough without a body lift, and in the end, had to do a 1". I have found no example of a 1st gen 4runner without a body lift, and a 1uz swap.
 
is your swap being done in raleigh? I am a few hours away and would love to do this.. what do you think your end cost will be?
 
is your swap being done in raleigh? I am a few hours away and would love to do this.. what do you think your end cost will be?

Durham, although I do live in Raleigh.

If you are not doing any of the work yourself it cost a lot more. I am having everything "contracted" out so that it is hassle free for me. Labor for these swaps can be 2-4k depending. Parts, depending if you're doing it right, or taking shortcuts, another $3k.
 
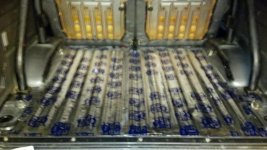
Before I dropped the truck off for the swap, I removed the interior, put fatmat sound deadoning material down, and replaced the carpet. The fatmat is awesome and will allow me to be able to peacefully ride in my 4runner while not being pestered with road noise. The picture is during the laying of the trunk. (and before my upgrade from droid eris to droid razr camera #crappyphoto)
 

Attachments

  • fatmat 4runner.JPG
    fatmat 4runner.JPG
    73.2 KB · Views: 13,733
Dont be a stranger

Keep this post full of pics and that advice you offered. I'm about to start gathering parts and research to do this swap in an 87 4runner with straight axle swap and I was going to look for a vvti motor till I saw your comment about the immobilizer. Might have saved me from a costly mistake. thanks.
 
No problem! The 98+ vvti engines are going to be a huge huge headache, both now and in the future, I would suggest steering away from that. Remember, straight axle requires the oil pan from an SC400 to work. If you get an Ls400 motor, you can go to lextreme.com and find a ton of people wanting to swap their sc400 pans for ls400 pans so don't worry about specifically having to buy the sc400 engine.
 
I had to change clutch orders due to competition clutch being out of pressure plates at the moment. I went with the Centerforce DF501110 which states up to 90% more holding power. Probably a good thing, as it needs to be much better than the oem. If you do a swap, do not put an oem 4runner clutch back in. Even the 3.0 which is what I have, isn't strong enough. I have read no less than 2000lb of clamping force.
 
Last edited:
I wanted to post an update to this thread since it has been awhile. The motor has not gone in yet, and I decided to do a SAS while everything was out. The SAS is nearly complete and we will be dropping the engine in soon hopefully. I went with SKY Offroad SAS kit with a spring under design to make sure this truck is not really lifted a lot. I don't want a huge jacked up vehicle. I also want to run 33's only, so the spring under will make them look good without looking to little.
 
Last edited:
Would the stock headers have not cleared? What modifications did you have to make to the 2UZ Tundra headers?

No headers would clear the steering arm of the 4runner. Two of the header tubes have to be cut and rewelded in different locations to not contact the steering arm. This is only on the drivers side.
 
Adapter Plate Fitted

The adapter plate fit almost perfectly. There was one bolt hole that we will have to file a little bit. The program seems to be off just a hair on that bolt location. Also, Since I used the bellhousing bolts to install the adapter, I need to get another set of bellhousing bolts for the bellhousing to adapter :) I would recommend that for an $800 1uz to R150 Kit, it could come with bolts.
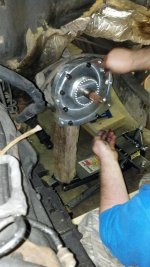
12/5/14 update: Talked to swap maker and he realized this was an issue and has since corrected it. Some of the bolt holes just had to be widened to fit the bolts. Should not be an issue with current production kits according to the seller (1uzfeswapkit.com)
 

Attachments

  • adapter plate installed.jpg
    adapter plate installed.jpg
    137.5 KB · Views: 4,611
Last edited:

Members online

Forum statistics

Threads
278,310
Messages
3,554,079
Members
248,016
Latest member
Advally Service

Trending content

Back
Top