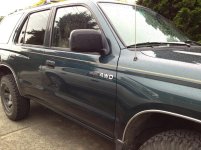
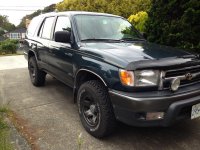
1996 4Runner 3rz 4x4 Build

jmcn

Member
NOW FOR SALE... Its a sad day. Thanks to all those who gave me advise on this build. I'm going to miss this truck so much, but I just can't afford to keep putting gas in it. Oh well.

Well, here we go. This is the start of my build thread for my 1996 Toyota 4runner base 3rz 4x4. I bought my truck about a year ago, after drooling over 3rd gen 4runners and 1st gen Tacomas for most of my life (I'm 20; born in 1993.. Prime time for Toyota watching). I was finally at a point in my life where I could justify owning a 4x4 for adventure camping and use as my personal BC Safari vehicle and spent months researching models and options. In June of 2011, I had narrowed down what I was looking for:
I wanted the 3rz 4cylinder (I had an 05 Taco 2wd with the 2tr before and loved it), I wanted four wheel drive and I wanted zero power options (or as few as I could find).
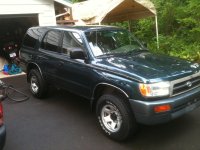
For some reason, 3rz 4Runners are almost impossible to find anywhere near where I live so the search went on for a couple of months. After much deliberating and searching, I finally found this guy. It ticked every box, minus the automatic transmission. I really wasn't super excited about that, but due to the rarity of 3rz motors, I jumped on it. The previous owner was a Toyota tech at a dealership and my truck had complete maintenance records since new. No rust of any kind, and a clean interior sealed the deal.

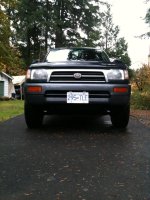
Here the little guy is, the day I brought him home.
 

Attachments
  • IMG_0495.jpg
    IMG_0495.jpg
    131.7 KB · Views: 7,612
Last edited:
Register to hide this ad
Welcome to the forum bud! i love that green color, also have a 96 with the same thing.

You must me super excited about the new ride! congrats.
Why did you want such a base model 4Runner?
 
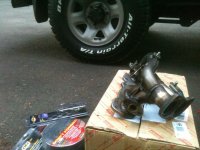
A few things needed to be addressed: first was the notorious cracked exhaust manifold. I purchased a kit from a gentleman on this forum for the 3rz/2tr mini-header upgrade. I realized there were cheaper options, but I wanted to stick with OEM. The kit went in really easily and I modified the original heat shield to fit the new header. I had originally wanted header wrap because it looks way cooler, but.. Oh well. Practicality prevails.
When that was done, I replaced the rusted out muffler with a Dynomax Super Turbo. I'm very happy with this choice. I find the exhaust to be just loud enough to make you and others feel like you have more horsepower than you actually do.

Here's a photo (taken with a sweet potato) of the header kit, next to my brand new 235 75R 15 BFG A/Ts.
 

Attachments

  • IMG_0533.jpg
    IMG_0533.jpg
    135.4 KB · Views: 2,367
[MENTION=14772]shootmymime[/MENTION] Thank you very much! There's a lot of cool stuff on here and I'm looking forward to potentially contributing at some point!

I wanted the base model for a couple of reasons: I drove a bunch of Limited models with the leather interior/power windows etc. and in all of them I found places where ages was taking its toll.. Torn and gross looking seats, slow squealing windows, broken power locks and mirrors.. Things like that. I wanted something with none of those potentially faulty options. I figured that if I decided to have, for example, power windows in the future, I can always just install them. I like doing stuff like that. I'm a university student, too, so I also was hoping to avoid potential part repair costs.
 
Last edited:
Welcome fellow base model owner! Looks pretty cool. Looking forward to more info on your Limited front clip swap.

Haha I just realized, you sure know you're a 3RZ owner when the first mod in the build thread is a header! Mine too, man, haha.
 
Last edited:
Thank you, [MENTION=25058]ChildrenOfBodom[/MENTION]! Your truck looks phenomenal. Really nice job and very tasteful mods. I'm thinking a manual trans swap will be in my future, too!

And you're totally right, the manifold had to go. Oddly enough, the previous owner replaced the cast one with... Get this... Another cast one... Which cracked... Like the last one... When I drove the truck home for the first time it sounded like a bike with a card in the spokes.
 
By this point I was back to school and had no money as usual, so mods were put on hold. I added a plastic insect deflector to protect my windshield and hood from rock chips in September. I also painted the grille to cover up all that sun-damaged paint and plastic, and the disc calipers gold to match the pinstripe on the side which effectively added 8hp.
 

Attachments

  • IMG_0622.jpg
    IMG_0622.jpg
    139.2 KB · Views: 2,291
Last edited:
Looks like a very clean ride to start with! Props on the nice find and the patience to wait, it's usually worth it!

Similar boat (college) and similar age with similar financial situation. My mods are dreadfully slow! haha.

Keep it up! :yo:
 
In March I messed up bigtime. I was slowing to a stop on a steep hill behind a group of other cars. The light changed and the cars started moving, so I took my foot off the brake, looked to my left for a second and when I looked back, a car two in front had stalled. It was raining and dark, and though I tried to stop, it wasn't going to happen. I smacked into the rear of a newer Dodge Caliber, cracking it's plastic bumper and crushing my own, along with my driver headlight, turn signal, bumper valance and left fender. I was devastated and felt super horrible, especially since the person I hit was so nice to me.

After surveying the damage, I figured I could fix it without making an insurance claim. The challenge was then to find a front bumper from a wrecked truck that was not involved in a front end collision. I looked for a while, but found nothing. I eventually found a 2000 4Runner Limited in a yard near my house. The previous owner moved to Vancouver Island from the US, and, for some reason, didn't want to go through the trouble of importing his truck. He sold his 2000 Limited to the auto wrecker in MINT shape with the equivalent of 110 000 kilometers on it. I pilfered it for its grille, front bumper, and visibly unused OEM Toyota roof rack. The bumper was chrome and had some rust on the inside so I got it for a good deal.

The 1996 front bumper attaches to the frame in a very similar way as the 2000. The main difference being that the newer 'fat lip' bumper is built to accommodate a removable crumple zone that older 4Runners do not have. Once you remove the crumple zone, you are left with a single 2cm bolt hole. When you lift the newer style bumper on to your truck, you can line up the hole on the bumper with the closest hole to you on your truck. Get someone to line up the new bumper for you while you mark where the second hole should go. Pull the bumper off and drill a slightly larger whole where you marked so you can have some adjustment before you tighten later. You can even secure the new bumper to the 96-98 factory bumper side struts!

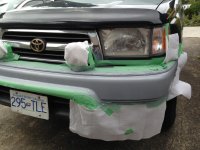
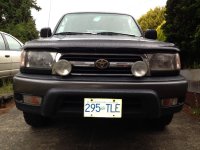
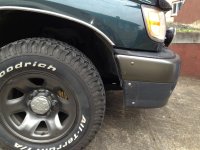
I sanded the chrome off the new bumper, heavily primed and painted it Tacoma Phantom Grey Pearl, which I think looks awesome. Here are some photos of the bumper on my truck. I added some inexpensive bush lights to help me see deer at night in my neighbourhood and other people while on the trail.

Primed for paint:
 

Attachments

  • IMG_0777.jpg
    IMG_0777.jpg
    132.8 KB · Views: 2,366
Final Coat.. Didn't realize there was a flash in the photo.. Such a bright license plate.
 

Attachments

  • IMG_0822.jpg
    IMG_0822.jpg
    133.6 KB · Views: 2,813
And here is where the new bumper meets the stock bumper side mounts. Its possible to make them fit, but barely. I opted to drill directly into the side of the triangulated mount and put a bolt into it. Since I removed the limited flares from the bumper, I already had holes that line up perfectly. I will eventually source out a matching carriage bolt to go with the other ones, but for now the stainless slot headed bolt works fine. I don't notice any extra vibrations through my bush lights at all, even with the removal of the usual crumple zone. One thing to remember for anyone attempting this swap: the turn signals are NOT plug and play. The screw in bulb receptacles from the 96-98 bumper don't fit the newer turn signals, and the receptacles from the newer truck don't plug into the old wiring... Which means you need to wire in the plugs from the other truck. No big deal- just two wires.
 

Attachments

  • IMG_0823.jpg
    IMG_0823.jpg
    130.6 KB · Views: 2,513
Thanks [MENTION=81047]farmerjon[/MENTION]! Was just checking out your build thread.. Very nice ride and loving the ARB bumper and photos. I'm with you on the mods.. It can be frustrating at times for sure. What are you studying?
 
Thanks [MENTION=81047]farmerjon[/MENTION]! Was just checking out your build thread.. Very nice ride and loving the ARB bumper and photos. I'm with you on the mods.. It can be frustrating at times for sure. What are you studying?

Thanks for the kind words! The ARB is easily one of my favorite parts of my 4Runner in general - I've whacked a deer with it and it's fun! :)

I'm studying Business Management with an unofficial double major in Information Systems... How about you?
 
Haha, you undoubtedly made a serious impression on that deer. Figuratively and literally.

Your degree sounds intense! Information systems... Man.
I'm finishing a degree in Jazz music. The complete opposite.
 
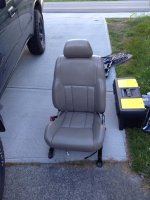
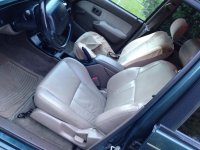
I was browsing Craigslist the other day and saw an ad for a set of 97 Limited front leather seats. I called the lady who owned them who said they were both for the passenger side and that she just wanted them gone. Free! I hurried over there after work and picked them up. Both had the usual power adjustments with heated basses. I pulled my driver seat out to compare the two. Mine was fully manual adjustment, but it appeared that the seat cushions could be interchanged. I took a chance and pulled everything apart. I was able to convert a passenger side power seat to a manual driver seat. Super simple to do and makes finding replacement cushions easy, seeing as in most cases the driver seat will be the one with all the wear and tear.
 

Attachments

  • IMG_0782.jpg
    IMG_0782.jpg
    135.5 KB · Views: 2,666
And this brings us to now, pretty much. My truck needs new suspension pretty badly, so that's the next on the list. I've ordered a set of Tacoma Bilstein 5100 ride height adjustable shocks to mate with some 99 tall coils for the front, for 2.5" of lift. The plan is to add 2" lift OME 906s for the rear to level the ride out a bit. Bigger tires will come when these ones wear out.. Or if I find a good deal. The plan is to find some old Chevy 16X6 steelies, lathe the center hub out and mount 235 85r 16s on them.. Pizza cutters for sure.

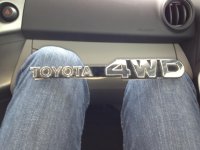
Here is today's addition. I was at a collector car swap meet this morning and picked these up for $10. Thoughts?
 

Attachments

  • IMG_0818.jpg
    IMG_0818.jpg
    135.9 KB · Views: 1,019
Aaaaand on the truck. Opinions/suggestions/comments totally welcome! The plan is to keep this truck old school Toyota inspired.. Nothing flashy.. Just super functional and cool. Thanks for all the kind words!
 

Attachments

  • IMG_0821.jpg
    IMG_0821.jpg
    136.5 KB · Views: 1,189
Haha, you undoubtedly made a serious impression on that deer. Figuratively and literally.

Your degree sounds intense! Information systems... Man.
I'm finishing a degree in Jazz music. The complete opposite.

haha, did you see the photos of the no damage + little blood? :D

First I've heard that degree sounds intense! how so, if you don't mind my asking? haha I've got mostly general ed down, along with some cool electives, like Spelunking (caving - like crawling through 15" spaces), Archaeology field school, etc. It can be fun, but now it's back to the hard stuff like pre-calculus.

Back on topic - trucks is looking better and better, I really like the final picture you just posted! Looks clean - the old school Toyota emblem is awesome - jealous!
 

Members online

Forum statistics

Threads
278,312
Messages
3,554,085
Members
248,016
Latest member
Advally Service

Trending content

Back
Top