2000 limited SleepyDad build

sorry did not see that reply

Sorry to hear that, Andy.

Are you doing anything special to the replacement motor?

well... I hope based on what I have read that yotashop does a first rate job on their rebuilds. fingers x'ed

doug thorley headers are going on with the reman. of course all new valve cover job... new cat and new O2 sensors.

once that is done and it's all running I will look at the supercharger again.

after that... I wanted to focus on the inside and get a setup in the back for camping storage and cooking. I was hoping to do it this summer but... the 6K worth of engine re-do kind of killed that idea.

I have to admit a R2.8 cummings swap did x my mind. but they are pretty much jeep and land cruiser focused. I think it would be a good match for these trucks, I have not seen anybody do it so... being the first one would be painful. + I think it would run $10K at least and maybe closer to $12K-$14K to do a good profession quality job.

anyways... I will update the build and may shoot a engine drop in video if I have time.
 
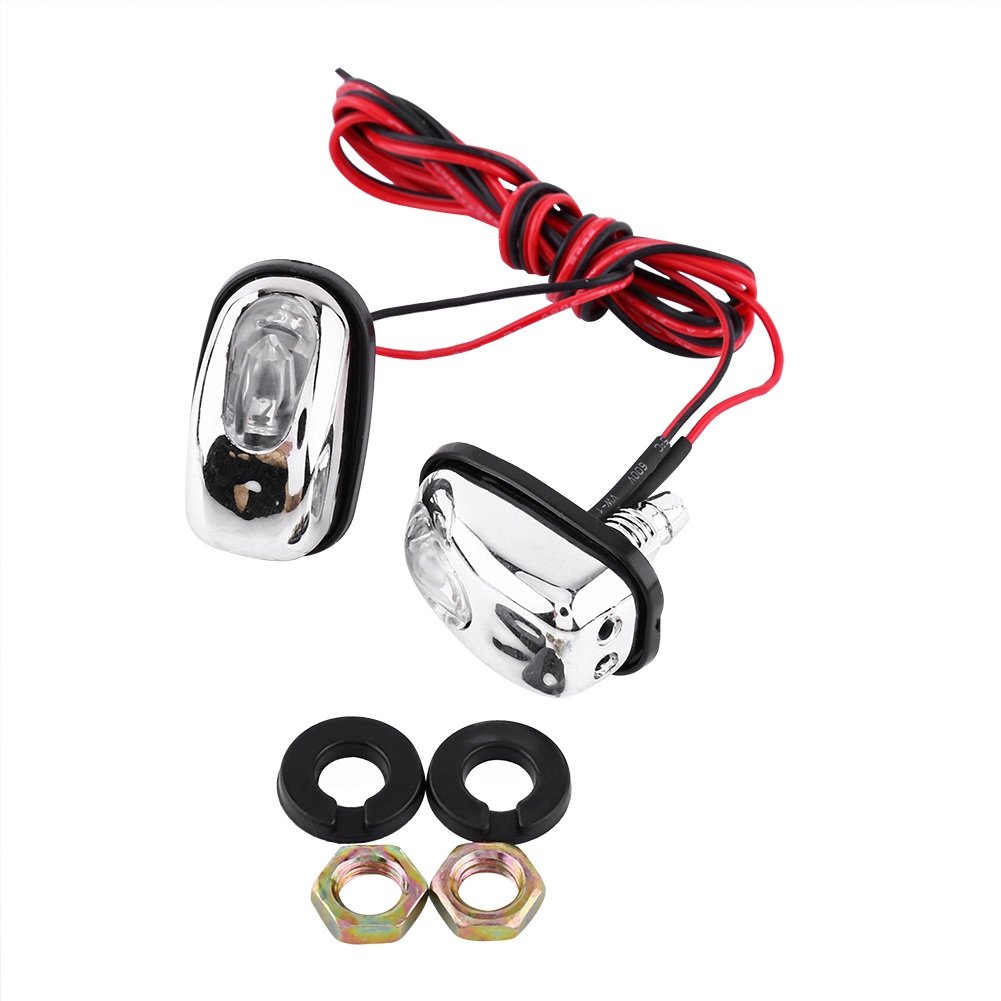
Washer nozzle cool kid mod

I joined the cool kids club and now I have 3 washer fluid outlets. very merica mod.

<a href="https://imgur.com/nEYIZVT"><img src="https://i.imgur.com/nEYIZVTl.jpg" title="source: imgur.com" /></a>
 
I joined the cool kids club and now I have 3 washer fluid outlets. very merica mod.

<a href="https://imgur.com/nEYIZVT"><img src="https://i.imgur.com/nEYIZVTl.jpg" title="source: imgur.com" /></a>

just bought a hood from pick'n-pull today and discovered it has the sprayers with led's on the front, I had no idea those existed. I also had no idea there 3 nozzle sprayers!! mind blown today
 
I joined the cool kids club and now I have 3 washer fluid outlets. very merica mod.

<a href="https://imgur.com/nEYIZVT"><img src="https://i.imgur.com/nEYIZVTl.jpg" title="source: imgur.com" /></a>
I wish those triple sprayers from the RAV4 weren't so expensive

Sent from my Pixel XL using Tapatalk
 
I wish those triple sprayers from the RAV4 weren't so expensive

Sent from my Pixel XL using Tapatalk

dude it's only money. they were only like $25 each. I did look at pick n pulls for a long time and never found any. not sure but the only rav 4 I could find had the 2 bangers. maybe it came with the fake hood bulge ravs? not sure but I'm set now. will have to mod the washer tank to hold 8 gallons now.
 
just bought a hood from pick'n-pull today and discovered it has the sprayers with led's on the front, I had no idea those existed. I also had no idea there 3 nozzle sprayers!! mind blown today

wait what? they make ones with LED! no way. I feel so empty inside now. so like when you hit the wash me it lights up and sprays at the same time? the future is now!
 
wait what? they make ones with LED! no way. I feel so empty inside now. so like when you hit the wash me it lights up and sprays at the same time? the future is now!


im not 100% sure but I dont think so. I think you can wire them up to turn on when you turn your headlights on...the lights face forward.

61sYx39MxaL._SL1001_.jpg
 
I don't know if the Rav4 ones are just like the ones for the 4th Gen 4runner but take a push pin to angle then streams for maximum coverage....
 
battery terminal refresh

finally I went looking for matching clamp style OEM terminals.

you can get the positive one for the 4runner and then use one for a Avalon for the negative that will match the style of the positive. I did have to cut and crimp on some Heavy-Duty Lugs.

used some Ancor lugs from west marine. excellent quality stuff. also remade the battery to chassis ground wire because I have always hated the way Toyota did it.

this way it's all pretty modular and I can replace something as a component if it gets messed up. the way Toyota did it... you would have to replace the entire wire harness. socks that way.

90982-06022 is the special one for the negative side, it fits perfect.
90982-05035 Positive Battery Terminal

<a href="https://imgur.com/l3BoEUm"><img src="https://i.imgur.com/l3BoEUml.jpg" title="source: imgur.com" /></a>

<a href="https://imgur.com/r3a0YrJ"><img src="https://i.imgur.com/r3a0YrJl.jpg" title="source: imgur.com" /></a>

<iframe width="800" height="600" src="https://www.youtube.com/embed/CDqayrHjfbw" frameborder="0" allow="autoplay; encrypted-media" allowfullscreen></iframe>
 
Last edited:
finally I went looking for matching clamp style OEM terminals.

you can get the positive one for the 4runner and then use one for a Avalon for the negative that will match the style of the positive. I did have to cut and crimp on some Heavy-Duty Lugs.

used some Ancor lugs from west marine. excellent quality stuff. also remade the battery to chassis ground wire because I have always hated the way Toyota did it.

this way it's all pretty modular and I can replace something as a component if it gets messed up. the way Toyota did it... you would have to replace the entire wire harness. socks that way.

90982-06022 is the special one for the negative side, it fits perfect.
90982-05035 Positive Battery Terminal

I see an engine next to that great electrical work, assuming they exchanged the damaged one and you finally got her running again? You mentioned installing Doug Thorley headers, did that happen, if so did you have to mod anything to install them? Did you put the SC on it right away?
 
I see an engine next to that great electrical work, assuming they exchanged the damaged one and you finally got her running again? You mentioned installing Doug Thorley headers, did that happen, if so did you have to mod anything to install them? Did you put the SC on it right away?

yes they sent me a new one once the damaged one was returned.

doug headers yes, what a pain in the arse they were.

I'm still waiting on the trans strainer, since I had to drop the pan I figured I would do it while the pan was off.

the engine is all in, yes I put the SC back onto it.

I'm having a custom cat made next week so... will see.

doug stuff

you have to mod the trans dip stick and trans pan dip stick tube, that is why I took it off. I used a California trans pan, tube and stick. There are some differences between the federal version and the cali pan, the cali works out better.

if you use the doug header O2 sensor spot - you have to create a bracket for the front O2 sensor because the stock mounting location does not work. super easy but still had to do it.

also custom bracket for the new location where the tran dip stick comes up and hooks up to the engine.

made a custom extension bracket for the drivers side wires that hook onto the engine mount, the headers come really really close to that wire and if you stretch it out a bit... it has maybe 1.5" of clearance now.

because I have a trans kick down cable... it needed some work. just some bending and it's protected from heat with that special space shuttle wrap I hope it will be ok.

you can't get the starter out via the side anymore with the doug headers, I had to remove the AC bracket to slip it in. not a huge deal but... getting to the starter bolts and starter now with the headers is harder than before. the starter is a pain but if you can image about 10x harder now... yes it's possible to make it worse.

I did shoot a video of some things... I will post a link to it in my thread. once the custom cat is all done I will wrap that up.

shit takes forever to get done in the auto industry.
 
Last edited:
finally I went looking for matching clamp style OEM terminals.

you can get the positive one for the 4runner and then use one for a Avalon for the negative that will match the style of the positive. I did have to cut and crimp on some Heavy-Duty Lugs.

used some Ancor lugs from west marine. excellent quality stuff. also remade the battery to chassis ground wire because I have always hated the way Toyota did it.

this way it's all pretty modular and I can replace something as a component if it gets messed up. the way Toyota did it... you would have to replace the entire wire harness. socks that way.

90982-06022 is the special one for the negative side, it fits perfect.
90982-05035 Positive Battery Terminal

I love this kind of clever research, thanks for doing the legwork and documenting it. I can't see an obvious difference between the pos and neg terminals, can you expand on what's different? Does one have additional plastic to insulate it?

Can you also expand on how you redid the ground cable, so I can copy it in my truck? :D
 
I love this kind of clever research, thanks for doing the legwork and documenting it. I can't see an obvious difference between the pos and neg terminals, can you expand on what's different? Does one have additional plastic to insulate it?

Can you also expand on how you redid the ground cable, so I can copy it in my truck? :D

sure no problem

so the battery posts are a DIN standard, I think. something like Positive = 17 mm and Negative = 15 mm

the existing ground to battery compared to my setup looks like this. Toyota just crimped the entire negative connector to the large engine ground wire and the chassis ground wire... yes mine has been chopped off but you should get the idea.

<a href="https://imgur.com/vAikQbp"><img src="https://i.imgur.com/vAikQbpl.jpg" title="source: imgur.com" /></a>

I just made my modular. I used lug connections instead so I could then disassemble or replace a part of it. the negative post clamp I used from the Avalon is just one Toyota makes for the existing DIN post size for the ground side.

Instead of combining the engine ground (big black wire) with the chassis ground I used

Tinned Copper Wire, 8 AWG
Tinned Copper Wire, 8 AWG (8mm²), Black - 25ft | Ancor

both ends of the chassis ground are finished with Tinned Lug #8 5/16"
Tinned Lug #8 5/16", 2pc | Ancor

<a href="https://imgur.com/2qsbAws"><img src="https://i.imgur.com/2qsbAwsl.jpg" title="source: imgur.com" /></a>

then finally the engine ground was just stripped back a little bit and I finished it off with
Tinned Lug #4 3/8"
Tinned Lug #4 3/8", 100pc | Ancor

<a href="https://imgur.com/doaga6u"><img src="https://i.imgur.com/doaga6ul.jpg" title="source: imgur.com" /></a>

I also have started using
Tesa tape, it seems ok. time will tell but I hate how standard vinyl tape gets all gooey.

https://www.amazon.com/gp/product/B016ZMXLEI/ref=oh_aui_search_detailpage?ie=UTF8&psc=1

and also... where I used to use that plastic split loom I now use this stuff
TechFlex F6 0.50 inch split sleeving
https://www.amazon.com/gp/product/B0008IV3XC/ref=oh_aui_search_detailpage?ie=UTF8&psc=1

so now I have the same setup on the positive and negative side with lugs and matching clamps that are 17 mm positive and 15 mm negative. for now I'm content.
 
yes they sent me a new one once the damaged one was returned.

doug headers yes, what a pain in the arse they were.

I'm still waiting on the trans strainer, since I had to drop the pan I figured I would do it while the pan was off.

the engine is all in, yes I put the SC back onto it.

I'm having a custom cat made next week so... will see.

doug stuff

you have to mod the trans dip stick and trans pan dip stick tube, that is why I took it off. I used a California trans pan, tube and stick. There are some differences between the federal version and the cali pan, the cali works out better.

if you use the doug header O2 sensor spot - you have to create a bracket for the front O2 sensor because the stock mounting location does not work. super easy but still had to do it.

also custom bracket for the new location where the tran dip stick comes up and hooks up to the engine.

made a custom extension bracket for the drivers side wires that hook onto the engine mount, the headers come really really close to that wire and if you stretch it out a bit... it has maybe 1.5" of clearance now.

because I have a trans kick down cable... it needed some work. just some bending and it's protected from heat with that special space shuttle wrap I hope it will be ok.

you can't get the starter out via the side anymore with the doug headers, I had to remove the AC bracket to slip it in. not a huge deal but... getting to the starter bolts and starter now with the headers is harder than before. the starter is a pain but if you can image about 10x harder now... yes it's possible to make it worse.

I did shoot a video of some things... I will post a link to it in my thread. once the custom cat is all done I will wrap that up.

shit takes forever to get done in the auto industry.

Did you by any chance get any seat time with the new motor but without the SC? Curious how much difference the SC really makes on a strong running motor.

Thanks for the information regarding all the mods to get the headers to fit. I bet she will sound so good with a fresh motor, boost and a new free-er flowing exhaust. Please take some pictures, would love to see your work and the shiny bits.
 
sure no problem

so the battery posts are a DIN standard, I think. something like Positive = 17 mm and Negative = 15 mm

the existing ground to battery compared to my setup looks like this. Toyota just crimped the entire negative connector to the large engine ground wire and the chassis ground wire... yes mine has been chopped off but you should get the idea.

I just made my modular. I used lug connections instead so I could then disassemble or replace a part of it. the negative post clamp I used from the Avalon is just one Toyota makes for the existing DIN post size for the ground side.

Instead of combining the engine ground (big black wire) with the chassis ground I used

Tinned Copper Wire, 8 AWG
Tinned Copper Wire, 8 AWG (8mm²), Black - 25ft | Ancor

both ends of the chassis ground are finished with Tinned Lug #8 5/16"
Tinned Lug #8 5/16", 2pc | Ancor


then finally the engine ground was just stripped back a little bit and I finished it off with
Tinned Lug #4 3/8"
Tinned Lug #4 3/8", 100pc | Ancor


I also have started using
Tesa tape, it seems ok. time will tell but I hate how standard vinyl tape gets all gooey.

https://www.amazon.com/gp/product/B016ZMXLEI/ref=oh_aui_search_detailpage?ie=UTF8&psc=1

and also... where I used to use that plastic split loom I now use this stuff
TechFlex F6 0.50 inch split sleeving
https://www.amazon.com/gp/product/B0008IV3XC/ref=oh_aui_search_detailpage?ie=UTF8&psc=1

so now I have the same setup on the positive and negative side with lugs and matching clamps that are 17 mm positive and 15 mm negative. for now I'm content.

Always enjoy seeing the quality of your work and attention to detail. I actually used the same source for the lugs in my electrical upgrades to the positive side, so I'm familiar with those products. I've also switched to the TechFlex sleeving and Tesa tape!

With the tips on the Avalon terminal, I'm ready to tackle my negative side (so to speak). So 4 AWG for engine ground, 8 AWG for body/chassis ground - right?
 
Last edited:
OK, I ordered the terminals form Amazon (funny, they can be bought as a set). Now I'm ready to fab the cables.

Did you run the negative cable to the original connection point on the engine, or did you attach it somewhere closer to the battery? The original cable disappears into a harness bundle, and I'm not sure where it comes out. Pondering just running a new cable to a closer point on the engine.
 
Did you by any chance get any seat time with the new motor but without the SC? Curious how much difference the SC really makes on a strong running motor.

Thanks for the information regarding all the mods to get the headers to fit. I bet she will sound so good with a fresh motor, boost and a new free-er flowing exhaust. Please take some pictures, would love to see your work and the shiny bits.

no I have not started it yet :(

sorry did not mean to give the impression that is all running and everything is completed.

it seems to take forever I started this entire fubar back in the end of May I think, it did not help that my first engine arrived with a hole worn into the head from shipping damage. think it took a full 60 days to get a good engine in my garage.
 

Forum statistics

Threads
278,312
Messages
3,554,089
Members
248,016
Latest member
Advally Service

Trending content

Back
Top