
You are using an out of date browser. It may not display this or other websites correctly.
You should upgrade or use an alternative browser.
You should upgrade or use an alternative browser.
2003 T4R Floppy Shifter
- Thread starter pants
- Start date
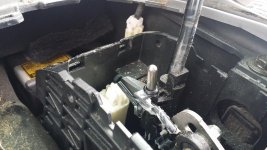
VertigoPerformance
Member
A few years back I came up with what I think is the solution but I have been too lazy to do it.
The last time I was dealing with this a few years ago I noticed the groove in the plastic plate that sits on top of this pin. My solution (Which I haven't done yet) is to epoxy fill that groove and polish it flush.
All it seems to take is a mm and this pin won't stay in.
This summer I am hoping to muster the energy to take the console apart and epoxy fill and sand the plate.
The last time I was dealing with this a few years ago I noticed the groove in the plastic plate that sits on top of this pin. My solution (Which I haven't done yet) is to epoxy fill that groove and polish it flush.
All it seems to take is a mm and this pin won't stay in.
This summer I am hoping to muster the energy to take the console apart and epoxy fill and sand the plate.
Last edited:
The underside of the plastic plate on my 4 runner didn't have a groove worn in it, Vertigo, but it does have a series of peaks and valleys that, along with that spring loaded pin are part of the design to keep these things in gear. It was actually fairly easy to remove to console trim and get at the shifter on my 03. Well worth the time. Good luck with yours.
VertigoPerformance
Member
I had it apart several times when originally trying to get the pin in place.
Mine has a shallow groove worn into the plate, at first I thought it was kind of designed that way to track the pin. At the time when I realized it was actually part of the problem I put it back together and just haven't got around to taking it apart again.
How many KM on yours then the problem came about? I had about 165k on mine when it happened.
Mine has a shallow groove worn into the plate, at first I thought it was kind of designed that way to track the pin. At the time when I realized it was actually part of the problem I put it back together and just haven't got around to taking it apart again.
How many KM on yours then the problem came about? I had about 165k on mine when it happened.

773_T4R
New member
Hey all just came across this thread and hopefully this post can be of some help.
I had this issue on our 05 Sienna as well and was able to find a good permanent solution...(post #8)
broken shifter 05 XLE - Toyota Sienna Forum - siennachat.com
Essentially what this person did was find a 3/8 metal tube that fit the bullet shaped pin and widened the original plastic hole to fit the tube thus reinforcing it. I did this on our Sienna and seems like a pretty solid solution. I haven't seen the 4runner's shifter assembly taken apart in my own eyes yet but I figured I'd post this to see if it would be some help. I guess this might've been a common design issue
I had this issue on our 05 Sienna as well and was able to find a good permanent solution...(post #8)
broken shifter 05 XLE - Toyota Sienna Forum - siennachat.com
Essentially what this person did was find a 3/8 metal tube that fit the bullet shaped pin and widened the original plastic hole to fit the tube thus reinforcing it. I did this on our Sienna and seems like a pretty solid solution. I haven't seen the 4runner's shifter assembly taken apart in my own eyes yet but I figured I'd post this to see if it would be some help. I guess this might've been a common design issue

TechWrench
Senior Member
I had the pin socket break on my '03 Limited a few months back. Finally found a good used replacement shifter assy., on ebay and installed it a few weeks ago. Now shifter works as it was intended to. A few thoughts on why the old one failed, other that the poor design. I think, at least in my case, that I became too lazy when shifting out of park and didn't give the shifter enough time to find its way through the zig-zag motion on its own. Making the shifts too fast, may have contributed to putting too much stress on the pin socket, and caused it to fail. With the 'new' shifter in place, I am making an effort to slow down when changing gears, and let the shifter find it own way through the pattern with out forcing it. So, far it seems to be working fine.

Montego Murph
Member
The underside of the plastic plate on my 4 runner didn't have a groove worn in it, Vertigo, but it does have a series of peaks and valleys that, along with that spring loaded pin are part of the design to keep these things in gear. It was actually fairly easy to remove to console trim and get at the shifter on my 03. Well worth the time. Good luck with yours.
I don't think those peaks and valleys are the problem -- those detents are there to hold the shifter in position using the spring and rod.
If I'm understanding this correctly, the problem is the rod itself getting hung up on grooves in the plastic cylinder as it travels up and down riding those detents. My theory is this: 99% of the time, it's just shifted into "D" and never beyond. After many shifts, the flat edge of the rod wears into the cylinder but stops carving at the "D" position because it rarely was moved past that. Later on when one tries to shift it there, the pin can't slide past the ridge it created over time, and the force added to move the shift then breaks the pin out of the cylinder.
Montego Murph
Member
OK. I messed around with springs and a new fabricated pin today and didn't have the results I wanted.
So I started looking at another direction and realized that yes, the OEM spring is really tense and a softer one would do a far better job... however.
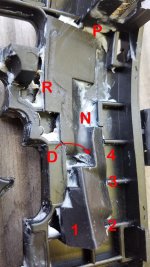
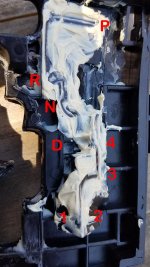
Methinks part of the problem lies with where the pin has to go. Check out these photos.... I do apologize for the obnoxiously large photo attachments, however I wanted people to have the ability to zoom in at detail if desired.
So everyone can see what goes on in there, I've identified the path where the slider pin rubs on the bottom of the plate. To identify the path, I smeared fresh grease on there, ran the shift through the pattern, and removed the plate to see the new lines. If you look closely, you can see where the pin has carved into the plastic between P, R, and N. Remember this is backwards because the part is flipped over.
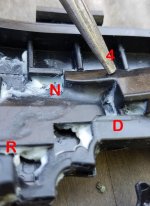
The horizontal shift from D to 4 (3 for our V6 friends) is where the problems seem to manifest. That said, look at that huge jump the pin has to slide over to get into that shift position. That is where it hangs up.
I think that by removing material from that area (shown by the pointer) we could relieve the force needed to move the shift into 4/3. Of course, this doesn't explain why it didn't always hang up since new.
Now... I'll be honest. I'm not willing to tear mine up for a maybe - especially if my gamble makes it worse.
If anyone knows of a broken/ruined/junker shifter somewhere they can send me, I'd be more than willing to do the experimentation, documentation, and grindywork and figure out the best way to do this... I've been looking but haven't found one yet.
Stay tuned...
So I started looking at another direction and realized that yes, the OEM spring is really tense and a softer one would do a far better job... however.
Methinks part of the problem lies with where the pin has to go. Check out these photos.... I do apologize for the obnoxiously large photo attachments, however I wanted people to have the ability to zoom in at detail if desired.
So everyone can see what goes on in there, I've identified the path where the slider pin rubs on the bottom of the plate. To identify the path, I smeared fresh grease on there, ran the shift through the pattern, and removed the plate to see the new lines. If you look closely, you can see where the pin has carved into the plastic between P, R, and N. Remember this is backwards because the part is flipped over.
The horizontal shift from D to 4 (3 for our V6 friends) is where the problems seem to manifest. That said, look at that huge jump the pin has to slide over to get into that shift position. That is where it hangs up.
I think that by removing material from that area (shown by the pointer) we could relieve the force needed to move the shift into 4/3. Of course, this doesn't explain why it didn't always hang up since new.
Now... I'll be honest. I'm not willing to tear mine up for a maybe - especially if my gamble makes it worse.
If anyone knows of a broken/ruined/junker shifter somewhere they can send me, I'd be more than willing to do the experimentation, documentation, and grindywork and figure out the best way to do this... I've been looking but haven't found one yet.
Stay tuned...
Attachments
Last edited:
Montego Murph
Member
A few years back I came up with what I think is the solution but I have been too lazy to do it.
The last time I was dealing with this a few years ago I noticed the groove in the plastic plate that sits on top of this pin. My solution (Which I haven't done yet) is to epoxy fill that groove and polish it flush.
All it seems to take is a mm and this pin won't stay in.
This summer I am hoping to muster the energy to take the console apart and epoxy fill and sand the plate.
Wait, Vertigo.... I just realized that we may be talking about the same thing.
Are you talking about filling in that "divot" pointed out as "D" in the closeup photo above?
That could work very well....

CookieRoe
Senior Member
[MENTION=93683]Montego Murph[/MENTION] : Great thread!!! Wow, you deserve a free lunch.
You mentioned where it basically starts: The horizontal shift from D to 4. Mine is tough to shift, but to return it to D, it is fine. Anyway, I have a friend who regularly goes to yards, so he'll keep an eye out for one. If he scores one, I'll be sure to let you know so I can send it to ya!
You mentioned where it basically starts: The horizontal shift from D to 4. Mine is tough to shift, but to return it to D, it is fine. Anyway, I have a friend who regularly goes to yards, so he'll keep an eye out for one. If he scores one, I'll be sure to let you know so I can send it to ya!
I had the pin socket break on my '03 Limited a few months back. Finally found a good used replacement shifter assy., on ebay and installed it a few weeks ago. Now shifter works as it was intended to. A few thoughts on why the old one failed, other that the poor design. I think, at least in my case, that I became too lazy when shifting out of park and didn't give the shifter enough time to find its way through the zig-zag motion on its own. Making the shifts too fast, may have contributed to putting too much stress on the pin socket, and caused it to fail. With the 'new' shifter in place, I am making an effort to slow down when changing gears, and let the shifter find it own way through the pattern with out forcing it. So, far it seems to be working fine.
Hey TechWrench
I did the same as you, found one in a junk yard for 50 bucks. I've got it bolted down, but I can't get it into gear - which I need to do to unbolt the old cable. I've plugged in two electrical connectors, one of which I think allows you to get it into gear, but still no luck.
Any idea what I'm doing wrong? Thanks
VertigoPerformance
Member
Wait, Vertigo.... I just realized that we may be talking about the same thing.
Are you talking about filling in that "divot" pointed out as "D" in the closeup photo above?
That could work very well....
I never got notification of your post..
It's a groove that travels the route the pin does, it looks like it's worn in from the pin, it doesn't look like a factory groove.
It may allow the pin to sit up a mm or two higher than it should.
VertigoPerformance
Member
Hey TechWrench
I did the same as you, found one in a junk yard for 50 bucks. I've got it bolted down, but I can't get it into gear - which I need to do to unbolt the old cable. I've plugged in two electrical connectors, one of which I think allows you to get it into gear, but still no luck.
Any idea what I'm doing wrong? Thanks
There is a small square cover on the shifter plate, it's release for the shifter, Carfuly open the cover with a screw driver and press the button inside.
There is a small square cover on the shifter plate, it's release for the shifter, Carfuly open the cover with a screw driver and press the button inside.
Aha....you were correct, Vertigo, that little black piece of plastic was missing. Found it in the floor and put it back in place. But I didn't have to remove the cover, as I've removed the entire console and did not have it back together yet.
Still can't get it in gear or start it - so I still can't remove the old cable. The gearshift has to be in N or D so that the nut holding the cable lines up with a hole on the side, allowing access to the nut with a rachet.
When the old shifter was in and I was at this stage of disassembly, I could get it in gear. That's how I got the old shifter out. But this new (used) one is not cooperating.
OK, this is now a....."Never Mind". I switched the little black plastic shift release do-hickeys, and then I could move it into gear. Got 'er installed and it works pretty decent. It is a little stiff going into 4th, but otherwise works well.
And the upside - got the console shined up like a new dime while I had it apart. Plenty of grime in there, gone now!
And the upside - got the console shined up like a new dime while I had it apart. Plenty of grime in there, gone now!
Here's an update on my situation. The used replacement unit started stiffening up on me pretty quick. I basically just drove in D all the time, afraid that forcing it down into the other gears would transition it to "floppy" mode. Then I had to do some towing - needed 4th gear. And it's winter now, and I like to gear down on steep icy hills. Anti-lock brakes are fine, but every little bit helps when you are on ice.
Since I bought this unit new in December 2002 and I'm going to keep it til it (or me?) dies (only 280,000 km or 168,000 miles now, it can do double that easy), I broke down and bought a new part. Got it from toyotapartsdeal.com for $468 USD. Ouch. But much better than the $1200 CAD quoted by the dealer for the part plus install.
After installation, I had to mess with the cable connection adjustment a few times to get it right. There may be some instructions for how to do this, but I could not find them, so I just messed with it. If you don't get it right, the gear lights on the dash won't light up, the shifter doesn't match up with the notches, and you can't really tell what gear you are in.
But now it shifts nice and smooth, and I'm ready for another 14 years of driving with all the gears.
Since I bought this unit new in December 2002 and I'm going to keep it til it (or me?) dies (only 280,000 km or 168,000 miles now, it can do double that easy), I broke down and bought a new part. Got it from toyotapartsdeal.com for $468 USD. Ouch. But much better than the $1200 CAD quoted by the dealer for the part plus install.
After installation, I had to mess with the cable connection adjustment a few times to get it right. There may be some instructions for how to do this, but I could not find them, so I just messed with it. If you don't get it right, the gear lights on the dash won't light up, the shifter doesn't match up with the notches, and you can't really tell what gear you are in.
But now it shifts nice and smooth, and I'm ready for another 14 years of driving with all the gears.
Montego Murph
Member
03,
That's awesome! Not a HORRIBLE price either, considering I've seen much higher.
Would you be willing to send me your old unit so that I can use it as a test mule for possible repair methods?
That's awesome! Not a HORRIBLE price either, considering I've seen much higher.
Would you be willing to send me your old unit so that I can use it as a test mule for possible repair methods?
03,
That's awesome! Not a HORRIBLE price either, considering I've seen much higher.
Would you be willing to send me your old unit so that I can use it as a test mule for possible repair methods?
I checked my records and the stealership quote was actually $1,442.00 CAD, so I feel even better about it.
I have 2 old units now, you are welcome to have both. I'll be down in the states in about a week, so I'll bring them down, it's stupid expensive to ship them from up here. Can we share shipping?
Similar threads

- Replies
- 4
- Views
- 1K


